Are you ready to give your kitchen cabinets a stunning upgrade? Installing crown moulding is one of the easiest and most effective ways to add style and value to your kitchen.
If you’re wondering How to Install Crown Moulding to My Kitchen Cabinets, imagine turning plain cabinet tops into elegant, custom-looking features that catch everyone’s eye. In this guide, you’ll discover simple, step-by-step instructions that anyone can follow—even if you’ve never done a project like this before. By the end, you’ll have the confidence and know-how to transform your kitchen with beautiful crown moulding.
Let’s get started and make your cabinets stand out!
Credit: www.familyhandyman.com
Tools And Materials Needed
Installing crown moulding on your kitchen cabinets adds style and a polished look. You need the right tools and materials to do the job well. This guide covers what you need before you start.
To How to Install Crown Moulding to My Kitchen Cabinets, gathering all supplies first helps you work smoothly and safely. Below are the essentials and extras you may need for the project.
Essential Tools
These tools help you measure, cut, and attach the crown moulding correctly.
- Miter saw for angled cuts
- Measuring tape for accurate dimensions
- Level to keep moulding straight
- Nail gun or hammer and finishing nails
- Stud finder to locate cabinet frames
- Caulk gun for filling gaps
- Sandpaper or sanding block for smooth edges
Choosing The Right Moulding
Pick moulding that matches your cabinet style and kitchen design. Wood types and profiles vary for different looks.
| Type | Description | Best For |
| Poplar | Easy to paint and shape | Painted cabinets |
| Oak | Durable with visible grain | Stained or natural wood cabinets |
| MDF | Smooth surface, cost-effective | Budget-friendly projects |
| Pine | Soft wood, easy to work with | Rustic or country kitchens |
Additional Supplies
Besides tools and moulding, these supplies help finish the installation smoothly.
- Wood filler to cover nail holes
- Painter’s tape for clean edges
- Primer and paint or stain to match cabinets
- Drop cloth to protect surfaces
- Safety glasses and gloves
Preparing Your Kitchen Cabinets
Installing crown moulding on your kitchen cabinets can add style and value. Preparation is key to a smooth installation process.
Before starting, you need to prepare your cabinets carefully. This includes cleaning and measuring them accurately.
Cleaning And Clearing Space
Start by clearing the area around your cabinets. Remove any items on top or nearby to avoid damage.
Clean your cabinet surfaces well. Dust and grease can stop the moulding from sticking properly.
- Take off decorations and small appliances
- Wipe cabinets with a mild cleaner
- Let the surface dry completely
- Ensure good lighting and workspace
Measuring Cabinets Accurately
Measure your cabinets carefully to get the right size of crown moulding. Accurate measurements avoid mistakes.
Use a tape measure and note each cabinet’s width and height. Check corners and angles too.
- Measure the top edge where moulding will attach
- Write down each measurement clearly
- Double-check all numbers before cutting
- Consider any cabinet doors or trim
Cutting Crown Moulding
Cutting crown moulding correctly makes your kitchen cabinets look neat. You need to measure and cut with care.
This guide explains how to measure, use a miter saw, and handle corners.
Measuring For Cuts
Measure the length of the cabinet tops where you want to install the moulding. Use a tape measure and write down each length.
- Measure the straight sections carefully.
- Mark where the inside and outside corners meet.
- Double-check your measurements before cutting.
Using A Miter Saw
A miter saw helps make clean, angled cuts for crown moulding. Set the saw to the right angle before cutting.
- Set the saw to a 45-degree angle for most cuts.
- Hold the moulding firmly against the saw fence.
- Cut slowly to avoid splintering the wood.
Handling Inside And Outside Corners
Inside and outside corners need special angle cuts to fit together perfectly.
| Corner Type | Cut Angle | Notes |
|---|---|---|
| Inside Corner | 45 degrees, mitered inward | Cut both pieces at complementary angles for a tight fit |
| Outside Corner | 45 degrees, mitered outward | Ensure edges meet flush without gaps |

Credit: www.thisoldhouse.com
Attaching Crown Moulding
Attaching crown moulding to kitchen cabinets adds a polished look. It hides gaps and finishes the cabinet edges.
Proper installation ensures the moulding stays secure and looks neat for years. Follow these steps carefully.
Positioning The Moulding
Start by measuring the top edge of your kitchen cabinets. Cut the crown moulding pieces to fit the length.
Hold the moulding in place and check how it fits. Make sure the angles match at corners for a smooth look.
- Use a ladder or step stool to reach the top safely
- Test fit each piece before nailing
- Align the moulding flush with cabinet edges
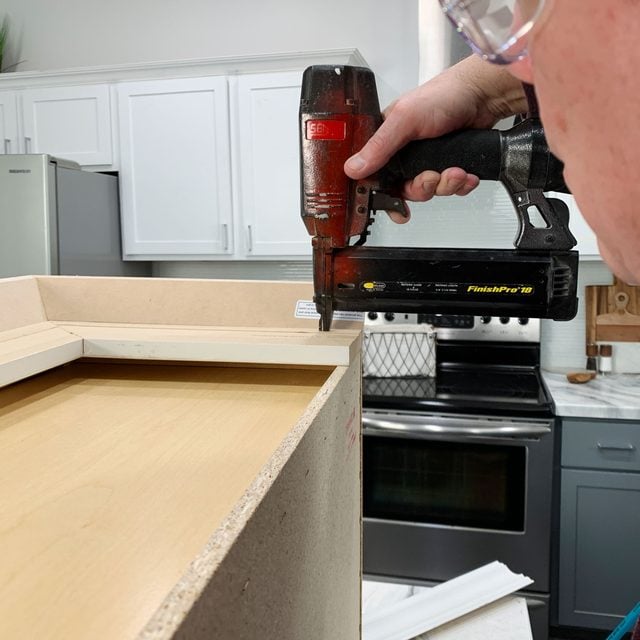
Nailing And Securing
Use a nail gun or hammer with finishing nails to secure the moulding. Nail into the cabinet frame for strength.
Place nails every 12 to 16 inches. Avoid nailing too close to edges to prevent splitting the moulding.
- Pre-drill holes if the wood is hard
- Use a level to keep moulding straight
- Fill nail holes with wood filler for a smooth finish
Dealing With Gaps And Imperfections
Small gaps can appear between moulding and cabinets. Use caulk or wood filler to hide these gaps.
Sand the filled areas gently after drying. Paint or stain to match the moulding and cabinets.
- Apply painter’s tape to protect cabinet surfaces
- Use a putty knife to smooth filler or caulk
- Check joints and corners for any uneven spots
Finishing Touches
Adding crown moulding to kitchen cabinets makes your space look complete. The finishing touches help the moulding blend perfectly.
These steps cover filling nail holes, sanding, and applying paint or stain. Each step improves the final look.
Filling Nail Holes
After attaching the crown moulding, small nail holes will be visible. Use wood filler to cover these holes.
Choose a filler that matches the colour of your moulding. Apply it with a putty knife and press it into each hole.
- Fill each nail hole completely
- Remove excess filler with the putty knife
- Let the filler dry before sanding
Sanding And Smoothing
Once the wood filler dries, sand the moulding to create a smooth surface. Use fine-grit sandpaper for best results.
Sand gently to avoid damaging the edges or corners of the moulding. Clean off dust with a soft cloth before painting.
- Use 220-grit sandpaper for a smooth finish
- Sand along the grain of the wood
- Wipe off dust before next steps
Painting Or Staining
Choose paint or stain that matches your kitchen cabinets. Apply thin, even coats with a brush or roller.
Allow each coat to dry fully before applying the next. This prevents drips and creates a professional look.
- Use primer if painting over bare wood
- Apply 2-3 coats for full coverage
- Use a clear finish to protect stained wood
Common Mistakes To Avoid
Installing crown moulding on kitchen cabinets can improve the look of your space. Many people make simple mistakes that cause problems.
Knowing the common errors helps you avoid them. This guide covers the top mistakes to watch out for during installation.
Measuring Errors
Wrong measurements are the main cause of bad fitting crown moulding. A small mistake can cause gaps or overlaps.
Always use a tape measure and double-check your numbers. Measure each side carefully before cutting.
- Measure twice, cut once
- Use a level to ensure straight lines
- Write down all measurements clearly
Incorrect Cutting Angles
Crown moulding requires angled cuts to fit corners properly. Cutting at the wrong angle creates gaps and poor joints.
Use a miter saw and set it to the correct angle. Practice on scrap pieces before cutting the final moulding.
- Know the corner angle (usually 90 degrees)
- Set the miter saw to half the corner angle (usually 45 degrees)
- Check the fit before nailing
Poor Adhesion Techniques
Using the wrong glue or nails can cause the moulding to fall off or shift over time. Adhesion is key for a strong hold.
Apply wood glue evenly and use finishing nails to secure the moulding. Fill nail holes and gaps with wood filler for a clean look.
- Use wood glue made for trim
- Nail at an angle to avoid splitting
- Fill gaps with caulk or filler
Tips For A Professional Look
Installing crown moulding on kitchen cabinets adds a polished finish. This upgrade makes your kitchen look elegant and complete.
Simple steps and careful choices help you get a professional result. Pay attention to details like color, style, and care.
Choosing Complementary Colors
Select crown moulding colors that match or complement your cabinets. This creates a smooth, unified look in your kitchen.
Light colors make small kitchens feel bigger. Darker shades add warmth and depth to larger spaces.
- Match moulding color with cabinet paint or stain
- Use lighter shades to brighten the space
- Consider your kitchen wall color for contrast
- Test paint samples before finalizing
Consistent Moulding Styles
Choose moulding styles that blend well with your cabinets and kitchen design. Consistency helps the space feel balanced.
Simple profiles work well in modern kitchens. More detailed styles fit traditional or classic designs.
- Match moulding profiles on all cabinets
- Avoid mixing too many styles in one kitchen
- Pick moulding that fits your cabinet’s architecture
- Measure carefully for clean, tight fits
Maintenance And Care
Keep your crown moulding clean to maintain its fresh look. Dust and grease can dull the finish over time.
Regular care helps moulding last longer and look new. Use gentle cleaning methods to avoid damage.
- Dust moulding weekly with a soft cloth
- Use mild soap and water for cleaning
- Avoid harsh chemicals that strip paint or stain
- Check for cracks or gaps and fix promptly
Credit: www.familyhandyman.com
Frequently Asked Questions
What Tools Are Needed To Install Crown Moulding On Cabinets?
You need a miter saw, measuring tape, nail gun, wood glue, caulk, and a level. These tools ensure precise cuts and secure installation of crown moulding on kitchen cabinets.
How Do I Measure For Crown Moulding On Cabinets?
Measure the length of each cabinet section where moulding will go. Add extra inches to account for miter cuts. Accurate measurements prevent gaps and ensure a seamless fit.
Can I Install Crown Moulding Without Professional Help?
Yes, with basic carpentry skills and the right tools, you can install crown moulding yourself. Follow step-by-step guides to achieve professional-looking results and save on labor costs.
What Type Of Wood Is Best For Kitchen Cabinet Moulding?
Choose hardwoods like oak, maple, or poplar for durability and smooth finishes. These woods hold paint well and resist warping in kitchen environments.
Conclusion
Installing crown moulding on your kitchen cabinets adds elegance. It enhances style and value. The process may seem complex, but it's manageable. To How to Install Crown Moulding to My Kitchen Cabinets, follow the steps carefully. Measure accurately. Cut precisely. Then, attach securely. Your kitchen will transform. The new look brings satisfaction.
A touch of craftsmanship. DIY projects like this save money. They also provide pride in your work. Now, enjoy your updated kitchen. Invite guests to admire. The beauty of crown moulding shines through. Your kitchen cabinets never looked better. You did it! Your effort paid off.