
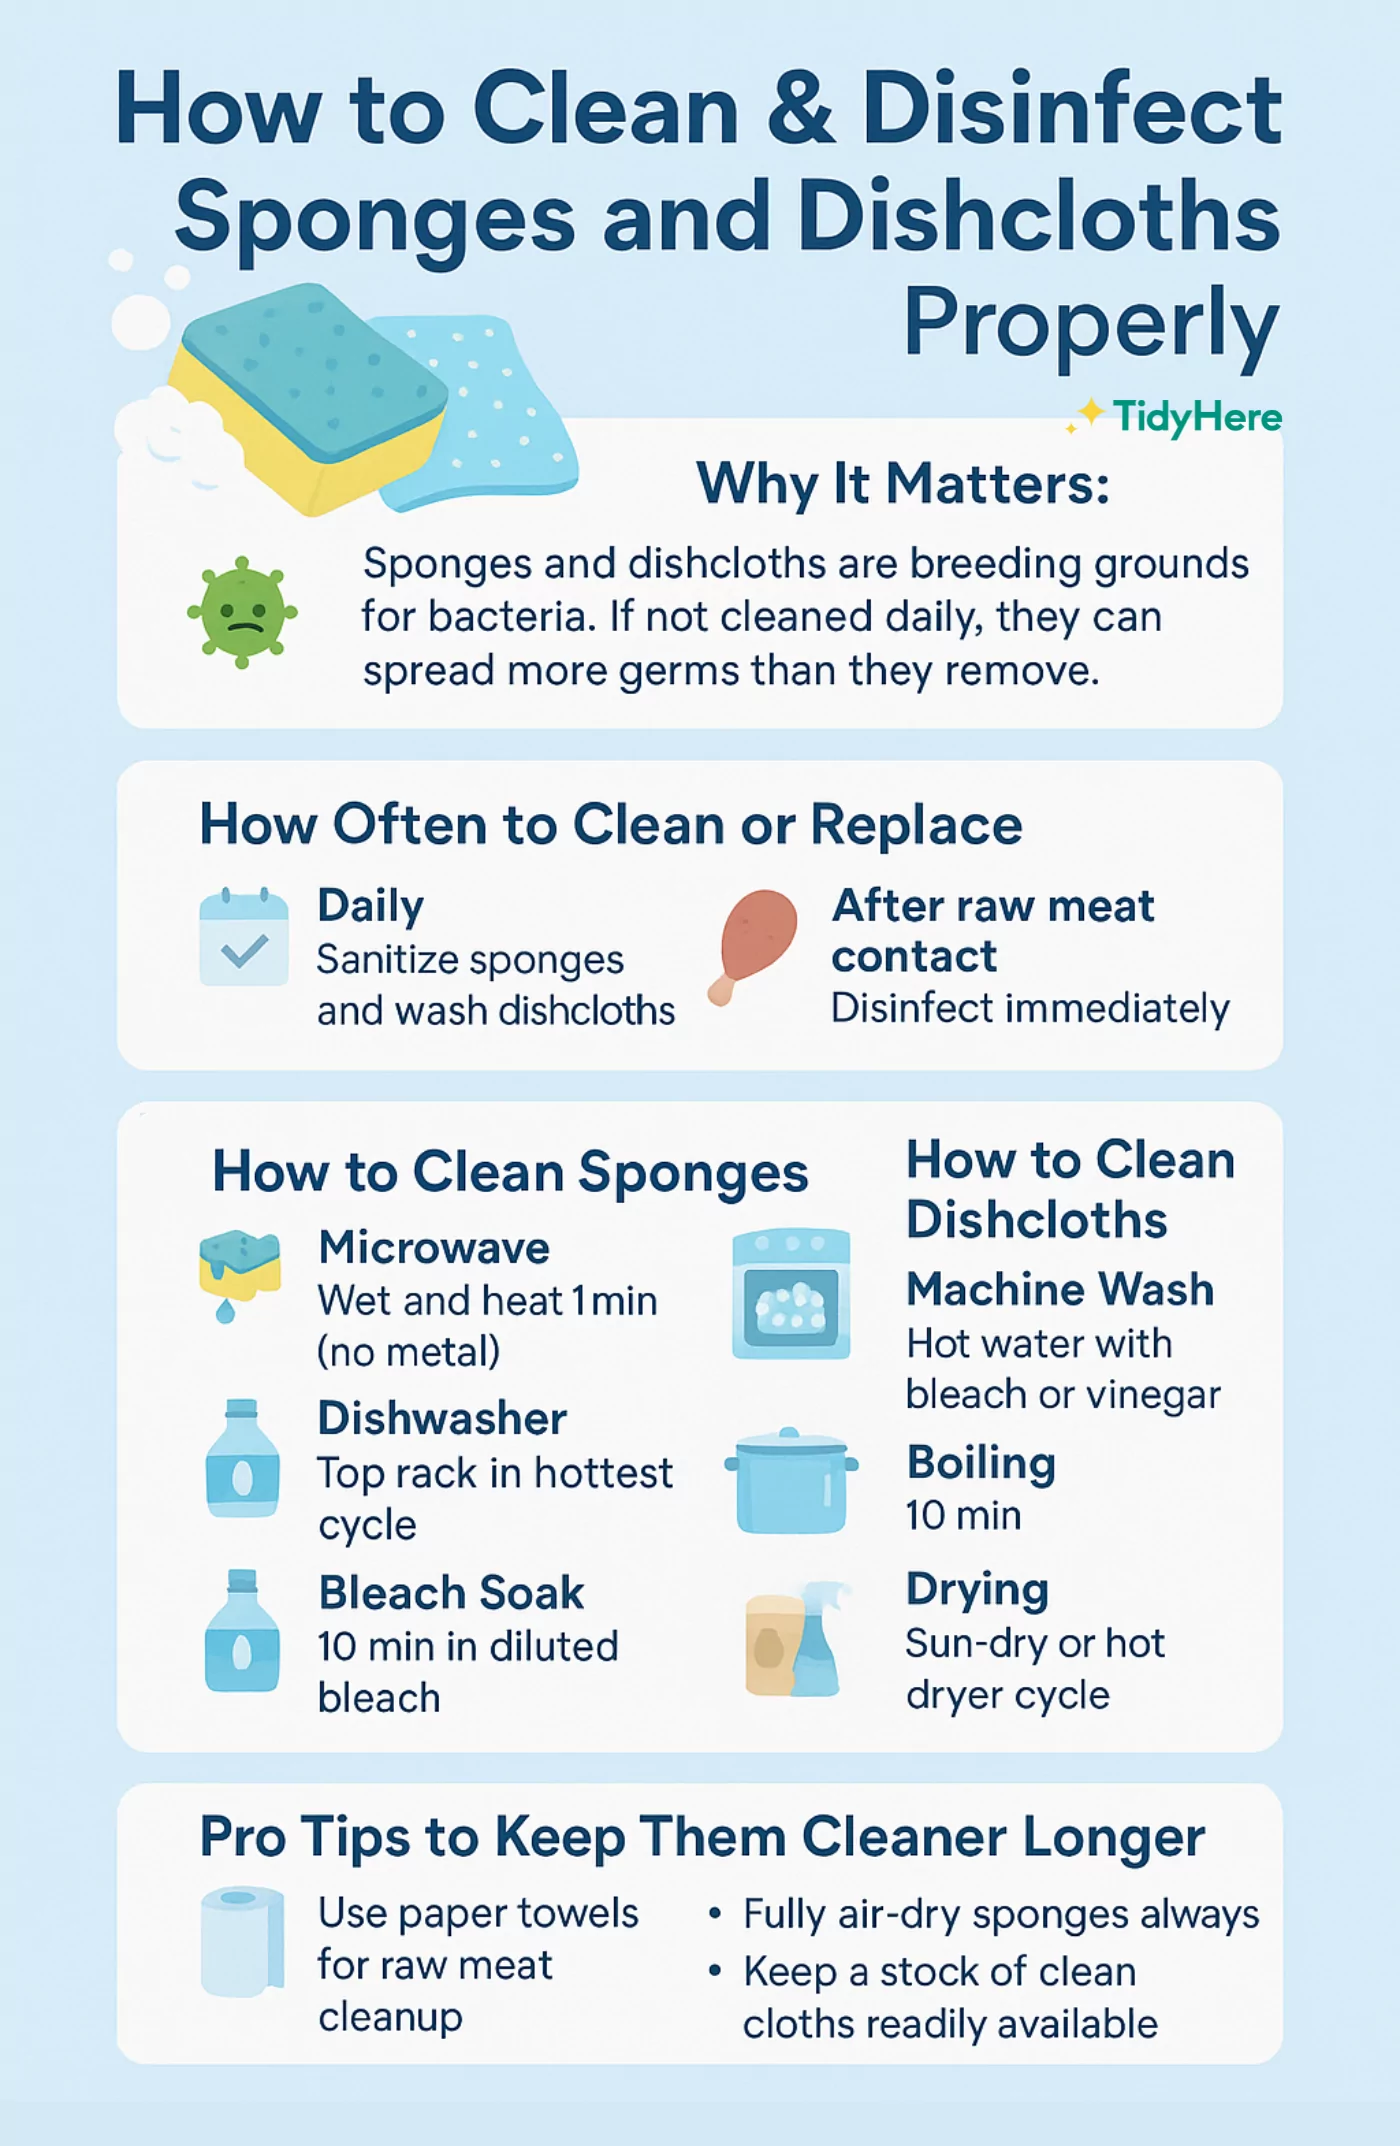
Your kitchen sponge is one of the hardest-working tools in your home, but did you know it could also be one of the dirtiest? Each time you wipe down a surface or clean a dish, your sponge picks up germs and bacteria.
If not properly sanitized, it could spread these unwanted guests throughout your kitchen. Imagine using a sponge that's cleaner than ever, helping you maintain a healthier home environment for your family. In this guide, you'll discover simple yet effective ways to sanitize your kitchen sponge, ensuring it remains a tool for cleanliness rather than a cause for concern.
Keep reading to uncover the secrets that will transform your sponge into a powerhouse of hygiene!
Why Sanitize Your Sponge
Kitchen sponges are used every day to clean dishes and surfaces. They can hold many germs because they stay wet and warm.
Sanitizing your sponge kills bacteria and keeps your kitchen safe. It helps stop the spread of germs that can cause illness.
Common Germs On Sponges
Sponges can carry many types of germs. These include bacteria, viruses, and fungi that grow in moist areas.
- Salmonella: causes food poisoning
- E. coli: leads to stomach illness
- Staphylococcus: can cause skin infections
- Mold and yeast: may cause allergic reactions
Health Risks Of Dirty Sponges
Using a dirty sponge can spread harmful germs to your food and kitchen surfaces. This increases the risk of getting sick.
People can get stomach pain, diarrhea, or skin infections from these germs. Keeping sponges clean helps protect your health.
Signs Your Sponge Needs Cleaning
Kitchen sponges are useful but can carry many germs. It is important to clean them often to keep your kitchen safe.
Knowing when your sponge needs cleaning helps stop bacteria from spreading. Here are some signs to watch for.
Odor And Discoloration
A bad smell coming from your sponge means bacteria are growing inside. The sponge may also change color, showing dark or yellow spots.
Discoloration is a clear sign the sponge is dirty. It might look stained even after rinsing.
- Smelly or sour odor
- Dark or yellow patches
- Color fading or uneven tones
Texture Changes
A sponge that feels slimy or sticky needs cleaning. Texture changes show that bacteria and food particles are trapped inside.
If the sponge becomes soft, breaks apart, or hardens, it is time to sanitize or replace it.
- Slimy or sticky surface
- Soft or falling apart
- Hard or brittle texture
Effective Sanitizing Methods
Kitchen sponges hold many germs and bacteria. Cleaning them often helps keep your kitchen safe.
Here are easy ways to sanitize your kitchen sponge using common household tools.
Microwave Technique
Wet the sponge and place it in the microwave. Heat it on high for two minutes. Be careful when removing it as the sponge will be hot.
This method kills most bacteria quickly and is very easy to do.
Dishwasher Cleaning
Put your sponge in the dishwasher on the top rack. Use the hottest cycle with a drying option. This cleans and dries the sponge well.
- Place sponge on the top rack
- Run on the hottest cycle
- Use heated dry if available
- Remove carefully after cycle ends
Boiling Method
Boil a pot of water. Put the sponge in the boiling water for five minutes. This kills germs and softens the sponge.
Let it cool before using or handling.
Bleach Solution
| Bleach Solution | Instructions |
|---|---|
| 1 tablespoon bleach + 1 quart water | Soak sponge for 5 minutes |
| Rinse thoroughly | Allow sponge to dry fully |
Use this method only if you are careful with bleach. It kills germs very well but must be rinsed off completely.
:max_bytes(150000):strip_icc()/GettyImages-1425295065-f406affe0c904d83a5b948f2d8b2ebff.jpg)
Credit: www.realsimple.com
Step-by-step Sanitizing Guide
Kitchen sponges can carry many germs. It is important to clean them often. Sanitizing kills bacteria and keeps your kitchen safe.
This guide shows easy steps to sanitize your sponge. Follow each part carefully for best results.
Prepare Your Sponge
Start by rinsing your sponge with warm water. Remove any food bits stuck inside. Squeeze out extra water to make it damp but not dripping.
Check your sponge for tears or heavy wear. If it is breaking apart, replace it instead of sanitizing.
Choose A Method
You can sanitize a sponge using heat, bleach, or vinegar. Each method kills germs effectively. Pick the one that fits your tools and preference.
- Microwave: uses heat to kill bacteria
- Bleach soak: uses chemical to disinfect
- Vinegar soak: uses natural acid for cleaning
Perform Sanitization
For the microwave, place a damp sponge in it. Heat on high for 1-2 minutes. Be careful removing it as it will be hot.
To use bleach, mix one tablespoon in one quart of water. Soak the sponge for five minutes. Rinse well after soaking.
For vinegar, soak the sponge in full-strength white vinegar for five minutes. Rinse the sponge well after soaking.
Drying And Storage Tips
After sanitizing, squeeze out excess water. Let the sponge air dry in a clean area. Avoid storing it in a wet sink or closed container.
- Keep sponge dry to prevent bacteria growth
- Store in a place with good air flow
- Replace sponge every 1-2 weeks for safety
Tips To Keep Sponges Cleaner Longer
Kitchen sponges can hold many germs if not cleaned well. Keeping them clean helps stop bacteria growth. Follow these tips to keep your sponges fresh and safe.
Regular care of your sponge makes it last longer and work better. Small habits make a big difference in kitchen hygiene.
Regular Rinsing And Squeezing
Rinse your sponge well after each use to remove food and soap. Squeeze it hard to get out water. A dry sponge holds fewer germs.
Do not leave your sponge wet in the sink. Damp sponges grow bacteria quickly. Rinsing and squeezing helps keep your sponge cleaner.
Proper Sponge Storage
Store your sponge in a place where it can dry fast. Use a sponge holder that lets air flow all around. Avoid closed containers that trap moisture.
- Keep sponge away from the sink bottom
- Use a rack or stand with holes
- Place in a sunny spot if possible
Proper storage stops mold and bad smells. A dry sponge is a cleaner sponge.
Replacing Sponges Periodically
Even with care, sponges wear out and collect germs. Change your sponge every one to two weeks. Replace sooner if it smells bad or falls apart.
- Mark the date when you start using a new sponge
- Throw away sponges with tears or stains
- Keep spare sponges ready for replacement
Regular replacement keeps your kitchen safe and clean. Old sponges can spread bacteria quickly.

Credit: tidyhere.com

Credit: currently.att.yahoo.com
Frequently Asked Questions
How Often Should I Sanitize My Kitchen Sponge?
Sanitize your kitchen sponge at least once daily to kill germs. Frequent sanitizing prevents bacteria buildup and keeps your kitchen hygienic.
What Is The Best Method To Sanitize A Kitchen Sponge?
Microwaving a damp sponge for 1-2 minutes or soaking it in a bleach solution effectively sanitizes. Both methods kill most bacteria.
Can I Use A Dishwasher To Sanitize My Sponge?
Yes, placing your sponge in the dishwasher’s top rack with a heated dry cycle sanitizes it well. This method is convenient and effective.
Is It Safe To Microwave Any Kitchen Sponge?
Only microwave damp, plain sponges without metal parts. Avoid microwaving dry or metallic sponges to prevent fire risks.
Conclusion
Sanitizing your kitchen sponge keeps your kitchen clean and safe. Regular cleaning stops germs from growing. Simple methods like microwaving or soaking in vinegar work well. Replace sponges often to avoid bad smells and bacteria build-up. Clean sponges help you cook and clean better.
Take care of your sponge to protect your family’s health. Small steps make a big difference in kitchen hygiene. Keep your sponge fresh and your kitchen healthier every day.


