

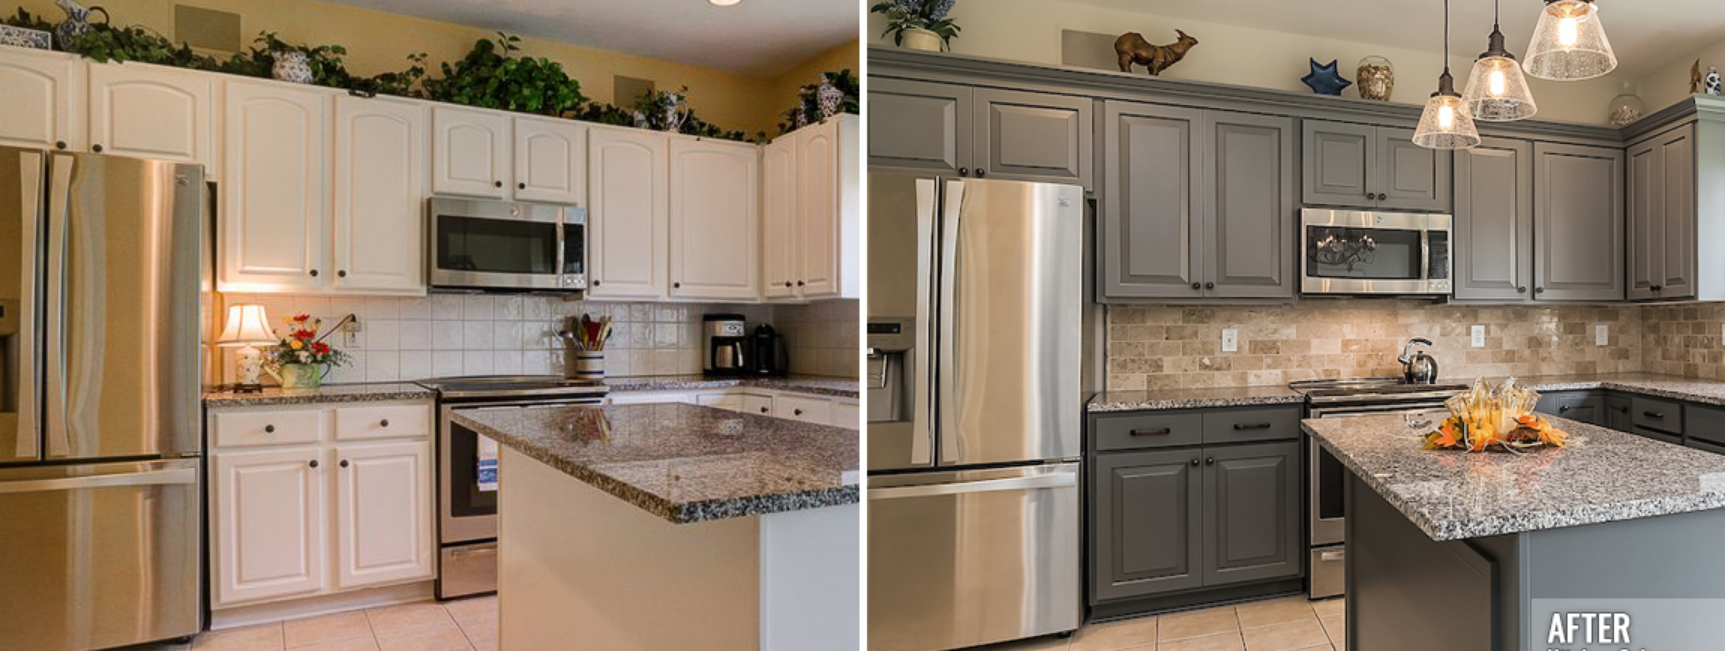
Are you tired of your outdated kitchen look but not ready for a full renovation? Replacing your kitchen drawer fronts could be the perfect solution.
It's a simple change with a big impact, transforming your space without breaking the bank. Imagine walking into your kitchen and feeling a sense of satisfaction with every drawer you open. You don’t need to be a professional to tackle this project, and with our guide, you’ll learn how to do it effortlessly.
Get ready to give your kitchen a fresh, modern vibe that reflects your style. Dive in to discover how you can make this quick yet transformative update.
Tools And Materials Needed
Replacing kitchen drawer fronts needs some basic tools and materials. Getting these ready saves time and keeps the project smooth.
Below are the key tools and materials you need before starting your drawer front replacement.
Tools
- Screwdriver set (flathead and Phillips)
- Power drill with drill bits
- Measuring tape
- Level
- Clamps
- Utility knife
- Hammer
- Putty knife
- Safety goggles
- Work gloves
Materials
Choose drawer fronts that match your kitchen cabinets. You will also need screws and wood filler to finish the job.
| Material | Description |
|---|---|
| Replacement Drawer Fronts | Wood or laminate panels cut to drawer size |
| Screws | Appropriate size to attach fronts securely |
| Wood Filler | For filling gaps or holes after installation |
| Sandpaper | To smooth surfaces before finishing |
| Paint or Stain | Match your kitchen cabinet finish |
| Brushes or Rags | For applying paint or stain |
Additional Supplies
Some extra items help make the job easier and safer:
- Drop cloth to protect your floor
- Masking tape for clean paint edges
- Cleaning cloth to wipe dust before painting

Credit: granitetransformations.co.uk
Preparing The Workspace
Replacing kitchen drawer fronts needs a clean and organized workspace. This helps you work safely and efficiently. You should clear the area and gather all tools before starting.
A well-prepared workspace reduces mistakes and speeds up the process. Make sure you have enough light and space to move around freely.
Clear The Area
Remove all items from the drawers and the countertop near your work area. This prevents damage and gives you room to work.
- Take out all utensils and contents from the drawers
- Clear nearby countertops of appliances and decor
- Move furniture that blocks your workspace
- Lay down a protective cloth or cardboard to avoid scratches
Gather Necessary Tools
Having the right tools ready will make the job easier. Keep everything within reach to avoid interruptions.
- Screwdrivers (flat and Phillips head)
- Drill with drill bits
- Measuring tape
- Level
- Clamps
- Replacement drawer fronts
- Safety gloves and goggles
Ensure Proper Lighting
Good lighting helps you see screws and edges clearly. Use natural light or add lamps if needed.
Tip:Use a portable LED work light to brighten dark cabinet interiors.
Removing Old Drawer Fronts
Replacing kitchen drawer fronts starts with removing the old ones. This process helps you prepare the drawer for the new front panel.
Careful removal prevents damage to the drawer or cabinet. Follow simple steps to detach the drawer and unscrew the front panel.
Detaching Drawer From Cabinet
First, pull the drawer out slowly until it stops. Most drawers have stops to keep them from falling out completely.
Lift the drawer slightly or press the release levers on the sides. This action allows you to pull the drawer fully out of the cabinet.
- Open the drawer fully
- Find the stops or release levers
- Lift or press to release the drawer
- Pull the drawer out carefully
Unscrewing The Front Panel
Once the drawer is out, flip it over to see screws holding the front panel. Use a screwdriver that fits the screws well.
Turn each screw counterclockwise to remove it. Keep the screws safe if you need them for the new front panel.
- Place the drawer on a flat surface
- Locate the screws on the back of the front panel
- Use the correct screwdriver
- Turn screws counterclockwise to loosen
- Remove the front panel gently

Credit: www.nhance.com
Measuring And Selecting New Fronts
Replacing kitchen drawer fronts improves your kitchen’s look. It is important to measure carefully. Choosing the right materials and style helps the new fronts match your kitchen.
This guide covers measuring your drawers and picking materials and styles. Follow these steps to get the perfect drawer fronts.
Taking Accurate Measurements
Measure each drawer front precisely. Use a tape measure for width and height. Measure the front surface, not the drawer box. Write down all measurements clearly. Measure twice to avoid mistakes.
- Remove the drawer from the cabinet.
- Use a tape measure to find the width of the front panel.
- Measure the height from top to bottom.
- Check the thickness of the drawer front.
- Note any special features like bevels or edges.
Choosing Materials And Styles
Select materials that match your kitchen’s look and durability needs. Wood is classic and strong. MDF is smooth and easy to paint. Metal or laminate offers modern looks.
| Material | Appearance | Durability | Maintenance |
| Wood | Warm, natural | High | Requires polishing |
| MDF | Smooth, paintable | Medium | Easy to clean |
| Metal | Modern, sleek | High | Wipe clean |
| Laminate | Varied colors | Medium | Scratch resistant |
Consider the style of your kitchen. Traditional kitchens suit wood. Modern kitchens look good with metal or laminate. Pick a style that matches your cabinets and handles.
Attaching New Drawer Fronts
Replacing kitchen drawer fronts can refresh your kitchen’s look. Attaching the new fronts carefully is important for a good fit.
This guide explains how to align and secure your new drawer fronts properly.
Aligning The New Front
Start by placing the new drawer front against the drawer box. Make sure it is even on all sides.
Check the gaps around the drawer front. They should be the same size on each side for a neat look.
- Hold the drawer front firmly in place.
- Use a level to check horizontal alignment.
- Adjust until the front is straight and centered.
Securing With Screws
Once the drawer front is aligned, secure it with screws from inside the drawer box. This keeps the front tight and stable.
Use the screws that came with the drawer front or ones that fit well. Do not overtighten to avoid damage.
- Drill pilot holes to prevent wood splitting.
- Insert screws through the drawer box into the drawer front.
- Tighten screws until the front is secure but not cracked.
- Check alignment again after securing.
Finishing Touches
Replacing kitchen drawer fronts is almost complete. The last steps add style and function.
These finishing touches ensure your drawers look great and work well every day.
Installing Handles Or Knobs
Handles or knobs make it easy to open your drawers. Choose hardware that fits your style.
Use a drill to attach the handles or knobs. Make sure screws are tight but not over-tightened.
- Measure the spacing for holes carefully before drilling
- Use a level to keep handles straight
- Test handle strength by gently pulling after installation
Adjusting Fit And Alignment
Check that your drawer front fits well inside the frame. It should open and close smoothly.
If the drawer front is off, adjust the screws or hinges. Small moves can fix alignment.
- Use a screwdriver to loosen screws slightly
- Shift the drawer front until it lines up evenly
- Tighten screws once the fit is perfect
- Make sure the drawer slides without rubbing
Tips For Maintenance And Longevity
Replacing kitchen drawer fronts can refresh your kitchen’s look. Proper care helps them last longer.
Use simple maintenance steps to keep your drawer fronts in good shape. This guide offers useful tips.
Regular Cleaning
Keep drawer fronts clean by wiping them often. Use a soft cloth and mild soap to avoid damage.
Avoid harsh cleaners that can strip paint or finish. Dry surfaces completely to prevent water marks.
Check And Tighten Hardware
Loose handles and hinges can cause wear. Inspect them regularly and tighten screws as needed.
- Use a screwdriver to check screws monthly
- Replace any worn-out hardware
- Lubricate hinges to keep drawers smooth
Protect From Moisture
Moisture can warp and damage drawer fronts. Avoid placing wet items near them.
Use coasters or mats under plants and containers. Fix leaks promptly to stop water damage.
Avoid Excessive Force
Opening and closing drawers gently prevents cracks and loosening. Teach family members to handle with care.
| Tip | Why It Helps |
| Clean regularly | Prevents dirt buildup and finish damage |
| Tighten hardware | Keeps drawers stable and aligned |
| Keep dry | Stops warping and mold growth |
| Use gently | Extends drawer front lifespan |
Credit: clickhere.medium.com
Frequently Asked Questions
How Do I Remove Old Kitchen Drawer Fronts Safely?
To remove old drawer fronts, unscrew the mounting screws from inside the drawer. Gently pull the front off, avoiding damage to the drawer box. Use a screwdriver and work slowly for best results.
What Tools Do I Need To Replace Kitchen Drawer Fronts?
You need a screwdriver, drill, measuring tape, clamps, and replacement drawer fronts. Sandpaper and wood filler help with finishing. These tools ensure a smooth and accurate installation process.
How To Measure Drawer Fronts For Replacement Accurately?
Measure the height, width, and thickness of your existing drawer fronts. Use a tape measure and note down exact dimensions. Accurate measurements help find or cut perfect replacement fronts.
Can I Paint Kitchen Drawer Fronts After Replacement?
Yes, you can paint drawer fronts after installing them. Sand the surface lightly and apply primer before painting. Use quality paint for a durable, smooth finish that enhances your kitchen’s look.
Conclusion
Replacing kitchen drawer fronts can refresh your kitchen’s look quickly. Choose the right materials and tools before starting. Take your time measuring and fitting each front carefully. Small steps lead to great results. Enjoy the satisfaction of a neat, updated kitchen space.
This simple project saves money and adds value. Try it yourself, and see the difference it makes!


