

Imagine this: you’re washing dishes, and suddenly, the kitchen sink clogs up. Frustrating, right?
That’s where a basket strainer comes in handy. It’s a simple tool that can save you from the messy, time-consuming task of unclogging your drain. If you’ve ever wondered how to install one, you’re in the right place. By the end of this article, you’ll know exactly how to install a basket strainer for your kitchen sink, making your daily chores smoother and more efficient.
No more hiring a plumber for something you can easily do yourself. With a bit of guidance, you can handle this task, even if you’re not a DIY pro. This guide will walk you through the process step by step, ensuring you have all the confidence you need to tackle the job. So, if you’re ready to save time, money, and effort, keep reading. Your kitchen sink will thank you for it!

Credit: www.familyhandyman.com
Tools And Materials Needed
Installing a basket strainer for your kitchen sink is simple with the right tools. Gather all materials before starting.
This guide lists the tools and materials you need to install the strainer properly.
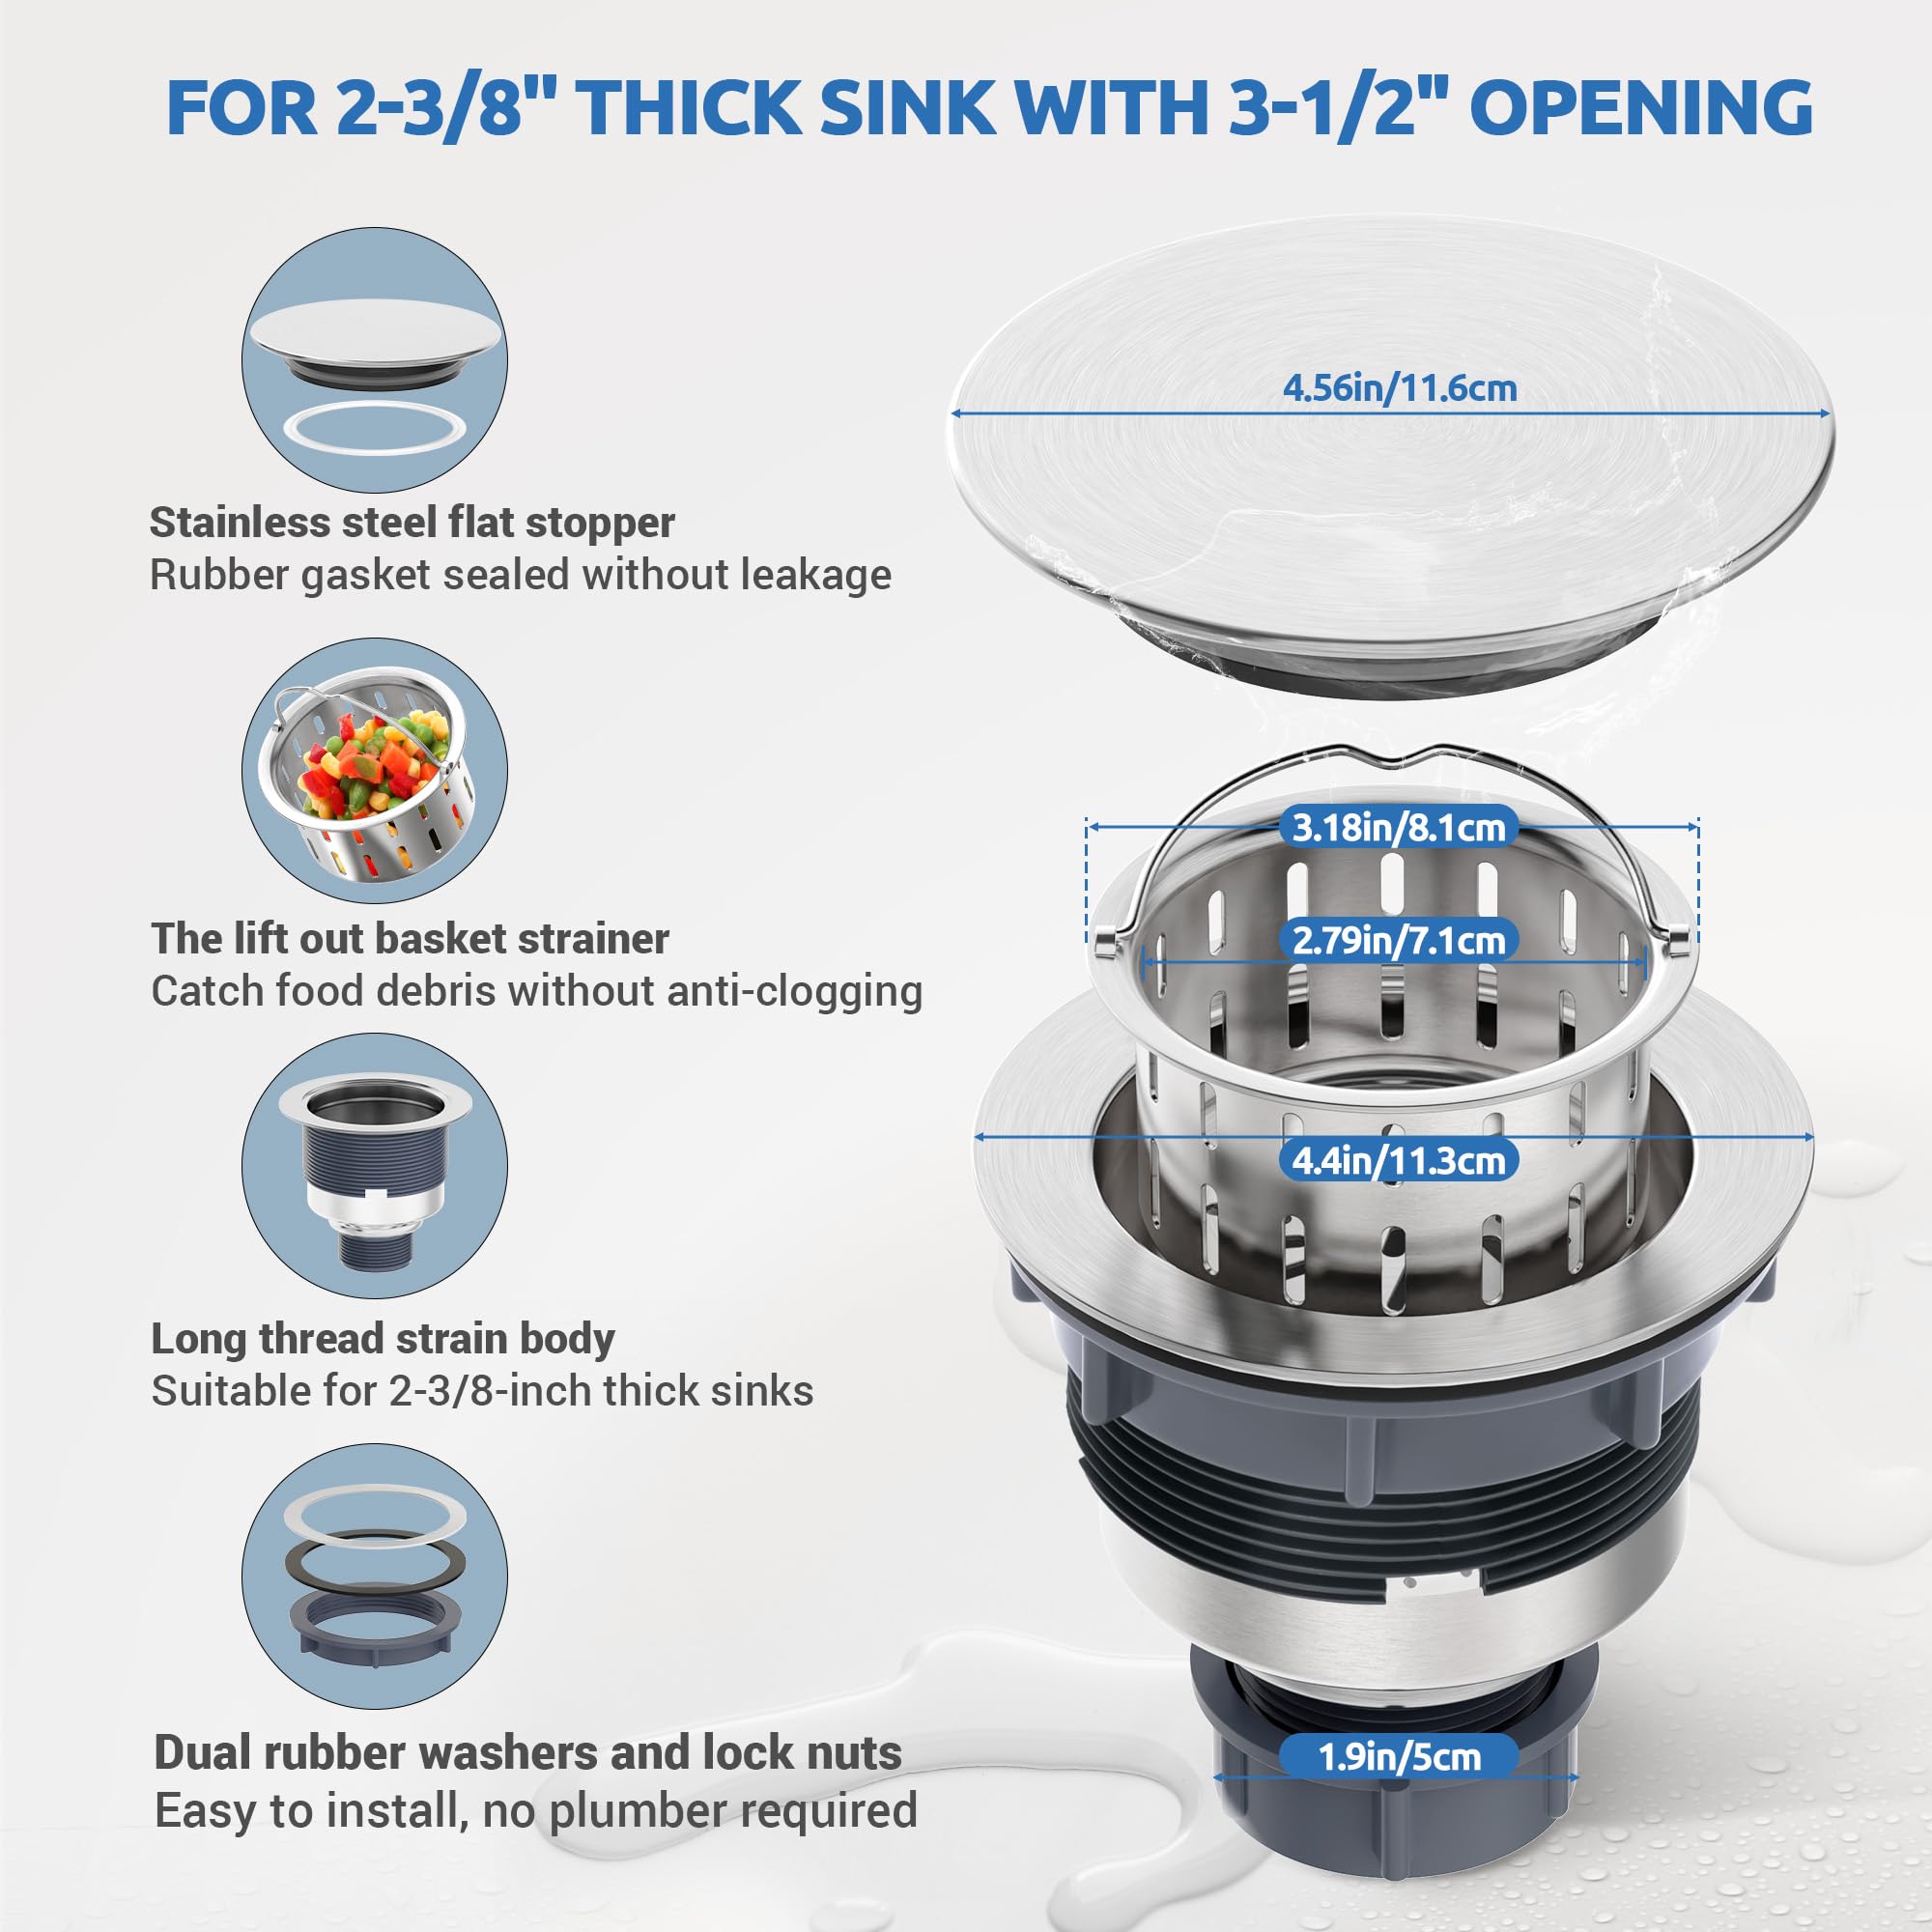
Basket Strainer
The basket strainer fits into the sink drain to catch debris. Choose one that matches your sink size.
It usually comes with a rubber gasket and mounting hardware for a secure fit.
Plumber’s Putty
Plumber’s putty seals the basket strainer to the sink. It prevents water leaks around the drain.
Use enough putty to create a tight seal, but do not overuse it.
Adjustable Wrench
An adjustable wrench helps tighten the strainer’s locknut under the sink. It fits different nut sizes.
Use the wrench carefully to avoid damaging the plumbing parts.
Slip-joint Pliers
Slip-joint pliers provide extra grip for tightening and loosening connections. They adjust to different widths.
They are useful if the locknut is hard to reach with a wrench.
Bucket
Place a bucket under the sink drain to catch water. This keeps the area dry and clean while working.
It also helps prevent water damage to cabinets or floors.
Rag Or Towel
Use a rag or towel to clean excess plumber’s putty and wipe up spills. Keep the workspace tidy.
It also protects surfaces from scratches during installation.

Credit: www.youtube.com
Preparing The Sink Area
Installing a basket strainer for your kitchen sink starts with proper preparation. Clear the area under the sink and gather your tools. This ensures a smooth installation process without interruptions.
Check the sink drain for any damage or old parts that need removal. A clean and ready sink area helps the basket strainer fit properly and prevents leaks.
Clear The Space Under The Sink
Remove all items stored under the sink. This gives you enough room to work and keeps your belongings safe from water or debris.
- Take out cleaning supplies and trash bins
- Use a flashlight to inspect the area
- Place a towel or bucket under the drain to catch any water
Turn Off The Water Supply
Before starting, shut off the water valves under the sink. This prevents water spills when you disconnect the drain pipes.
Check that the water is off by turning on the faucet briefly. No water should flow out.
Remove The Old Drain Assembly
Loosen the slip nuts on the drain pipes using a wrench. Carefully remove the old drain and clean the sink opening.
| Tool | Use |
| Adjustable wrench | Loosen nuts and bolts |
| Bucket | Catch water spills |
| Cleaning cloth | Wipe sink area clean |
Removing The Old Strainer
Removing the old basket strainer from your kitchen sink is the first step before installing a new one. This process requires some tools and basic knowledge of plumbing.
Take your time to avoid damage to the sink or pipes. Follow each step carefully to make the removal smooth and safe.
Gather The Necessary Tools
Before starting, prepare the tools you need to remove the old strainer. Having everything ready will make the job easier.
- Adjustable wrench
- Pipe wrench
- Bucket to catch water
- Plumber’s putty or silicone sealant
- Cleaning rag or sponge
- Flashlight for better visibility
Turn Off Water Supply
Shut off the water supply to the sink to prevent leaks and water damage. You can turn off the valves under the sink or the main water valve.
Disconnect The Drain Pipes
Place a bucket under the drain to catch any water left in the pipes. Then use the adjustable wrench to loosen the slip nuts on the drain pipes.
Carefully remove the pipes and set them aside. Check for water spills and clean them immediately with a rag.
Loosen The Strainer Locknut
Use a pipe wrench or pliers to turn the locknut holding the strainer from under the sink. Turn it counterclockwise to loosen it.
If the locknut is stuck, apply a small amount of lubricant and wait a few minutes before trying again.
Remove The Old Strainer Basket
Push the strainer basket up from under the sink. You may need to tap it gently with a rubber mallet if it is stuck.
- Loosen the locknut completely.
- Push the basket upwards carefully.
- Lift the basket out of the sink drain hole.
- Clean the sink surface around the drain hole.
Clean The Sink Drain Area
Remove old plumber’s putty or sealant from the sink drain area. Use a putty knife or scraper for this task.
Credit: www.amazon.ca
Cleaning The Drain Opening
Cleaning the drain opening is an important step before installing a basket strainer for your kitchen sink. It ensures proper fit and prevents clogs.
Removing debris and buildup helps water flow smoothly and keeps your kitchen sink working well.
Remove Visible Debris
Start by removing any food scraps or dirt around the drain opening. Use a paper towel or cloth to wipe the surface clean.
Scrub The Drain Area
Use a soft brush or old toothbrush with mild soap to scrub around the drain opening. This removes grease and grime.
Flush With Hot Water
Pour hot water down the drain to clear away loosened debris. Hot water also helps dissolve grease.
Check For Drain Damage
Inspect the drain opening for cracks or rust. Damaged parts can cause leaks after installation.
- Look closely at the metal edges
- Check for discoloration or holes
- Replace damaged parts before installing the strainer
Dry The Drain Opening
Use a dry cloth to wipe the drain opening completely. A dry surface helps the basket strainer seal tightly.
| Cleaning Step | Purpose |
|---|---|
| Remove Visible Debris | Clear loose dirt and food scraps |
| Scrub the Drain Area | Remove grease and grime build-up |
| Flush with Hot Water | Clear loosened debris and dissolve grease |
| Check for Drain Damage | Ensure no cracks or rust cause leaks |
| Dry the Drain Opening | Prepare surface for tight strainer seal |
Assembling The New Basket Strainer
Installing a new basket strainer in your kitchen sink helps prevent debris from clogging the drain. This guide shows you how to assemble the strainer properly.
Follow these steps carefully to ensure a tight, leak-free fit for your new basket strainer.
Prepare The Sink Drain Opening
Clean the sink drain opening to remove old putty or debris. This ensures a good seal for the new strainer.
Use a putty knife or cloth to clear the area and dry it well before assembly.
Apply Plumber’s Putty
Roll plumber’s putty into a rope about 1/2 inch thick. Place it around the underside edge of the basket strainer flange.
The putty creates a waterproof seal between the strainer and sink.
Insert The Basket Strainer
Push the basket strainer firmly into the sink drain opening. Make sure it sits evenly on the putty.
Press down to spread the putty and form a seal.
Attach The Rubber Gasket And Locknut
From under the sink, slide the rubber gasket onto the strainer’s threaded end. Next, screw on the metal locknut by hand.
Tighten the locknut using a wrench. Avoid overtightening to prevent damage.
Remove Excess Putty
After tightening, excess putty will squeeze out around the strainer flange. Wipe it away with a cloth or putty knife.
Cleaning the excess putty keeps the sink area neat and prevents buildup.
Installing The Basket Strainer
Installing a basket strainer is an important step for your kitchen sink. It helps catch food and debris, preventing clogs in your drain pipes.
This guide will show you how to install the basket strainer correctly with simple steps.
Applying Plumber’s Putty
Start by rolling a small amount of plumber’s putty into a rope shape. Make a ring that fits around the underside of the strainer’s lip.
Press the putty ring firmly onto the strainer to create a watertight seal. This prevents leaks around the sink drain.
Positioning The Strainer
Place the basket strainer into the sink drain hole. Make sure it sits evenly and the putty spreads out to seal the sink surface.
- Check that the strainer is centered in the drain hole.
- Press down firmly to secure the putty between the sink and strainer.
- Remove any extra putty that squeezes out with a putty knife or your fingers.
Securing The Strainer From Below
Under the sink, slide the rubber gasket over the strainer’s threaded section. Follow this with the metal washer.
| Part | Purpose |
|---|---|
| Rubber Gasket | Prevents water leaks |
| Metal Washer | Distributes pressure evenly |
| Locknut | Keeps strainer tight and secure |
Hand-tighten the locknut onto the strainer’s threads. Then, use a wrench to tighten the locknut firmly. Do not overtighten to avoid damage.
Check that the strainer does not move and is sealed tightly to the sink bottom.
Connecting The Drain Pipes
Connecting the drain pipes is an important part of installing a basket strainer for your kitchen sink. This step ensures the water flows out properly without leaks. You need to attach the tailpiece and tighten the slip nuts carefully.
Take your time and check each connection. Proper fitting keeps your sink working well and avoids water damage under your cabinet.
Attaching The Tailpiece
The tailpiece connects the basket strainer to the drain pipe. First, insert the tailpiece into the basket strainer outlet. Make sure the rubber washer is in place to prevent leaks. Then, slide the slip nut over the tailpiece before pushing it in.
- Place the rubber washer inside the slip nut.
- Push the tailpiece into the basket strainer outlet.
- Slide the slip nut up to the connection point.
- Hand-tighten the slip nut to hold the tailpiece.
Tightening The Slip Nuts
Tightening the slip nuts secures the drain pipes and stops leaks. Use your hands or a wrench for this step. Avoid overtightening, which can crack the pipes or damage washers.
| Tool | Purpose | Tip |
| Hands | Initial tightening | Turn nuts firmly but gently |
| Adjustable wrench | Final tightening | Use light pressure to avoid damage |
| Plumber’s tape | Seal threads if needed | Wrap before tightening nuts |
Testing For Leaks
After installing the basket strainer, checking for leaks is very important. Leaks can cause water damage under your sink.
Testing ensures all connections are tight and sealed properly. Follow these steps to find and fix leaks early.
Prepare The Area
Clear out the cabinet under the sink. Place a dry towel or paper towels where leaks might appear. This helps you spot water quickly.
Check All Connections
Inspect the basket strainer and drain pipe joints. Make sure all nuts and washers are tight. Loose parts often cause leaks.
Run Water And Observe
Turn on the faucet and let water run through the basket strainer. Watch all connections carefully for drips or moisture.
- Check around the basket strainer flange
- Look at the slip nuts on the drain pipes
- Inspect the gasket and seal areas
Fix Leaks Quickly
If you spot a leak, turn off the water. Tighten the loose connections. Replace damaged washers or gaskets if needed.
| Location | Action | Check Result |
|---|---|---|
| Basket strainer flange | Ensure plumber’s putty seals well | Dry / Leaking |
| Drain pipe slip nuts | Tighten nuts securely | Dry / Leaking |
| Rubber gaskets | Replace if cracked or worn | Good / Replace |
Maintenance Tips
Keeping your basket strainer clean helps your kitchen sink work well. Regular care stops clogs and bad smells.
Follow simple steps to maintain your basket strainer for a long time. This guide shows easy ways to keep it clear.
Regular Cleaning
Clean the basket strainer often to remove trapped food and debris. This prevents blockages and keeps water flowing smoothly.
- Remove the basket from the sink drain.
- Rinse it under warm water to wash away particles.
- Use a soft brush to scrub off stuck bits.
- Dry the basket before placing it back.
Check For Damage
Look for cracks or rust on the basket strainer. Damaged parts can cause leaks or let debris pass into pipes.
Replace the basket if you see holes or broken edges. Keeping it intact helps your sink drain well.
Avoid Harsh Chemicals
Do not pour strong chemicals down the drain. They can harm the basket strainer’s metal and seals.
Use natural cleaners like baking soda and vinegar instead. These clean without damage.
Prevent Clogs
| Tip | Why It Helps |
| Empty food scraps into trash, not sink | Stops large bits from blocking the strainer |
| Use hot water after washing dishes | Flushes grease that can build up |
| Clean strainer basket weekly | Prevents debris from hardening and clogging |
Tighten Connections
Check the basket strainer’s fit in the sink drain. Loose parts cause leaks and water damage.
Use a wrench to gently tighten the strainer nut under the sink. Avoid overtightening to prevent damage.
Frequently Asked Questions
What Tools Are Needed To Install A Basket Strainer?
You need a plumber’s putty, adjustable wrench, screwdriver, and plumber’s tape. These tools help secure and seal the basket strainer effectively.
How Do You Apply Plumber’s Putty For Basket Strainers?
Roll plumber’s putty into a rope shape and place it under the strainer flange. Press firmly to create a watertight seal before tightening the strainer.
Can I Install A Basket Strainer Without Removing The Sink?
No, you must remove the drain pipe and clean the sink hole. This ensures proper fitting and prevents leaks during basket strainer installation.
How Tight Should The Basket Strainer Be Installed?
Tighten the strainer nut until snug but avoid overtightening. Over-tightening can crack the sink or damage the strainer’s rubber gasket.
Conclusion
Installing a basket strainer for your kitchen sink is simple and helpful. It stops food and debris from clogging the drain. Follow the steps carefully, and use the right tools. Tighten all parts to avoid leaks. Clean the strainer regularly for best results.
A good strainer keeps your sink working well. Enjoy a cleaner, safer kitchen sink every day.


