
How to Gift Wrap Kitchen Utensils and Pans Together: Step-by-Step Guide
Have you ever found yourself puzzled over how to gift wrap kitchen utensils and pans together? You’re not alone.
Finding the perfect way to present these oddly shaped items can be a challenge. But imagine the joy on your loved one’s face when they receive a beautifully wrapped bundle of culinary treasures. Intrigued? This guide will show you how to turn your gift wrapping into a delightful surprise.
We’ll uncover simple yet effective techniques that will not only make your gift stand out but also spark excitement and anticipation. So, if you want to master the art of wrapping these kitchen essentials with style and ease, keep reading. Your gift-giving game is about to level up!

Credit: www.hgtv.com
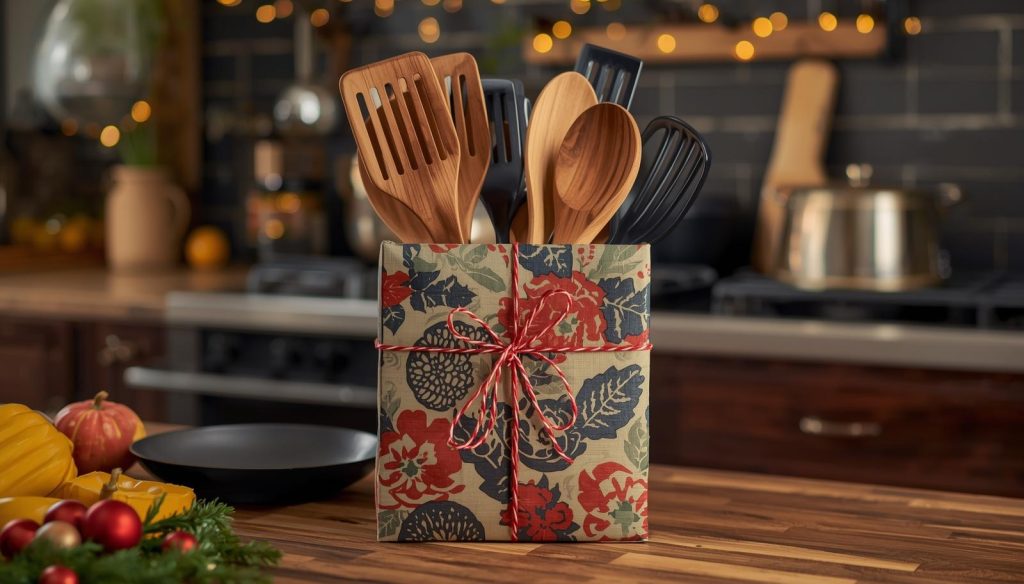
Choosing The Right Materials
Gift wrapping kitchen utensils and pans can make your present look special. Using the right materials helps protect the items and adds a nice touch. You want the wrapping to be strong and pretty.
Choosing wrapping materials depends on the size and shape of the utensils and pans. This guide covers wrapping paper, fabric wraps, and ribbons or twine for a neat package.
Selecting Wrapping Paper
Pick wrapping paper that is thick enough to hold the weight of pans and utensils. Avoid thin paper that tears easily. Matte or kraft paper works well for a clean look.
- Choose tear-resistant paper for durability.
- Pick colors or patterns that match the occasion.
- Use double layers for extra strength on heavier pans.
- Avoid glossy paper that can slip off the items.
Using Fabric Wraps
Fabric wraps are reusable and eco-friendly. They can fit oddly shaped utensils and pans better than paper. Cotton or linen cloths are good choices.
| Fabric Type | Benefits | Best Use |
| Cotton | Soft, easy to tie, washable | Small to medium utensils |
| Linen | Durable, natural look | Pans and larger sets |
| Furoshiki Cloth | Traditional Japanese wrap, decorative | Mixed utensil bundles |
Incorporating Ribbons And Twine
Ribbons and twine add charm and hold the wrapping in place. Choose materials that match your wrapping choice and the gift’s style.
- Use jute twine for a rustic look with kraft paper or fabric.
- Silk or satin ribbons add elegance to smooth wrapping paper.
- Wrap tightly but gently to keep items secure.
- Add small decorative items like dried herbs or tags for detail.
Preparing Utensils And Pans
Gift wrapping kitchen utensils and pans together needs careful preparation. Proper steps help protect each item and make the gift look neat.
Start by getting your utensils and pans ready. This ensures they stay clean and safe while wrapped.
Cleaning And Drying
Wash all utensils and pans thoroughly before wrapping. Remove any food or grease to avoid stains and smells. Dry each item completely to prevent rust or mold.
- Use warm water and dish soap to clean
- Rinse off all soap residue
- Dry with a clean towel or air dry
- Check for spots or moisture before wrapping
Grouping Items By Size And Shape
Group utensils and pans by their size and shape. This helps them fit better and stay stable inside the wrapping. Place small items together, and nest pans if possible.
| Group | Examples | Tips |
|---|---|---|
| Small Utensils | Spoons, spatulas, whisks | Bundle with rubber bands or place in a pouch |
| Medium Utensils | Knives, ladles, tongs | Wrap individually or in sets |
| Pans | Frying pans, saucepans | Stack with paper between to avoid scratches |
Adding Protective Padding
Use padding materials to protect each item during handling. Soft padding stops scratches and dents. Place padding between pans and around utensils.
- Bubble wrap
- Foam sheets
- Crumbled paper
- Dish towels
Creative Wrapping Techniques
Gift wrapping kitchen utensils and pans can be fun and thoughtful. Creative wrapping makes the gift look special.
Use simple ideas to wrap items together nicely. This makes the gift easy to carry and nice to see.
Layered Wrapping Method
Start by stacking the pans and utensils from largest to smallest. Wrap each layer with tissue paper or thin cloth.
Use ribbons or twine to hold the layers together. This keeps everything safe and adds a neat look.
- Place the largest pan at the bottom
- Add smaller pans and utensils on top
- Wrap each layer separately
- Secure layers with string or ribbon
Basket Or Box Presentation
Use a basket or box to hold all kitchen items. This makes the gift easy to carry and looks organized.
Fill gaps with shredded paper or cloth to protect the items. Wrap the whole basket or box with clear or colored wrap.
- Choose a sturdy basket or box
- Place heavier items at the bottom
- Fill spaces with soft filler
- Wrap the basket with cellophane or cloth
- Tie a big bow on top
Using Reusable Kitchen Towels
Wrap utensils and pans in clean kitchen towels. This adds a practical touch to the gift.
Use colorful or patterned towels to make the gift bright. Tie the wrapped items with a ribbon or string.
- Pick towels that match kitchen themes
- Lay utensils on the towel and roll it up
- Place pans inside a larger towel wrap
- Secure with ribbon or twine
- Towel becomes part of the gift
Credit: www.hgtv.com
Personalizing Your Gift
Gift wrapping kitchen utensils and pans can feel plain without a personal touch. Adding small details makes your gift stand out and shows care.
Personalizing your gift helps the receiver feel special and appreciated. Simple ideas can make a big difference.
Attaching Custom Tags
Custom tags add a warm message or the recipient’s name. You can use cardstock, craft paper, or pre-made tags. Attach them with twine or ribbon.
- Write a short personal note
- Include the occasion, like “Happy Birthday”
- Use colorful markers or calligraphy pens
- Add stickers or small drawings
Including Recipe Cards
Recipe cards bring a thoughtful and useful element to your gift. Write down favorite recipes that use the utensils or pans.
| Recipe Name | Main Ingredients | Cooking Time |
| Vegetable Stir Fry | Broccoli, Carrots, Soy Sauce | 20 minutes |
| One-Pan Chicken | Chicken, Potatoes, Herbs | 45 minutes |
| Simple Pancakes | Flour, Eggs, Milk | 15 minutes |
Adding Small Decorative Items
Small decorations make your wrapped gift more charming. Attach items that match the kitchen theme or the recipient’s taste.
- Mini wooden spoons or spatulas
- Fresh herbs like rosemary or thyme sprigs
- Colorful ribbons or fabric strips
- Small dried flowers or pine cones
Transporting And Storing Wrapped Gifts
Wrapping kitchen utensils and pans together makes a unique gift. Proper care is needed to keep the package safe. This guide helps you handle wrapped gifts during transport and storage.
Following simple steps can prevent damage. You can keep the gift neat until the moment it is given.
Securing The Package
Tightly securing the gift package keeps the items from moving inside. Use strong wrapping materials like bubble wrap or kraft paper to cover the utensils and pans.
- Wrap each utensil or pan separately to avoid scratches.
- Use packing tape to seal the wrapping tightly.
- Add a ribbon or string around the whole package for extra security.
- Label the package with “Fragile” if needed.
Preventing Damage During Transit
Protecting the wrapped gift from bumps and drops is important. Cushion the package inside a box or bag for safer transport.
| Protection Method | Details |
| Bubble Wrap | Wrap around the package for shock absorption |
| Foam Sheets | Place between items to prevent rubbing |
| Sturdy Box | Use a box that fits snugly with padding inside |
| Secure Placement | Keep the gift stable in the vehicle or bag |
Storing Before Gifting
Store wrapped kitchen gifts in a dry, cool place before giving. Avoid stacking heavy items on top to keep the shape intact.
- Keep away from moisture to prevent wrapping damage.
- Place on a flat surface to avoid bending or warping.
- Check the package occasionally for any damage.

Credit: food52.com
Frequently Asked Questions
How Do I Securely Wrap Kitchen Utensils And Pans?
Use a sturdy box and place pans flat at the bottom. Wrap utensils in bubble wrap or cloth. Fill gaps with tissue paper to prevent movement. Seal the box tightly with tape for protection during transit.
What Materials Are Best For Gift Wrapping Cookware?
Use kraft paper or decorative wrapping paper for a clean look. Add ribbons or twine for elegance. Bubble wrap or foam sheets protect fragile pans and utensils inside the package.
Can I Wrap Different Sized Utensils And Pans Together?
Yes, group smaller utensils separately inside the box. Place larger pans at the bottom. Use padding to avoid scratches and keep items stable during handling.
How To Add A Personal Touch When Wrapping Kitchen Gifts?
Include a handwritten note or recipe card. Use themed ribbons or tags. Choose wrapping paper that matches the recipient’s kitchen style or favorite colors.
Conclusion
Gift wrapping kitchen utensils and pans can be simple and fun. Use sturdy paper and secure tape to keep items safe. Add ribbons or tags to make the gift look nice. Wrapping together saves time and looks thoughtful. This way, your gift feels special and ready to use.
Anyone can follow these easy steps for a neat presentation. Give your kitchen gifts a personal and careful touch every time.


