
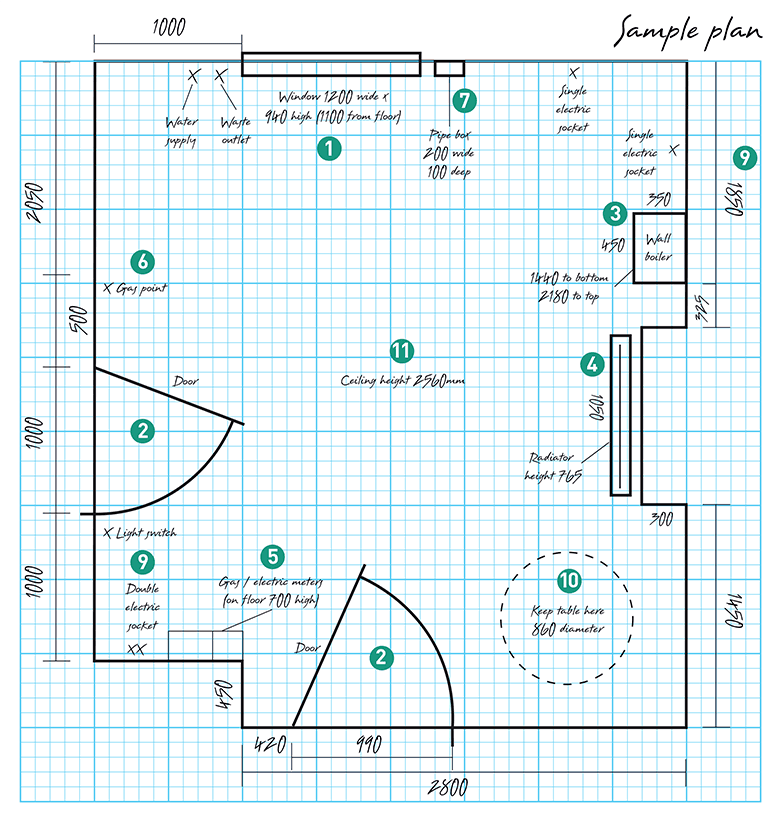
Are you ready to create the perfect kitchen layout that fits your space and style? Drawing your kitchen on graph paper is a simple, powerful way to visualize your ideas before making any costly changes.
With just a pencil, ruler, and some basic steps, you can design a kitchen that works for your daily life and looks amazing. Keep reading, and you’ll discover easy tips to turn your vision into a clear, practical plan that anyone can follow.
Your dream kitchen starts here!
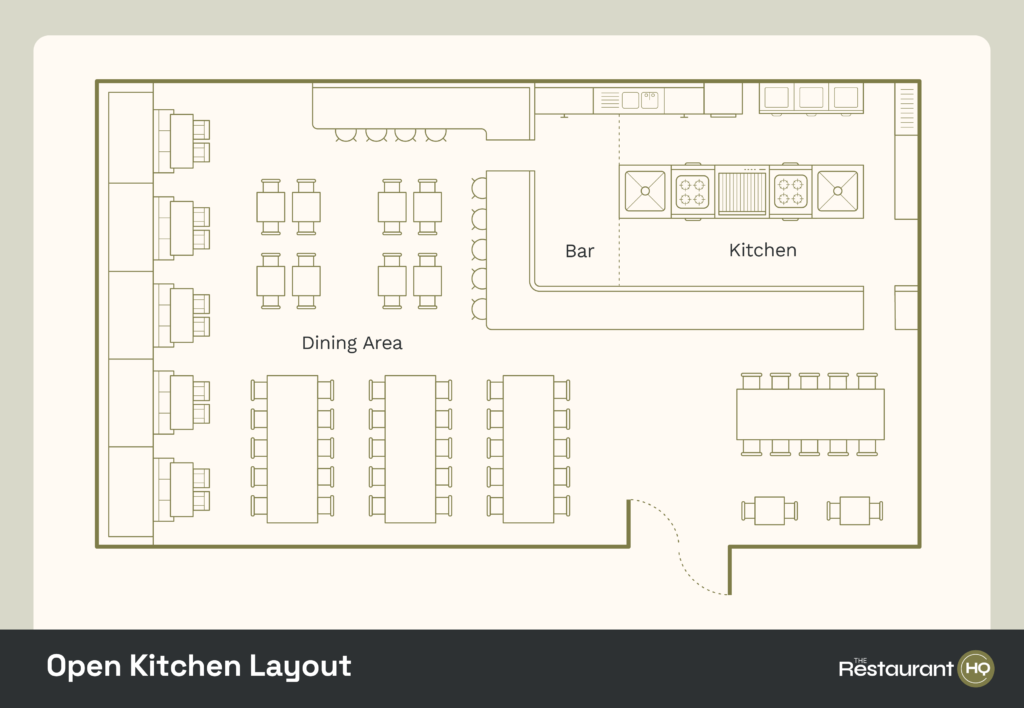
Credit: www.therestauranthq.com
Tools Needed
Drawing a kitchen layout on graph paper needs the right tools. These tools help you create a clear and accurate plan.
Use simple materials that make drawing easy and precise. This guide covers the best graph paper and drawing supplies.
Choosing The Right Graph Paper
Pick graph paper with squares that match your scale. Usually, a quarter-inch or half-inch grid works well for kitchen layouts.
- Quarter-inch grid: good for small kitchens
- Half-inch grid: better for larger spaces
- Use paper that is easy to erase on
- Choose plain or lightly colored graph paper
Essential Drawing Supplies
| Tool | Purpose |
| Pencil | Draw lines and shapes; easy to erase |
| Eraser | Fix mistakes without damaging the paper |
| Ruler | Draw straight, accurate lines |
| Measuring Tape | Measure kitchen dimensions |
| Colored Pencils | Mark different zones or appliances |

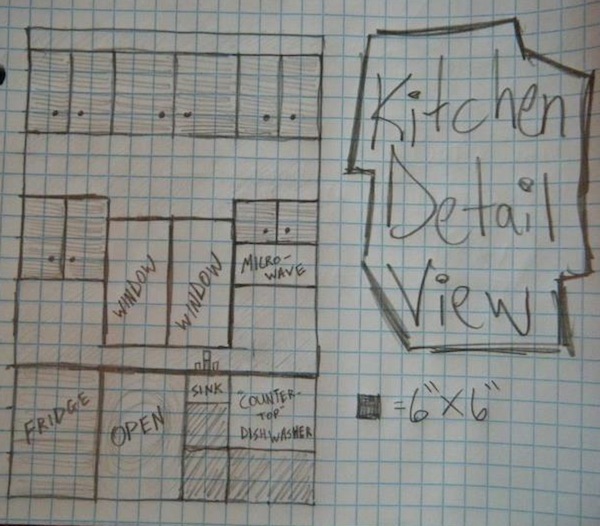
Credit: www.reddit.com
Measuring Your Kitchen Space
Drawing a kitchen layout starts with knowing your kitchen size. Accurate measurements help you plan well.
Use graph paper to make your drawing clear and to scale. This guide shows how to measure your kitchen correctly.
Taking Accurate Measurements
Measure the length and width of your kitchen walls using a tape measure. Write down each measurement carefully.
- Start measuring from one corner of the kitchen.
- Measure along the longest wall first.
- Note down the height of the walls if needed.
- Double-check your measurements for accuracy.
Noting Doors And Windows
Mark all doors and windows on your graph paper. Their size and position affect your kitchen design.
| Feature | Measure Width | Measure Height | Distance from Floor | Distance from Nearest Wall |
| Door | _____ cm | _____ cm | _____ cm | _____ cm |
| Window | _____ cm | _____ cm | _____ cm | _____ cm |
Setting The Scale
Drawing a kitchen layout on graph paper needs a clear scale. The scale shows how real measurements fit on paper.
Setting the right scale helps you draw accurate shapes and plan your kitchen space well.
Deciding On Scale Ratio
Choose a scale ratio that fits your kitchen size and paper. Common scales are 1:20 or 1:50.
For example, 1:20 means 1 unit on paper equals 20 units in real life.
- Use 1:20 for small kitchens or detailed plans
- Use 1:50 for larger kitchens or simple layouts
- Pick a ratio that fits your graph paper size
Marking The Scale On Paper
Write the scale ratio clearly on your graph paper. Place it where you can see it while drawing.
Draw a small scale bar to show the length of one unit. This helps check measurements quickly.
- Label the scale bar with real measurement values
- Use a ruler to keep lines straight
- Keep the scale visible throughout your drawing
Sketching The Walls
Drawing the walls is the first step in creating your kitchen layout on graph paper. It helps you see the space clearly and plan where everything will go.
Use a pencil to sketch the walls lightly. This way, you can make changes as needed without damaging your drawing.
Drawing Outer Boundaries
Start by drawing the outer walls of the kitchen. These walls show the limits of your space on the graph paper.
Each square on the graph paper can represent a fixed measurement, like one foot or one meter. This keeps your drawing to scale.
- Choose a scale for each square (example: 1 square = 1 foot)
- Draw straight lines for the outer walls
- Make sure the corners meet at right angles
- Check the overall shape and size of the kitchen
Adding Interior Walls
Next, add any interior walls inside the kitchen space. These walls divide the room or create openings.
Use the same scale as the outer walls. Draw these walls lightly so you can adjust them if needed.
- Mark the positions of doors and windows
- Draw interior walls to show separations
- Keep walls straight and aligned with the grid
- Leave space for walkways and appliances
Placing Fixtures And Appliances
Drawing a kitchen layout on graph paper helps you plan space well. It shows where to put fixtures and appliances clearly.
Good placement makes cooking easier and keeps the kitchen organized. Use the graph lines to keep everything in scale.
Locating Sink
The sink is often the center of kitchen work. Place it near plumbing lines and a window if possible for light.
Keep space on both sides of the sink for washing and drying dishes. Mark the sink size on the graph paper accurately.
Locating Stove
Put the stove where you have good ventilation. It should be away from the sink but close enough for easy use.
Leave counter space on each side of the stove for placing pots and pans safely. Measure the stove area clearly on paper.
Locating Refrigerator
The refrigerator needs space to open doors fully. Place it near the kitchen entrance for quick access.
Keep it away from heat sources like the stove to save energy. Mark the fridge size and door swing on the layout.
Incorporating Cabinets And Counters
Draw cabinets and counters along walls and islands. They provide storage and workspace for cooking tasks.
Use graph squares to keep cabinet sizes correct. Plan counters near appliances to make food prep smooth and simple.
- Base cabinets under counters for storage
- Wall cabinets for dishes and pantry items
- Counters near sink and stove for easy use
- Leave walking space between counters for safety
Adding Details
Adding details to your kitchen layout on graph paper helps you see the full plan. It shows where all parts will go.
Details like outlets, switches, lights, and vents make the drawing clear and useful. This helps in building or remodeling.
Marking Electrical Outlets And Switches
Mark all electrical outlets on your graph paper. Place them near countertops and appliances.
Switches should be near doorways for easy access. Use symbols or letters to show outlets and switches clearly.
- Use a circle with “O” for outlets
- Use a square with “S” for switches
- Note the height from the floor if needed
- Place outlets near the fridge, stove, and sink
Including Lighting And Ventilation
Show where ceiling lights, under-cabinet lights, and fans will go. This helps with good kitchen brightness and airflow.
Mark vents near cooking areas to remove smoke and smells. Use simple symbols to keep your drawing clean.
- Draw a star or circle for lights
- Use arrows to show airflow direction
- Mark exhaust fans near the stove
- Note windows for natural ventilation
Reviewing And Adjusting
Drawing a kitchen layout on graph paper takes careful review. Checking your work helps catch mistakes. Adjustments improve the design and make it practical.
After your first draft, spend time reviewing every detail. Accurate measurements and clear placement of appliances matter. This process ensures your kitchen fits well and works smoothly.
Checking For Accuracy
Start by measuring the distances on your drawing. Compare them to real kitchen dimensions. Check that appliances and cabinets have the right size and space.
- Measure wall lengths carefully
- Confirm appliance sizes match actual models
- Check clearances for doors and drawers
- Ensure pathways are wide enough for movement
- Verify window and door placement
Making Necessary Changes
After spotting errors, update your drawing. Move items to better locations. Resize features to fit the space properly. Small changes can improve flow and usability.
| Issue | Change to Make | Reason |
|---|---|---|
| Appliance too close to wall | Shift appliance by one square | Allows door to open fully |
| Pathway narrower than 36 inches | Remove or resize cabinet | Improves movement space |
| Sink under window blocked | Adjust window height or sink position | Ensures natural light and access |
| Counter too short | Extend counter by adding squares | Provides more workspace |
Credit: tinyhousetalk.com
Finalizing The Layout
After sketching your kitchen layout on graph paper, you need to finish it carefully. Finalizing means making your drawing clear and easy to read.
This step helps you see the whole design and make any needed changes before starting the actual kitchen work.
Darkening Key Lines
Darken the most important lines in your drawing. These lines show walls, counters, and major appliances. Use a darker pencil or pen to make them stand out.
Keep lighter lines for measurements and guides. Dark lines help you focus on the main parts of the kitchen layout easily.
- Use a ruler for straight, clean lines
- Darken outlines of cabinets and counters
- Highlight walls and door openings
- Keep grid lines light for reference
Labeling Components
Add clear labels to each part of your kitchen layout. Write names like “Sink,” “Fridge,” and “Oven” near their spots. This helps anyone reading the plan understand it quickly.
Use simple letters or short words. Keep labels neat and place them outside the drawing lines if possible.
- Label appliances and fixtures
- Mark cabinet types or sizes
- Note door swings and windows
- Use consistent lettering style
Frequently Asked Questions
How Do I Start Drawing A Kitchen Layout On Graph Paper?
Begin by measuring your kitchen space accurately. Use one square on the graph paper to represent a fixed unit like one foot. Sketch the room’s perimeter first, then add fixtures and appliances based on their real dimensions for a precise layout.
What Scale Should I Use For Kitchen Layouts On Graph Paper?
A common scale is 1 square equals 1 foot. This scale balances detail with readability. It helps visualize space accurately and fit appliances and cabinets proportionally on the graph paper.
How Can I Ensure Accurate Appliance Placement In The Layout?
Measure appliances precisely and mark their dimensions on the graph paper. Position them considering workflow zones like cooking, cleaning, and storage. This ensures functional spacing and efficient kitchen movement.
Why Use Graph Paper For Designing Kitchen Layouts?
Graph paper provides a clear, scaled grid that simplifies drawing. It helps maintain proportional accuracy and visualize space efficiently. This method reduces errors compared to freehand sketches.
Conclusion
Creating a kitchen layout on graph paper is simple and effective. This method helps you visualize your kitchen space clearly. It ensures all elements fit well. Graph paper provides a precise guide for measurements. You can easily adjust layouts as needed.
This approach saves time and reduces errors. Planning on graph paper also boosts creativity. You can experiment with different designs effortlessly. Remember to consider your needs and space limitations. A well-planned kitchen layout enhances functionality and comfort. Try this method for a smoother kitchen design process.
Happy designing!


