

Are you ready to unleash your inner artist and add a sharp edge to your drawing skills? If you’ve ever admired the sleek design of a kitchen knife and wondered how to capture its essence on paper, you’re in the right place.
Whether you're a budding artist looking to hone your craft or someone who loves the idea of drawing everyday objects, learning how to draw a kitchen knife can be both fun and rewarding. This guide will walk you through simple steps, making the process easy and enjoyable.
Imagine impressing your friends with a detailed sketch that looks like it could slice through the page! Keep reading to discover the secrets of turning a blank sheet into a masterpiece that even a professional chef would admire.

Credit: www.dreamstime.com
Materials Needed
Drawing a kitchen knife needs some simple materials. These help you create a clear and accurate sketch.
Having the right tools makes the drawing process easier and more fun. Let's look at what you need.
Paper
Choose smooth, white drawing paper. It lets pencil lines show clearly and erasing is easy.
You can use sketch pads or loose sheets, but avoid very thin or rough paper.
Pencils
Use different pencils for light and dark lines. A range from 2H to 4B works well.
- 2H pencil for light sketching
- HB pencil for general drawing
- 2B to 4B pencils for shading and details
Eraser
A soft eraser helps fix mistakes without damaging the paper. Kneaded erasers work great for lightening areas.
Use a small eraser for fine details and a larger one for bigger corrections.
Ruler
A ruler helps you draw straight lines and measure knife parts. This keeps your drawing accurate.
Choose a clear plastic ruler to see your drawing underneath while measuring.
Sharpener
Keep your pencils sharp for precise lines. A good sharpener ensures fine points without breaking leads.
Manual or electric sharpeners both work well. Regular sharpening improves your drawing quality.
Basic Shapes Of A Kitchen Knife
Drawing a kitchen knife starts with understanding its basic shapes. These shapes help you create a simple and clear outline.
Focus on the main parts: the blade, handle, and spine. Each part has its own simple shape.
Blade Shape
The blade is usually a long, thin triangle with a curved cutting edge. The top edge, called the spine, is straighter and thicker.
Handle Shape
The handle often looks like a rounded rectangle or an oval. It is thicker than the blade to hold comfortably.
Connecting Parts
The blade and handle connect at the bolster or tang. This area is usually a small rectangle or trapezoid shape.
- Blade: long triangle with a curve
- Handle: rounded rectangle or oval
- Bolster: small rectangle or trapezoid
Basic Drawing Tips
Use light lines to sketch basic shapes first. Adjust the size and curves before adding details.
Try drawing the blade and handle separately, then join them smoothly.
Drawing The Blade
Drawing a kitchen knife blade requires focus on shape and details. The blade looks sharp and clean.
Start by outlining the blade shape. Then add lines and features to make it realistic.
Outline The Blade Shape
Begin by sketching the main shape of the blade. The blade is usually long and slightly curved.
Draw a straight back edge and a curved cutting edge that narrows to a point.
- Start with a straight top line for the spine of the blade
- Create a smooth curve down to the tip on the cutting edge
- Make sure the blade tapers from the handle to the tip
- Keep the shape simple and clear for accuracy
Add The Blade Details
Next, add details like the bevel and the edge line. These show the blade’s sharpness.
Include small lines to show reflections or texture on the metal surface.
- Draw a thin line parallel to the cutting edge for the sharpened bevel
- Add a small curve near the tip to highlight sharpness
- Use light shading or lines to create a shiny metal look
- Keep details subtle to avoid cluttering the drawing
Sketching The Handle
Drawing a kitchen knife handle needs careful attention. The handle gives balance and grip to the knife.
Start by focusing on the shape and then add details to make it look real.
Draw The Handle Shape
Begin by sketching the basic outline of the handle. Use simple shapes like rectangles or ovals. Keep the edges smooth but slightly curved for comfort.
- Draw a long oval or rectangle for the main body.
- Round the corners to show where fingers will rest.
- Make sure the handle is thick enough to hold easily.
- Leave space at the end for a butt or pommel if needed.
Add Texture And Details
Next, add lines and small shapes to show the texture and features of the handle. This makes your drawing look more real.
| Detail | Description |
| Grip Lines | Draw short lines along the handle to show grip areas. |
| Screws or Rivets | Add small circles to show where the handle is fixed. |
| Wood Grain | Use wavy lines to mimic wood texture if the handle is wooden. |
| Metal Shine | Draw light reflections with soft curved lines on metal parts. |
Refining The Drawing
After sketching your kitchen knife, refining the drawing makes it look clean and realistic. This step focuses on finalizing lines and adding depth.
Take your time to enhance details and prepare your drawing for coloring or shading.
Clean Up Lines
Erase unnecessary marks and sharpen the edges of your knife. Clear lines help the drawing look neat and professional.
- Use a fine eraser to remove stray pencil marks.
- Redraw lines that look faint or uneven with a sharp pencil or pen.
- Keep the blade edges smooth and straight for realism.
- Define the handle with clear curves and details.
Add Shading And Highlights
Shading gives the knife a three-dimensional look. Highlights make it shiny and metallic.
| Technique | Purpose | Tools |
| Light shading | Adds subtle depth | Soft pencil or blending stump |
| Dark shading | Shows shadows and edges | Hard pencil or charcoal |
| Highlights | Creates shine | White gel pen or eraser |
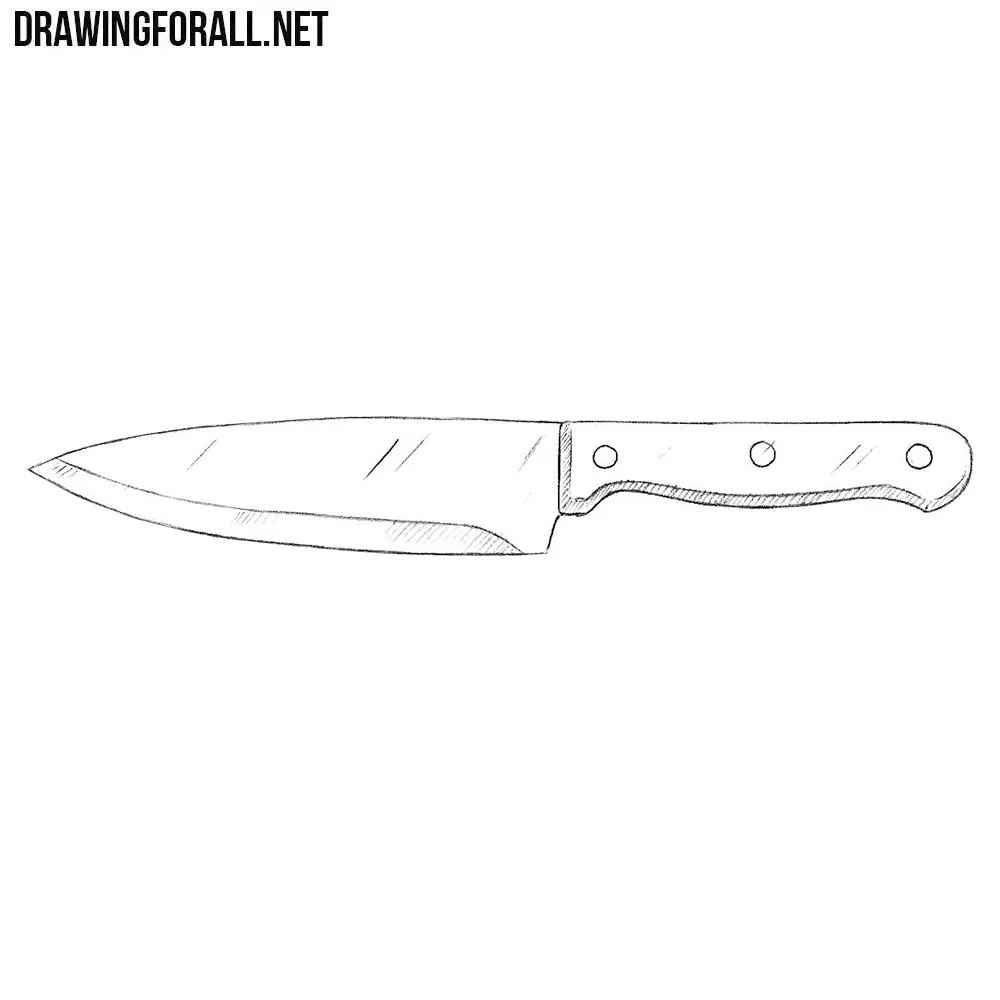
Credit: www.drawingforall.net
Coloring Techniques
Coloring a kitchen knife drawing adds life and depth. It helps show the metal shine and sharp edges.
Using the right colors and smooth shading makes the knife look real and sharp.
Choose Colors
Pick colors that show the blade’s metal and handle materials. Use grays and silvers for the blade.
For the handle, choose wood tones or black shades depending on the style.
- Light gray for the blade’s shiny parts
- Darker gray for shadows on the blade
- Brown or black for the handle
- White or light gray for highlights
Apply Colors Smoothly
Use soft strokes or blending tools to spread colors evenly. Avoid rough lines to keep the metal look.
Layer colors lightly to build shadows and highlights. This technique creates a smooth, shiny effect.
- Start with a light base color
- Add darker shades for depth
- Blend edges softly for smooth transition
- Use white or light colors to add shine
Common Mistakes To Avoid
Drawing a kitchen knife can be tricky if you do not know what to avoid. Some mistakes can make your drawing look wrong or less realistic.
Knowing these common errors helps you draw a better kitchen knife with ease and confidence.
Ignoring The Knife’s Shape
Many beginners draw kitchen knives with wrong shapes. The blade is often too thick or too straight. This makes the knife look fake.
Kitchen knives have a thin, sharp blade that curves slightly. The handle also has a special shape to hold.
Forgetting The Handle Details
The handle is not just a simple rectangle. It has curves, screws, and texture that show its grip and material.
Skipping these details makes the drawing less interesting and less real.
Using Wrong Proportions
The blade and handle must have the right size ratio. Too long or too short parts look strange.
Check the proportions before you draw. This keeps the knife looking balanced and correct.
Skipping Shading And Highlights
Kitchen knives are made of metal and wood or plastic. They reflect light and have shadows.
Not adding shading or highlights makes the knife appear flat and dull.
Drawing The Blade Edge Incorrectly
The blade edge is very sharp and thin. Drawing it too thick or blunt removes the sharp look.
Use fine lines and small details to show the sharp edge properly.
Neglecting The Knife’s Perspective
Drawing the knife from a flat view can make it boring. Different angles show the knife better.
Practice drawing the knife from side, top, or three-quarter views to add depth.
Tips For Practice And Improvement
Drawing a kitchen knife takes patience and practice. It helps to focus on shapes and details step by step.
Use simple tools like pencils and erasers. Keep your workspace clean and well-lit to see your work clearly.
Study Knife Shapes
Look at real kitchen knives or pictures. Notice the blade’s curve, the handle shape, and where they connect.
Practice Basic Drawing Skills
Work on drawing straight lines and smooth curves. These skills help in making the knife look real and sharp.
- Use light pencil strokes to sketch outlines
- Draw shapes repeatedly to improve accuracy
- Practice shading to add depth and texture
Use Reference Images
Keep photos of different kitchen knives nearby. Compare your drawing to the photo to find areas to fix.
Set Practice Goals
| Practice Focus | Time | Goal |
| Outline Accuracy | 15 minutes | Draw clean lines |
| Shading | 20 minutes | Create light and shadow |
| Handle Details | 10 minutes | Show texture and grip |
Ask For Feedback
Show your drawings to friends or teachers. Listen to their advice and try to improve the next time.
Keep Your Drawings
Tip:Save your drawings in a folder. Look back to see how you improve over time.

Credit: www.freepik.com
Frequently Asked Questions
How Do I Start Drawing A Kitchen Knife?
Begin by sketching the basic outline of the blade and handle. Use simple shapes like rectangles and triangles for accuracy. Focus on proportions first, then refine details for a realistic look.
What Materials Are Best For Drawing Kitchen Knives?
Use pencils for initial sketches and fine liners for outlines. Colored pencils or markers add depth. High-quality paper helps achieve smooth shading and clean lines.
How Can I Add Realistic Details To My Knife Drawing?
Add shading to show light and shadow on the blade and handle. Include texture details like the knife edge and handle grip for realism. Use blending techniques for smooth transitions.
What Are Common Mistakes When Drawing Kitchen Knives?
Avoid uneven blade edges and disproportionate handles. Don’t skip basic shapes, as they ensure accuracy. Also, avoid heavy outlines that make the drawing look unnatural.
Conclusion
Drawing a kitchen knife can be simple and fun. Start with basic shapes and add details step by step. Practice helps improve your skills every time you draw. Focus on the blade’s shape and the handle’s grip. Use light lines first, then darken them once you are happy.
Keep your drawing clean and clear. Enjoy the process and do not rush. Soon, you will create a nice kitchen knife drawing with ease. Try different styles to find what you like best. Drawing is about patience and practice, so keep going!


