

Are you dreaming of a kitchen transformation but unsure where to begin? Drawing your own kitchen cabinet plans might seem like a daunting task, but it’s easier than you think.
Imagine creating a space that not only fits your needs but also reflects your unique style and taste. With the right guidance, you can bring your vision to life, step-by-step, and even save money in the process. This guide will walk you through everything you need to know about designing your kitchen cabinet plans.
By the end, you’ll feel empowered and ready to take action on your dream kitchen. Ready to dive in? Let’s get started!

Credit: www.cabinetplans.io
Tools And Materials Needed
Drawing kitchen cabinet plans needs the right tools and materials. These help you create clear, accurate designs.
Good preparation saves time and makes your work easier. Use tools that fit your skill level and project size.
Essential Drawing Tools
Basic drawing tools help you sketch and detail your kitchen cabinet plans. They ensure neat and precise lines.
- Pencils of different hardness (HB, 2B)
- Eraser for corrections
- Ruler or straightedge for clean lines
- Set squares for right angles
- Compass for circles and curves
- Graph paper for scale drawings
Software Options
Drawing software lets you create digital kitchen cabinet plans. It saves time and allows easy changes.
- AutoCAD: professional tool for detailed plans
- SketchUp: 3D modeling for better visualization
- Sweet Home 3D: simple and free for beginners
- Adobe Illustrator: for precise vector drawings
Choose software based on your comfort and project needs. Many programs offer tutorials to help you learn.
Measuring Instruments
Accurate measurements are key to fitting cabinets perfectly. Use the right measuring tools to avoid mistakes.
- Tape measure for length and width
- Calipers for small or detailed parts
- Level to check flat surfaces
- Angle finder for corners and slopes
- Laser measure for quick distance checks
Credit: www.dreamstime.com
Planning Your Kitchen Layout
Drawing kitchen cabinet plans starts with a good layout. You need to think about space and how you will use it.
A clear plan helps you make the kitchen functional and nice to look at.
Assessing Kitchen Space
Measure the kitchen area carefully. Note the location of doors, windows, and appliances.
Check for any obstacles like vents or pipes that affect cabinet placement.
- Measure length, width, and height
- Mark fixed features like sinks and stoves
- Note where electrical outlets are
- Consider walking paths and door swings
Identifying Work Zones
Divide the kitchen into work zones for cooking, cleaning, and storage.
This helps place cabinets where they are most useful and easy to reach.
- Cooking zone near stove and oven
- Cleaning zone around the sink
- Storage zone for food and utensils
- Prep zone with countertop space
Choosing Cabinet Styles
Select cabinet styles that match your kitchen design and needs.
Think about door types, finishes, and hardware for a good look and feel.
- Shaker cabinets for a classic look
- Flat-panel cabinets for modern style
- Glass doors to show dishes
- Open shelving for easy access
- Choose materials that resist moisture
Taking Accurate Measurements
Drawing kitchen cabinet plans needs exact measurements. Accurate data helps fit cabinets perfectly.
Use a tape measure and write down each number. Double-check measurements to avoid mistakes.
Measuring Walls And Corners
Measure all walls where cabinets will go. Note the length and height of each wall.
Check corners carefully. Measure from corner to corner along the walls.
- Measure wall length from corner to corner
- Measure wall height from floor to ceiling
- Note any wall irregularities or bumps
Window And Door Placement
Measure windows and doors on kitchen walls. Include width, height, and distance from corners.
Record exact placement to avoid cabinet clashes with openings.
- Window width and height
- Door width and height
- Distance from wall corners to windows and doors
Appliance Dimensions
Measure all appliances that will fit near cabinets. Include width, height, and depth.
Check space needed for opening doors and drawers of appliances.
| Appliance | Width | Height | Depth | Clearance Needed |
|---|---|---|---|---|
| Refrigerator | 36 inches | 70 inches | 30 inches | 2 inches around |
| Oven | 30 inches | 28 inches | 24 inches | Door swing space |
| Dishwasher | 24 inches | 34 inches | 24 inches | Door swing space |
Sketching Basic Cabinet Shapes
Drawing kitchen cabinet plans starts with simple shapes. These shapes show where each cabinet will go.
Use basic rectangles and squares to outline the cabinets on your sketch. This helps you plan space and design.
Drawing Wall Cabinets
Wall cabinets hang above the countertop. They are usually smaller in height than base cabinets.
Sketch rectangles along the upper part of your kitchen layout. Show the width and height clearly.
- Draw the cabinet width to fit your wall space
- Keep the height between 30 to 42 inches
- Leave space between cabinets for appliances or windows
Drawing Base Cabinets
Base cabinets sit under the countertop. They are deeper and taller than wall cabinets.
Sketch larger rectangles below the wall cabinets. Show the base cabinet depth and height clearly.
- Base cabinets are usually 34.5 inches tall
- The depth is often 24 inches for countertop support
- Include spaces for sinks or cooktops if needed
Adding Pantry And Specialty Cabinets
Pantry and specialty cabinets add storage and style. They come in tall or unique shapes.
Draw tall rectangles for pantries. Use different shapes for corner or appliance cabinets.
- Pantry cabinets are usually 84 to 96 inches tall
- Corner cabinets can be L-shaped or diagonal
- Appliance cabinets fit around ovens or microwaves
Adding Details To Cabinet Plans
Adding details to kitchen cabinet plans helps make the design clear. It shows how the cabinets will look and function.
Detailed plans reduce mistakes during building and installation. They guide the carpenter step by step.
Door And Drawer Fronts
Draw the door and drawer fronts with their exact size. Show the style, like flat, raised, or shaker.
Mark how the doors open and where the drawers pull out. This helps with space planning.
- Draw front panels with correct width and height
- Show door swing direction with arrows
- Label drawer fronts by size and type
- Include any glass or panel details
Shelves And Dividers
Include shelves inside the cabinets to show storage areas. Indicate fixed or adjustable shelves.
Draw dividers if you want separate sections for better organization. Use thin lines to mark their position.
- Mark shelf thickness and spacing
- Show if shelves are adjustable or fixed
- Draw vertical dividers clearly inside cabinets
- Label each shelf or divider for reference
Hardware Placement
Mark where handles, knobs, and pulls will go on doors and drawers. This ensures proper placement and size.
Show the hardware type and dimensions. This helps when ordering and installing the pieces.
| Hardware Type | Common Placement | Notes |
|---|---|---|
| Knobs | Top corner of door or drawer front | Use one knob per door or drawer |
| Handles/Pulls | Center or edge of drawer front | Length depends on drawer size |
| Hinges | Inside edge of door | Show hinge type and position |
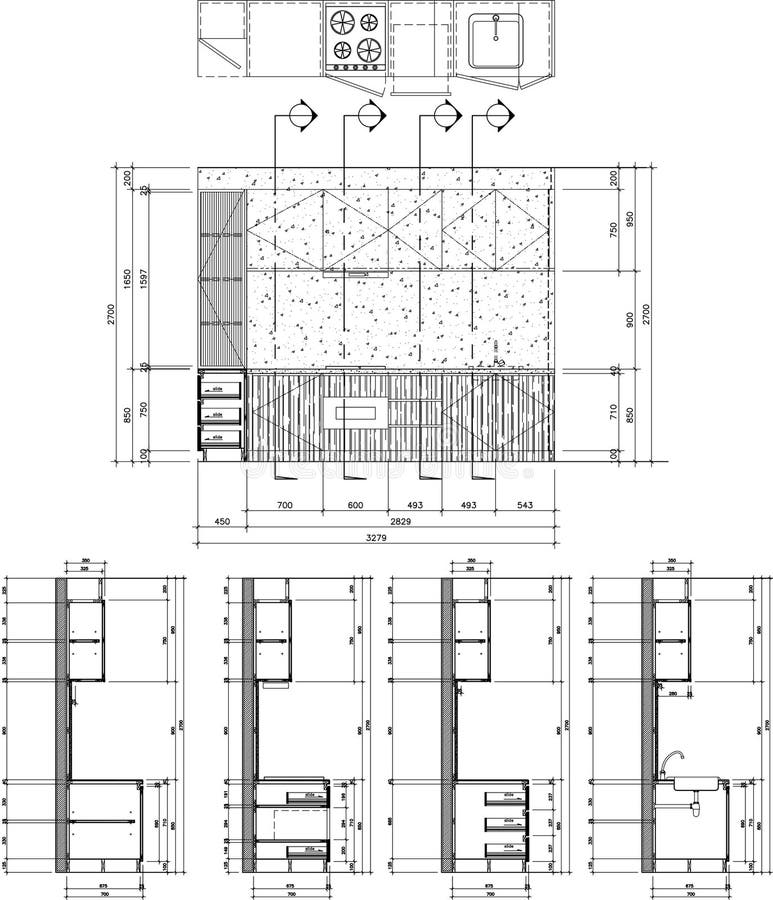
Creating Elevation Views
Elevation views show the front and side of kitchen cabinets. They help you see cabinet details clearly.
These drawings guide builders and installers during kitchen setup. Elevation views also help plan cabinet placement.
Front Elevation Drawing
The front elevation shows the cabinet faces as you look straight at them. It displays doors, drawers, and handles.
Draw the front elevation to scale. Include all visible cabinet parts and their measurements.
Side Elevation Drawing
The side elevation shows the cabinet from the side view. It helps show cabinet depth and side panels.
Use the side elevation to check how far cabinets stick out from walls or other furniture.
Cabinet Heights And Depths
Measure cabinet heights from the floor to the top edge. Depth is how far cabinets extend from the wall.
- Standard base cabinets height: 34.5 inches
- Standard wall cabinets height: 30 inches
- Standard cabinet depth: 24 inches for base cabinets
- Wall cabinets usually have 12 inches depth
Incorporating Electrical And Plumbing
Drawing kitchen cabinet plans requires careful attention to electrical and plumbing needs. These systems affect cabinet placement and usability.
Including outlets, switches, pipes, and vents in your plans ensures smooth installation and safe operation.
Marking Outlets And Switches
Plan the location of electrical outlets and switches early. Place outlets near countertop work areas for convenience.
- Mark outlets 15 inches above countertop height.
- Place switches near cabinet doors for easy access.
- Avoid placing outlets behind appliances to allow easy reach.
- Ensure outlets follow local electrical codes and safety rules.
Plumbing Connections
Identify where water supply and drainage pipes will go. Plan cabinet spaces around sinks and dishwashers carefully.
| Connection Type | Recommended Location | Notes |
| Water Supply | Under sink base cabinet | Allow room for shut-off valves |
| Drainage Pipe | Back wall behind sink | Leave access for maintenance |
| Dishwasher Hookup | Next to sink cabinet | Include both water and drain lines |
Ventilation Considerations
Ventilation is vital for removing cooking fumes and moisture. Plan cabinet design to fit vents and ductwork.
Key points for ventilation:
- Locate range hood vents directly above stove.
- Keep vent ducts short and straight for efficiency.
- Use cabinets with cutouts to allow duct passage.
- Ensure vents comply with building codes.
Reviewing And Refining Plans
After drawing your kitchen cabinet plans, spend time reviewing every detail. This step helps catch mistakes early. Refining your plans ensures the cabinets fit well and work properly.
Careful checking and adjustments make the final design stronger. Focus on measurements, usability, and the overall look. Let’s explore these key areas.
Double-checking Measurements
Accurate measurements prevent costly errors during installation. Verify all dimensions, including height, width, and depth of each cabinet part. Measure spaces where cabinets will be placed.
- Check wall lengths and heights
- Confirm door and drawer sizes
- Measure spaces for appliances and fixtures
- Account for baseboards and moldings
- Re-measure any irregular walls or corners
Adjusting For Functionality
Think about how you will use the cabinets daily. Make sure doors and drawers open easily. Leave enough space for movement around the kitchen.
| Function | Adjustment |
| Drawer Access | Allow 18 inches clearance in front |
| Cabinet Doors | Ensure doors do not block walkways |
| Corner Cabinets | Use rotating shelves for better reach |
| Appliance Fit | Match cabinet openings to appliance sizes |
| Counter Space | Keep work areas clear and accessible |
Finalizing The Design
Make final touches to your plans before starting construction. Confirm the style and materials you want to use. Check that all parts align and fit together well.
Checklist for Final Design
- All measurements confirmed and noted
- Functionality adjustments completed
- Material choices selected
- Hardware placement planned
- Design matches kitchen layout
Preparing Plans For Construction
Drawing kitchen cabinet plans is key before building. Good plans make construction easier and smoother.
These plans show all details needed. They help avoid mistakes during the work.
Creating Detailed Drawings
Start by drawing each cabinet clearly. Include measurements for height, width, and depth.
Show where shelves and drawers go. Add notes about door styles and hardware placement.
- Draw front, side, and top views
- Label all parts and dimensions
- Use scale to keep drawings accurate
Material Lists
Make a list of all materials needed. Include wood type, screws, hinges, and finishes.
This list helps buy the right amount of supplies. It also keeps the budget clear.
- Type and quantity of wood
- Hardware like handles and hinges
- Paint or stain for finishing
- Tools needed for assembly
Communicating With Contractors
Share your plans and lists with contractors. Make sure they understand every detail.
Answer their questions quickly. Clear communication helps avoid delays and errors.
- Provide copies of drawings and material lists
- Discuss the timeline and deadlines
- Confirm who is responsible for each task

Credit: www.create-enjoy.com
Frequently Asked Questions
What Tools Are Needed To Draw Kitchen Cabinet Plans?
You need graph paper, pencils, rulers, and measuring tape. Digital tools like CAD software help create precise plans. These tools ensure accurate dimensions and clear design visualization for your kitchen cabinet project.
How Do I Measure My Kitchen For Cabinet Plans?
Measure wall lengths, ceiling height, and existing appliances. Note window and door locations. Accurate measurements help design cabinets that fit perfectly and maximize kitchen space.
What Details Should Be Included In Kitchen Cabinet Plans?
Include cabinet dimensions, door styles, drawer placements, and hardware types. Also, show cabinet heights and materials. Detailed plans guide builders and ensure your vision becomes reality.
Can Beginners Draw Kitchen Cabinet Plans Easily?
Yes, beginners can start with simple sketches and basic measurements. Using templates or software simplifies the process. Practice improves accuracy and design confidence over time.
Conclusion
Drawing kitchen cabinet plans takes practice and patience. Start with clear ideas and simple sketches. Measure your space carefully to fit your design. Use basic tools like pencils, rulers, and graph paper. Focus on function and style that suit your needs.
Keep your lines neat and details clear. Review your plan before building or buying materials. This way, you avoid costly mistakes. With each drawing, your skills will improve. Soon, creating kitchen cabinet plans will feel easier and more natural. Keep practicing, and enjoy the process of designing your kitchen.


