
Are you ready to transform your drawing skills and bring your artistic vision to life? Imagine capturing the heart of your home with just a pencil and paper.
Learning how to draw a kitchen in 2 point perspective can open up a world of creativity, allowing you to depict depth and realism like never before. In this guide, you’ll discover easy-to-follow steps that will make the process enjoyable and rewarding.
Whether you’re a beginner or looking to enhance your current skills, this tutorial is designed to guide you through each stage. By the end, you’ll not only have a stunning drawing but also the confidence to tackle more complex projects. Let’s dive in and unlock the secrets of perspective drawing, where your kitchen will leap off the page in stunning 3D detail.
Basics Of 2 Point Perspective
Drawing a kitchen in 2 point perspective helps show depth and space. It makes your sketch look more real and three-dimensional.
This method uses two vanishing points on the horizon line. These points guide how lines in the drawing angle and meet.
Key Concepts And Terms
Two point perspective uses key ideas to create the illusion of space. Understanding these terms helps you draw correctly.
- Horizon Line:The eye level line where the sky meets the ground.
- Vanishing Points:Two points on the horizon line where parallel lines converge.
- Orthogonal Lines:Lines that lead to the vanishing points.
- Vertical Lines:Lines that remain straight up and down, not angled.
- Perspective Grid:A guide made by connecting vanishing points to help place objects.
Setting Up Vanishing Points
Start by drawing the horizon line across your paper. Place two vanishing points far apart on this line.
| Step | Action |
|---|---|
| 1 | Draw a horizontal line across the page. |
| 2 | Mark two points far apart on this line. These are your vanishing points. |
| 3 | Use these points to draw angled lines that show depth. |
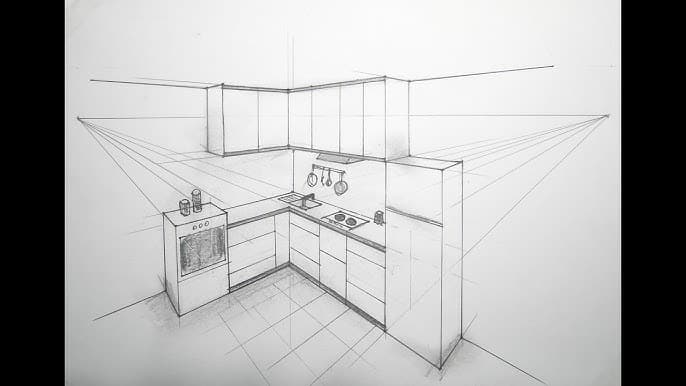
Lines that go to each vanishing point create the sides of kitchen cabinets, counters, and walls. Vertical lines stay straight up.

Credit: maggiemadesign.medium.com
Preparing Your Drawing Space
Drawing a kitchen in 2 point perspective needs a clean and organized space. This helps you focus and draw better lines.
Set up your tools and clear your desk before you start. Good preparation makes the drawing process smooth.
Choosing The Right Materials
Use materials that are easy to handle and suit perspective drawing. Good tools improve your control and accuracy.
- Use a ruler or a straight edge to draw clean lines
- Choose pencils with different hardness (HB, 2B) for sketching and shading
- Use smooth paper that can hold erasing without tearing
- Keep a good eraser to fix mistakes without smudging
- Have a sharpener ready to keep your pencil points fine
Creating A Rough Sketch
Start with a light sketch to plan your kitchen layout in two-point perspective. This sketch guides your final drawing.
Mark the horizon line and two vanishing points. Sketch the main shapes lightly before adding details.
- Draw the horizon line across your paper
- Place two vanishing points far apart on the horizon
- Sketch the kitchen walls converging to these points
- Add rough shapes for counters, cabinets, and appliances
- Keep lines light so you can erase or adjust
Drawing The Kitchen Walls
Drawing kitchen walls in two-point perspective helps create a realistic view. It shows how walls meet and recede into space.
This guide focuses on starting with the walls. You will learn to place the horizon line and sketch the wall edges.
Establishing Horizon Line
The horizon line represents the viewer’s eye level. It helps keep the perspective accurate in your drawing.
Draw a horizontal line across your paper. Place it where you want the viewer’s eye level to be.
- Keep the horizon line straight and even
- It should be high or low based on the viewpoint
- Two vanishing points go on this line
Sketching Wall Edges
Next, draw two vanishing points on the horizon line. These points guide the angles of your walls.
From each vanishing point, draw lines that form the edges of the kitchen walls. These lines make walls look like they go back in space.
- Start with vertical lines for the corner where walls meet
- Draw diagonal lines from the corner to each vanishing point
- These diagonal lines create the top and bottom edges of walls
- Use light pencil strokes to adjust if needed
Adding Kitchen Cabinets And Counters
Drawing kitchen cabinets and counters in 2 point perspective helps create a realistic space. Use vanishing points to keep the shapes accurate.
Pay attention to details like handles and drawer lines to make the cabinets look real. This guide shows how to add these features correctly.
Using Vanishing Points For Accuracy
Start by placing two vanishing points on your horizon line. All cabinet edges should align with these points. This keeps the drawing balanced and correct.
- Draw vertical lines to mark cabinet height.
- Use the left vanishing point for edges facing left.
- Use the right vanishing point for edges facing right.
- Keep the base and counter lines parallel to the floor.
- Check angles often to avoid distortion.
Detailing Cabinet Features
Add details to cabinets to make them more believable. This includes doors, drawers, handles, and counter textures.
| Feature | Description | Drawing Tip |
| Cabinet Doors | Rectangular panels covering storage space | Draw vertical and horizontal lines aligned to vanishing points |
| Drawers | Smaller horizontal sections inside cabinets | Use thinner horizontal lines and add small vertical lines for separation |
| Handles | Small shapes for opening cabinets | Draw simple rectangles or ovals centered on doors or drawers |
| Counters | Flat surfaces on top of cabinets | Use straight lines with slight thickness to show depth |
Incorporating Appliances
Drawing a kitchen in 2 point perspective helps show depth and space. Adding appliances makes the scene look real and complete.
Appliances have simple shapes but need correct angles in perspective. This guide explains how to place and draw them well.
Positioning Appliances In Perspective
Start by finding the vanishing points on your horizon line. Appliances should align with these points to keep the perspective correct.
Place appliances along the kitchen walls or counters you drew in perspective. Use light lines to block their positions first.
- Draw vertical edges straight up and down.
- Align horizontal edges to the nearest vanishing point.
- Keep appliance sizes consistent with room scale.
- Space appliances evenly for a natural look.
Shaping And Detailing
Use basic shapes like rectangles and cubes for each appliance. This keeps the drawing simple and accurate in perspective.
Add details like handles, buttons, and screens after the main shapes are done. These small parts bring your appliances to life.
- Draw handles as small rectangles or cylinders.
- Use circles for knobs and buttons.
- Add lines to show panels or doors.
- Keep details aligned with the perspective lines.

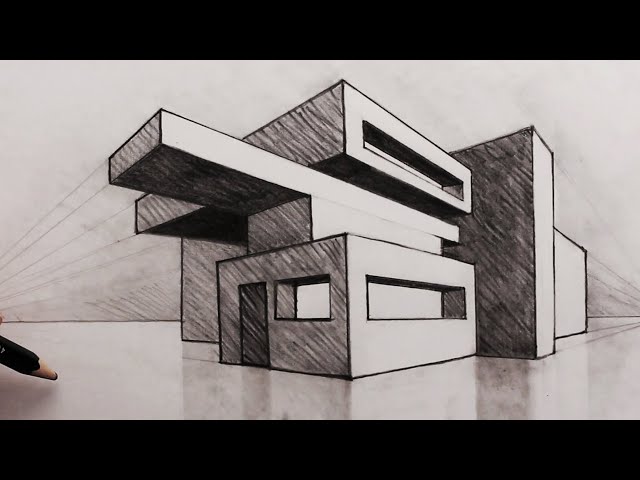
Credit: www.youtube.com
Drawing Fixtures And Accessories
Adding fixtures and accessories brings life to your kitchen drawing. These small details make the space feel real and complete. Focus on simple shapes and lines to keep your perspective correct.
Use light and shadow to show depth and dimension on fixtures. This helps them stand out in the two-point perspective drawing.
Lighting And Faucets
Draw lighting fixtures like ceiling lamps or pendant lights with basic shapes. Use ellipses for round bulbs and rectangles for lamp shades. For faucets, start with a simple curved line and add a spout and handles. Keep all lines pointing toward your vanishing points.
- Sketch the light fixture base attached to the ceiling or wall.
- Draw the bulb or shade below the base using ellipses or rectangles.
- For faucets, draw the pipe coming out from the wall or sink edge.
- Add the spout and handles, keeping their shapes simple and clear.
Small Kitchen Items
| Item | Shape | Placement Tips |
| Toaster | Rectangular box with rounded edges | Place on countertop near outlets |
| Knife Block | Rectangular with vertical lines for knives | Put beside the stove or prep area |
| Fruit Bowl | Oval or circular with simple fruit shapes | Center on kitchen island or table |
| Coffee Maker | Tall rectangle with buttons | Position near sink or electrical outlet |
Draw small kitchen items with simple shapes and keep their scale consistent with the room. Use light lines to place items first, then add details. This approach helps keep your perspective accurate and your drawing neat.
Enhancing Depth With Shadows
Shadows add depth and realism to your kitchen drawing. They help objects look three-dimensional. Using shadows correctly makes your art more interesting.
In two point perspective, shadows follow the light source and vanish into space. Learning to place shadows will improve your kitchen sketch.
Determining Light Source
Find the light source before drawing shadows. It shows where light hits and where shadows fall. The light can come from a window, lamp, or ceiling light.
- Decide if light is natural or artificial.
- Mark the light source on your drawing.
- Note the direction of light rays.
- Keep light source consistent for all objects.
- Check how light changes near corners and edges.
Adding Realistic Shadows
Shadows create contrast and depth in your kitchen scene. Draw shadows on surfaces opposite the light source. Use softer edges for light shadows and hard edges for sharp shadows.
| Shadow Type | Description | Example |
| Cast Shadow | Shadow that falls on another surface | Cabinet shadow on floor |
| Form Shadow | Shadow on the object itself | Side of a table facing away from light |
| Core Shadow | Darkest part of the form shadow | Edge of a kitchen island |
| Reflected Light | Light bouncing back into the shadow | Light under countertop |
Credit: www.youtube.com
Final Touches And Cleanup
After drawing your kitchen in 2 point perspective, it is time to refine your work. This step makes your drawing clear and neat. Cleaning up helps your kitchen look more realistic and professional.
Focus on sharpening lines and removing extra marks. These final touches bring your drawing to life and prepare it for coloring or presentation.
Refining Lines
Go over your drawing with a sharp pencil or fine pen. Darken the main lines that define the kitchen shapes and edges. Make sure the lines are smooth and steady.
Use light pressure to keep the drawing clean. Avoid thick or messy lines. This helps separate important parts from the background.
- Trace only the lines you want to keep
- Keep line thickness consistent
- Use a ruler for straight edges
- Draw gently to avoid smudging
Erasing Guidelines
Remove all construction lines and sketch marks carefully. These lines helped build the perspective but are not part of the final drawing.
Use a soft eraser to avoid damaging the paper. Erase gently and check your drawing often to keep important lines safe.
- Start erasing from the lightest lines
- Hold the eraser at an angle for control
- Clean up smudges and dust from the paper
- Use a brush or cloth to remove eraser crumbs
Frequently Asked Questions
What Is 2 Point Perspective In Kitchen Drawing?
2 point perspective uses two vanishing points on the horizon. It creates realistic depth and dimension in kitchen drawings. This technique shows how objects appear smaller as they recede. It helps artists draw kitchens with accurate proportions and spatial relationships.
How Do I Start Drawing A Kitchen In 2 Point Perspective?
Begin by drawing a horizon line and two vanishing points. Sketch the kitchen’s main walls converging towards these points. Add cabinets, appliances, and counters using guidelines aimed at the vanishing points. This method ensures accurate angles and depth in your kitchen sketch.
Which Tools Are Best For 2 Point Perspective Kitchen Drawings?
Use a pencil, ruler, and eraser for precise lines and corrections. A drawing board or graph paper can help maintain straight lines. Digital tools like drawing tablets with perspective grids are also great for accuracy and easy adjustments.
How Can I Add Details In A 2 Point Perspective Kitchen?
Add details by drawing cabinets, appliances, and fixtures using perspective guidelines. Use shading and texture to enhance realism. Include elements like tiles, handles, and lighting to make the kitchen look more lifelike and complete.
Conclusion
Drawing a kitchen in 2 point perspective helps improve your art skills. It makes your drawings look real and clear. Start with simple shapes and add details step by step. Practice often to feel more confident and quick. Remember, every drawing teaches something new.
Keep trying, and your kitchen scenes will look better each time. Drawing with perspective can be fun and rewarding. Enjoy the process and see your art grow.


