
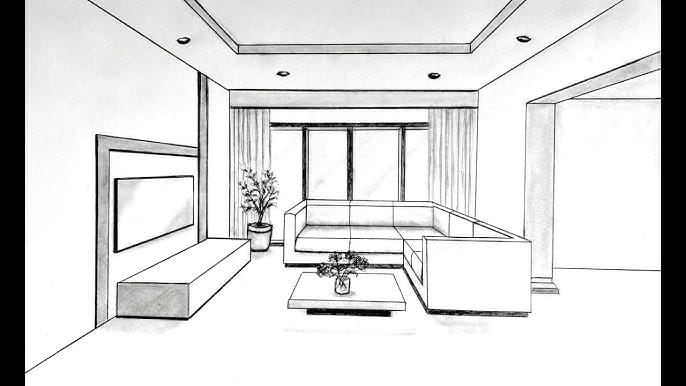
Have you ever wanted to create a realistic kitchen drawing that looks like you could step right inside it? Learning how to draw a kitchen in one point perspective can make your artwork pop with depth and realism.
This simple technique helps you turn a flat sketch into a dynamic space, guiding your eyes straight to the focal point. Whether you’re a beginner or looking to sharpen your skills, this step-by-step guide will show you exactly how to bring your kitchen design to life.
Ready to transform your drawings and impress everyone with your new skill? Let’s get started!
Credit: rlegg.medium.com
Basics Of One Point Perspective
One point perspective is a drawing technique that shows depth. It helps create the look of space on a flat surface.
This method is useful for drawing rooms, streets, and objects that face you directly.
What Is One Point Perspective
One point perspective uses a single vanishing point on the horizon line. All lines go toward this point.
This makes objects look smaller as they get farther away. It gives a sense of depth in the drawing.
- Horizon line is where the sky meets the ground.
- Vanishing point is on the horizon line.
- All parallel lines move toward the vanishing point.
Key Elements To Remember
Keep the horizon line steady. It sets the eye level and controls the view.
Use the vanishing point to guide all the lines that show depth. This keeps the drawing correct.
- Draw the horizon line first.
- Place the vanishing point on the horizon.
- Make sure all horizontal lines lead to the vanishing point.
- Vertical lines stay straight up and down.
- Measure distances carefully to keep proportions right.
Common Mistakes To Avoid
Do not place the vanishing point off the paper. It will break the perspective.
Avoid drawing lines that do not meet the vanishing point. This makes objects look wrong.
- Skipping the horizon line makes depth unclear.
- Using multiple vanishing points causes confusion.
- Drawing lines at the wrong angle breaks the illusion.
- Ignoring size changes makes the drawing flat.

Credit: www.youtube.com
Preparing Your Drawing Tools
Drawing a kitchen in one point perspective needs the right tools. These tools help you create straight lines and perfect angles.
Getting your tools ready makes the drawing process smooth and fun. Let’s look at what you need and how to prepare your space.
Essential Supplies
You need a few basic supplies to draw a kitchen in one point perspective. Each tool helps with a specific part of the drawing.
- Pencil: Use a sharp, HB or 2B pencil for clear lines.
- Eraser: A soft eraser helps fix mistakes without damaging paper.
- Ruler: A 12-inch ruler is best for drawing straight lines.
- Paper: Use a smooth drawing paper or sketchbook page.
- Sharpener: Keep your pencil tip sharp for detailed work.
- Compass (optional): Helps draw circles or arcs if needed.
Setting Up Your Workspace
Organize your workspace to keep all tools handy. Good lighting and a flat surface help you draw better.
Clear your desk from clutter and place your tools within reach. Sit comfortably to avoid strain during drawing.
- Choose a bright spot with natural or desk light.
- Use a flat table or drawing board.
- Keep pencils, erasers, and rulers near your dominant hand.
- Have a container or cup for holding extra supplies.
- Keep a scrap paper nearby for testing pencil marks.
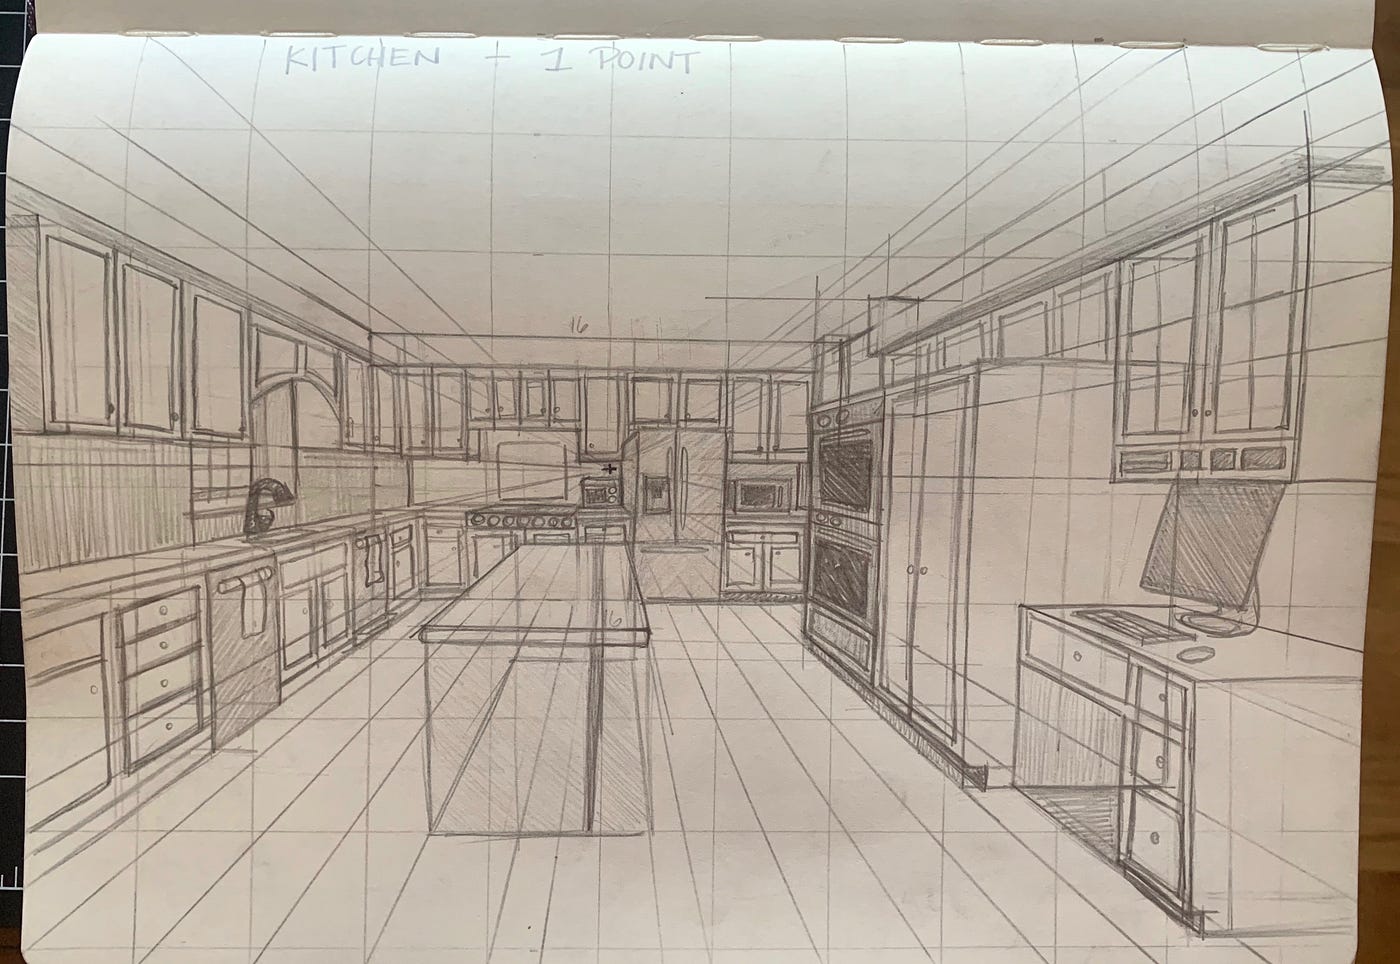
Sketching The Horizon Line And Vanishing Point
Drawing a kitchen in one point perspective starts with setting the horizon line and vanishing point. These guide the drawing’s depth and shape.
By placing these correctly, you create a strong base for your sketch. They help objects look real and in correct scale.
Placing The Horizon Line
The horizon line represents the viewer’s eye level. It is usually placed across the middle of your paper, but you can adjust it.
- Decide your viewpoint height (standing or sitting).
- Draw a straight horizontal line across your page.
- Keep this line light for easy adjustments.
- This line will guide all horizontal elements in the kitchen.
Marking The Vanishing Point
The vanishing point lies on the horizon line. It is where all parallel lines converge in your drawing.
Follow these tips to find the vanishing point:
| Tip | Explanation |
|---|---|
| Center it | Place the point near the middle of the horizon line for balanced perspective. |
| Adjust for focus | Move it left or right to show more of the kitchen’s side walls. |
| Mark lightly | Use a small dot or cross that you can erase later if needed. |

Credit: www.youtube.com
Drawing The Basic Kitchen Shape
Drawing a kitchen in one point perspective helps create depth and realism. Start by sketching the basic shapes of the kitchen space.
Focus on the main structural elements like walls, floor, and ceiling. These guide the placement of cabinets and appliances later.
Outlining Walls And Floor
Begin with the back wall as your main reference. Use the vanishing point to draw the side walls and floor lines.
- Draw a horizontal line for the floor edge.
- Mark the vanishing point in the center of your paper or canvas.
- From the vanishing point, draw diagonal lines outward to form walls and floor edges.
- Sketch vertical lines to define corners of walls and kitchen boundaries.
Adding The Ceiling
Next, outline the ceiling by connecting it to the vanishing point. This completes the room’s box shape.
| Step | Action | Purpose |
| 1 | Draw horizontal ceiling line | Sets upper boundary |
| 2 | Connect ceiling corners to vanishing point | Creates perspective depth |
| 3 | Add vertical ceiling lines | Defines height and structure |
Adding Kitchen Cabinets And Appliances
Drawing a kitchen in one point perspective gives depth and realism. Adding cabinets and appliances helps bring your sketch to life.
These elements follow the same perspective rules. Placing them correctly creates a believable space.
Positioning Cabinets
Start by drawing the main cabinet lines toward the vanishing point. Cabinets should align with the walls in perspective.
Draw the top and bottom edges of the cabinets as lines that meet at the vanishing point. This keeps the shape accurate.
- Place base cabinets along the lower wall line.
- Draw upper cabinets above the base cabinets.
- Use vertical lines to separate cabinet sections.
- Keep cabinet doors and drawers parallel to the walls.
Sketching Appliances In Perspective
Appliances like refrigerators and ovens also follow perspective rules. Draw their edges pointing to the vanishing point.
Keep appliance shapes simple at first. Add details like handles and buttons after the main form is correct.
- Sketch appliance height using vertical lines.
- Draw sides and tops angled toward the vanishing point.
- Use rectangles and squares for basic shapes.
- Add small details last to keep perspective consistent.
Incorporating Details And Textures
Adding details and textures makes your kitchen drawing more real. These elements show materials and shapes clearly.
Focus on small parts like surfaces, handles, and walls. These details give depth to your one point perspective sketch.
Drawing Countertops And Handles
Draw countertops with straight lines that follow the perspective. Show thickness by adding edges and shadows.
For handles, use simple shapes like rectangles or circles. Place them on doors and drawers with consistent size.
- Use light and dark lines to show depth on edges
- Keep handles the same size to keep perspective correct
- Add small shadows under handles for realism
Adding Tiles And Patterns
Tiling adds texture to walls and floors. Draw tiles as squares or rectangles that get smaller toward the vanishing point.
Patterns like wood grain or stone can be shown with simple lines or dots. Keep patterns light so they do not distract.
- Draw tile lines parallel to the perspective lines
- Use light shading for texture like wood or stone
- Repeat simple patterns to keep the drawing clean
Shading And Enhancing Depth
Shading adds realism to your kitchen drawing. It helps show where light hits and where shadows fall.
Using shading correctly makes the space look three-dimensional. It gives your drawing depth and interest.
Light Source Placement
Decide where your light source is in the kitchen. This can be a window, lamp, or ceiling light.
The light source guides where you place shadows and highlights. It shows which parts are bright and which are dark.
- Place the light source above or to the side for natural effects.
- Keep the light consistent throughout the drawing.
- Use the vanishing point to help decide light direction.
Creating Shadows And Highlights
Shadows appear on surfaces blocked from the light. Highlights show where light hits directly.
Use softer shadows for smooth surfaces and harder shadows for sharp edges. This adds realism.
- Shade under cabinets and appliances to show depth.
- Add highlights on countertops and shiny surfaces.
- Use lighter shading as objects get farther from the light.
- Remember shadows follow the lines toward the vanishing point.
Final Touches And Refinements
After you finish the main drawing of the kitchen in one point perspective, it is time to add final touches. These refinements make your drawing look clean and complete. They help bring out the details and depth of your kitchen scene.
Focus on cleaning up your lines and adding colors or effects. These steps improve the overall appearance and make your kitchen look more realistic and inviting.
Cleaning Up Lines
Start by erasing any extra sketch lines or mistakes. Use a sharp pencil or fine pen to redraw the main lines clearly. Make sure all lines that meet the vanishing point are straight and neat.
Remove any smudges or overlapping marks. This helps your drawing look tidy and easy to understand. Check edges of cabinets, counters, and appliances to sharpen their shapes.
- Erase all unnecessary sketch lines
- Redraw key lines with a clean, steady stroke
- Keep lines that connect to the vanishing point precise
- Check and fix any uneven or wobbly lines
- Remove smudges and stray marks
Adding Color Or Finishing Effects
Adding color brings life to your kitchen drawing. Use light colors to show natural light and darker shades for shadows. This adds depth and makes objects look three-dimensional.
You can also add texture or patterns to surfaces like tiles, wood, or metal. Light shading on the floor and walls helps to create a realistic atmosphere.
- Choose colors that suit your kitchen design
- Use light and shadow to show depth
- Add simple textures for materials
- Apply soft shading on walls and floor
- Use colored pencils, markers, or digital tools
Frequently Asked Questions
What Is One Point Perspective In Kitchen Drawing?
One point perspective is a drawing technique with a single vanishing point. It creates depth and realism in kitchen sketches. Lines converge to this point, making objects appear natural and proportional.
How Do I Start Drawing A Kitchen In One Point Perspective?
Begin by drawing a horizon line and placing a vanishing point on it. Sketch the kitchen’s back wall first, then add cabinets, appliances, and countertops using converging lines.
Which Tools Help In Drawing Kitchens With One Point Perspective?
Use a ruler, pencil, eraser, and graph paper for accuracy. Digital tools like drawing tablets and software also simplify perspective drawing and corrections.
How Can One Point Perspective Improve Kitchen Design Visualization?
It helps visualize spatial relationships and proportions accurately. Designers and homeowners see how elements fit and interact, enhancing planning and communication.
Conclusion
Creating a kitchen in one point perspective is simple and fun. Start with a single vanishing point. Draw lines from this point for depth. Add cabinets, counters, and appliances. Use straight lines for accuracy. Practice helps improve your skills. Don’t rush; take your time to get details right.
Experiment with different kitchen designs. Each drawing builds your confidence. Remember, drawing is about practice and patience. Keep trying and enjoy the process. Soon, you’ll create beautiful kitchen drawings. Happy sketching!


