
Are you ready to transform your kitchen with bright, stylish lighting? Installing pot lights in your kitchen ceiling can instantly create a clean, modern look while making your space feel bigger and more inviting.
If you’re wondering How to Install Pot Lights in a Kitchen Ceiling, don’t worry about the complexity. This guide will walk you through every step, making the process simple and manageable—even if you’re not an expert. By the end, you’ll have the confidence to light up your kitchen like a pro.
Keep reading to discover how easy it can be to install pot lights and give your kitchen the upgrade it deserves.
Choosing Pot Lights
Pot lights are great for kitchen ceilings. They provide bright, focused light without taking up space.
Picking the right pot lights helps your kitchen look good and work well.
Types Of Pot Lights
There are several types of pot lights for kitchens. Each type fits different ceiling styles and needs.
- New Construction Lights: Used in open ceilings before drywall is installed.
- Remodel Lights: Designed for existing ceilings, easy to install without major changes.
- IC-Rated Lights: Safe for insulation contact, good for insulated ceilings.
- Non-IC Rated Lights: Need space around them, not safe near insulation.
- Dimmable Lights: Allow you to adjust brightness for different moods.
Selecting The Right Size
Pot lights come in different sizes. The size affects how much light they give and how they look.
Most kitchens use 4-inch or 6-inch pot lights. Smaller lights work well for focused areas. Larger lights cover more space.
- 4-inch lights: Good for task lighting over counters.
- 6-inch lights: Better for general lighting in larger rooms.
- Spacing: Place lights about 4 to 6 feet apart for even light.
Energy Efficiency Options
Energy-efficient pot lights save money and help the environment. Look for LED options.
LED pot lights use less electricity and last longer than traditional bulbs. They also stay cool, which is safer for ceilings.
- LED bulbs: Use less energy and last up to 25,000 hours.
- CFL bulbs: Use more energy than LEDs but less than incandescent.
- Incandescent bulbs: Use more energy and get hot quickly.
- Look for ENERGY STAR certified lights for better efficiency.

Credit: www.thisoldhouse.com
Gathering Tools And Materials
Installing pot lights in your kitchen ceiling requires the right tools and materials. This ensures a smooth and safe installation.
Before starting, collect everything you need to avoid interruptions during the work.
Essential Tools
Having the proper tools makes the installation easier and safer. Some tools are common for electrical work, while others are specific for pot lights.
- Power drill with hole saw attachment
- Wire stripper and cutter
- Voltage tester
- Measuring tape
- Stud finder
- Fish tape for pulling wires
- Screwdrivers (flat and Phillips)
Lighting Fixtures And Components
Choose the right lighting fixtures and parts that fit your kitchen and ceiling type. Check wattage and bulb compatibility.
| Component | Description |
| Pot light housing | Holds the light and fits into the ceiling |
| Trim kit | Finishing ring that covers the hole edge |
| LED or halogen bulbs | Light source for the fixture |
| Electrical boxes | Protect wiring connections |
| Wire connectors | Secure electrical wire connections |
Safety Gear
Safety gear protects you from injuries and electrical hazards. Always wear the right gear when working on ceiling lights.
- Safety goggles to protect your eyes
- Insulated gloves for electrical work
- Dust mask to avoid inhaling debris
- Work boots with good grip
- Flashlight or headlamp for better visibility
Planning Light Placement
Installing pot lights in a kitchen ceiling needs good planning. The right light placement improves the kitchen’s look and function.
Careful planning helps avoid dark spots and too much brightness. It also keeps the ceiling neat and balanced.
Measuring The Ceiling
Start by measuring the length and width of your kitchen ceiling. Use a tape measure for accuracy.
Write down the measurements. This helps you figure out how many pot lights you need and where to place them.
Spacing Guidelines
Pot lights should be spaced evenly to give smooth light coverage. A good rule is to place lights about 4 to 6 feet apart.
Keep lights at least 6 inches away from walls. This prevents harsh shadows and bright spots near edges.
- Space lights 4 to 6 feet apart
- Keep lights 6 inches from walls
- Use more lights for larger kitchens
Considering Kitchen Layout
Think about where you use the most light in your kitchen. Focus on areas like the sink, stove, and counters.
Place pot lights to avoid shadows when you work. Arrange lights to brighten workspaces and dining spots.
- Light above the sink and stove
- Brighten countertops for food prep
- Use dimmers near dining areas
Credit: raleighelectricians.com
Preparing The Ceiling
Installing pot lights in your kitchen ceiling needs careful planning. Preparing the ceiling correctly makes the job easier and safer.
This guide covers marking positions, cutting holes, and handling obstacles in the ceiling.
Marking Positions
First, plan where each pot light will go. Mark spots evenly to spread light well. Use a tape measure and pencil for accuracy.
- Measure the length and width of the kitchen ceiling
- Divide the ceiling into a grid for even spacing
- Mark the center of each grid square with a pencil
- Check that marks avoid ceiling joists and vents
- Use a stud finder to locate joists before marking
Cutting Holes
Cut holes at the marked spots carefully. Use the right tools to avoid damage. Measure twice before cutting.
- Wear safety goggles and a dust mask
- Drill a small pilot hole at each mark
- Use a hole saw bit sized for your pot lights
- Cut slowly to keep edges clean
- Remove debris and smooth hole edges with sandpaper
Dealing With Ceiling Obstacles
Ceilings may have obstacles like wires, pipes, or joists. Check before cutting holes to avoid problems.
| Obstacle | Action |
| Electrical Wires | Turn off power and avoid cutting near wires |
| Water Pipes | Locate pipes with a scanner and mark safe zones |
| Joists | Mark joist locations and place lights between them |
| Vent Ducts | Avoid cutting near ducts to maintain airflow |
Wiring And Electrical Setup
Installing pot lights in your kitchen ceiling needs careful wiring. It is important to follow safety rules and local codes.
Good wiring ensures your lights work well and stay safe over time. Let’s look at the main steps.
Turning Off Power
Before you start working, always turn off the power at the main breaker. This stops electricity from flowing to the area.
Use a voltage tester to make sure the wires have no power. Never skip this safety step.
- Locate your home’s main electrical panel
- Switch off the breaker for the kitchen area
- Test wires with a voltage tester
- Wear insulated gloves if possible
Running Wires
Next, run wires from the power source to each pot light location. Use the right type and gauge of wire for safety.
Drill holes in ceiling joists to pass the wires if needed. Keep wires neat and avoid sharp bends.
- Use 14/2 or 12/2 electrical cable depending on circuit load
- Run cables through drilled holes in ceiling joists
- Leave extra wire length for easy connections
- Secure wires with cable staples every 4 feet
Connecting To Circuit
Connect the wires from your pot lights to the kitchen circuit. Match wire colors: black to black, white to white, and ground wires together.
Use wire nuts to secure connections. Attach the ground wire to the metal box if present. Double-check all connections before turning power back on.
- Connect black (hot) wires together
- Connect white (neutral) wires together
- Connect bare or green (ground) wires together
- Use wire nuts to cover each connection
- Attach ground wire to metal junction box
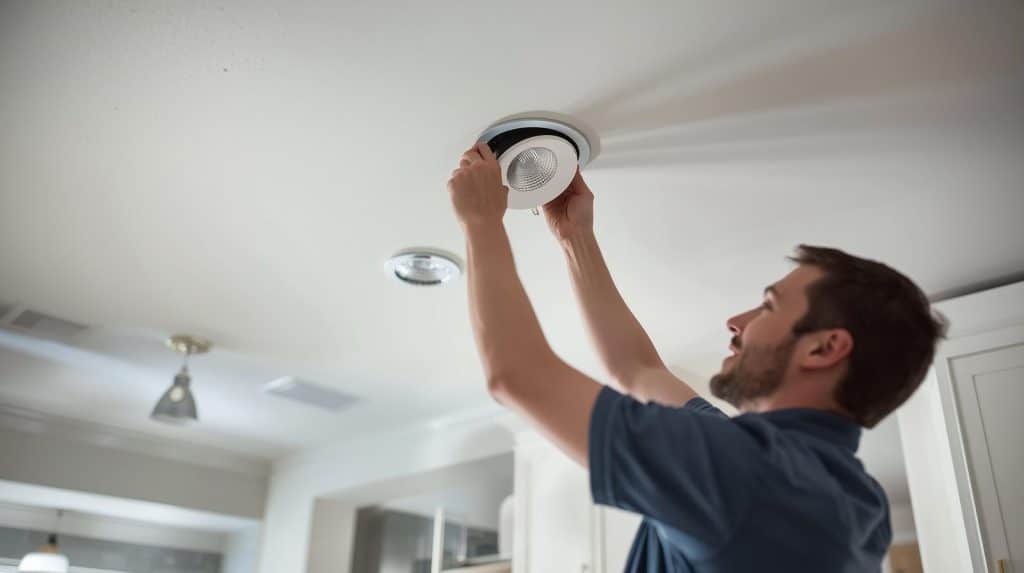
Installing Pot Lights
Pot lights add clean and bright lighting to your kitchen ceiling. They are easy to install with the right tools. This guide explains how to mount, secure, and adjust pot lights properly.
Follow these steps carefully to ensure your pot lights are safe and look great in your kitchen.
Mounting Fixtures
Start by turning off power to the kitchen ceiling. Cut holes in the ceiling where the pot lights will go. Insert the fixture housing into the hole. Make sure the fixture fits snugly and is flush with the ceiling.
- Turn off power at the circuit breaker
- Mark hole locations on the ceiling
- Use a hole saw to cut openings
- Insert the fixture housing into each hole
- Check that each fixture sits flush with the ceiling
Securing Lights
Secure each pot light fixture using the mounting clips or screws provided. These keep the fixture stable and prevent it from falling. Connect the wiring carefully using wire nuts. Make sure all connections are tight and insulated.
| Task | Details |
| Use mounting clips | Attach clips to hold fixture tightly in place |
| Connect wiring | Match wires by color and twist them securely |
| Insulate connections | Use wire nuts and electrical tape for safety |
| Test fixture stability | Gently push to confirm fixture does not move |
Adjusting Angles
Many pot lights have adjustable heads. You can tilt or swivel them to light specific areas. Adjust angles after installation to avoid glare and highlight workspaces.
- Loosen the adjustment ring if present
- Move the light head to the desired angle
- Tighten the ring to fix the position
- Test the lighting effect in the room
Testing And Final Adjustments
After installing pot lights in your kitchen ceiling, it is important to test and adjust them. This ensures they work properly and look good.
Testing and fine-tuning help you avoid problems and get the best lighting results in your kitchen.
Restoring Power
Before testing your new pot lights, turn the power back on at the circuit breaker. Make sure the switch that controls the lights is off first.
Once the power is restored, you can safely turn on the switch to check the lights.
Checking Light Functionality
Turn on the light switch and see if all pot lights turn on. Check for any flickering or dim lights.
If some lights do not work, check the bulbs and wiring connections. Replace any faulty bulbs.
- Ensure all bulbs fit tightly in their sockets
- Look for loose wires or connectors
- Test the switch to confirm it works properly
Fine-tuning Placement
After confirming the lights work, adjust their position if needed. Some pot lights can be tilted to better light specific areas.
Move the lights slightly to reduce shadows or brighten key spots like counters or the stove.
- Adjust tilt angles to focus light where needed
- Space lights evenly for balanced illumination
- Check from different angles in the kitchen

Credit: m.youtube.com
Safety Tips And Maintenance
Installing pot lights in a kitchen ceiling requires attention to safety and regular care. Proper maintenance helps keep the lights working well and avoids accidents.
This guide covers routine checks, how to replace bulbs safely, and ways to avoid common problems with pot lights.
Routine Checks
Check pot lights often to make sure they are safe and working well. Look for any signs of damage or wear on the fixtures and wiring.
- Inspect the light covers for cracks or dirt
- Ensure wiring is secure and not frayed
- Look for flickering or dim lights
- Check the ceiling around the lights for water damage
Replacing Bulbs
Turn off the power before changing any bulbs. Use the right type and wattage for your pot lights. Handle bulbs with care to avoid breakage and injury.
| Type of Bulb | Recommended Wattage | Replacement Frequency |
| LED | 8-12 watts | 5-10 years |
| Halogen | 35-50 watts | 2-4 years |
| Incandescent | 40-60 watts | 1-2 years |
Avoiding Common Issues
Prevent problems by keeping pot lights clean and dry. Avoid using bulbs that exceed the fixture’s wattage limit to reduce fire risk.
- Do not cover lights with insulation or other materials
- Clean dust and grease from bulbs and fixtures regularly
- Use dimmer switches that match your bulb type
- Replace damaged parts immediately
Frequently Asked Questions
How Do I Choose The Right Pot Lights For My Kitchen?
Select LED pot lights with adjustable brightness and color temperature. Choose dimmable fixtures for flexibility. Ensure they fit your ceiling type and provide even light distribution.
What Tools Are Needed To Install Pot Lights Safely?
You need a drill, hole saw, wire stripper, voltage tester, screwdriver, and fish tape. Safety gear like gloves and goggles is essential. Always turn off power before starting.
Can I Install Pot Lights Without Professional Help?
Yes, if you have basic electrical skills and follow safety guidelines. Turn off power, use proper tools, and follow local codes. When unsure, consult a licensed electrician.
How Many Pot Lights Should I Install In A Kitchen?
Install one pot light every 4 to 6 square feet for balanced lighting. Consider task lighting over counters and ambient lighting for overall brightness.
Conclusion
Installing pot lights in your kitchen ceiling enhances the ambiance. It brightens up your space effectively. Follow the steps carefully for best results. Plan your layout before starting. Safety should always be a priority. Turn off power when working with wires.
Use the right tools for precision. Measure accurately to avoid errors. Seek help if needed. Experience a well-lit kitchen with your new pot lights. Enjoy the modern look and feel. Your kitchen will be both functional and stylish. Happy lighting!


