
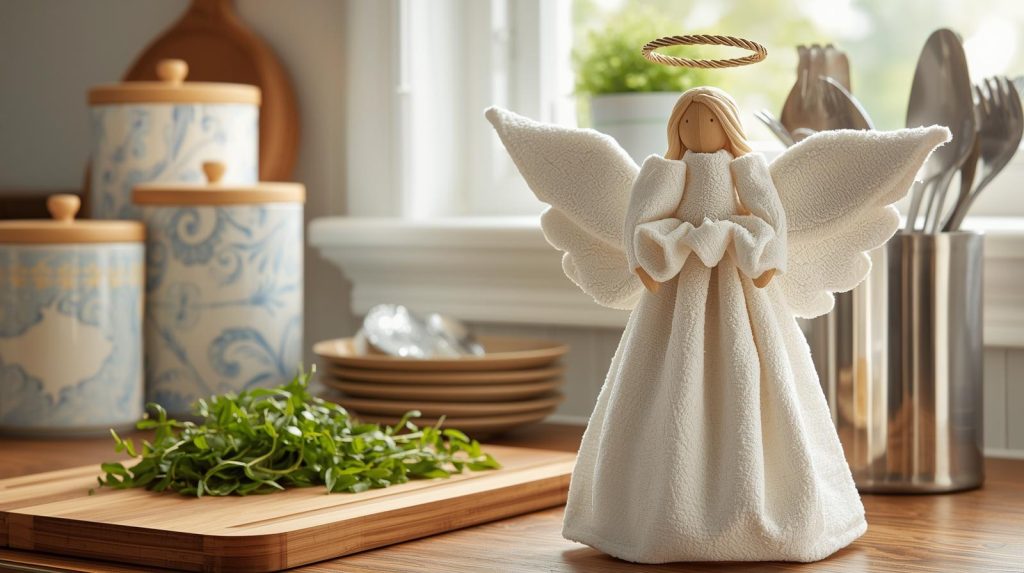
Are you looking for a fun, creative project that adds a touch of charm to your kitchen? Learning How to Make a Kitchen Angel Out of Dish Towels might be just what you need.
This delightful DIY project not only repurposes ordinary dish towels into something extraordinary but also brings a warm, welcoming vibe to your home. Imagine the satisfaction of crafting something unique with your own hands that becomes a conversation starter for your guests.
As you follow along, you’ll discover how this simple yet enchanting craft can transform your kitchen decor. Ready to get started? Let’s dive into the world of crafting your very own kitchen angel!
Materials Needed
Making a kitchen angel from dish towels is a fun and easy craft. You will need a few simple materials to create your angel.
Gathering the right supplies helps you make a beautiful and sturdy angel decoration.
Choosing The Right Dish Towels
Pick dish towels that are clean and soft. Cotton towels work best because they fold easily.
Look for towels with pretty colors or patterns. These will make your angel look nice and bright.
- Choose medium-sized towels for easy folding
- Avoid thick or stiff fabrics
- Pick colors that match your kitchen or season
Additional Supplies
You will need a few other items to finish your kitchen angel. These help hold the towels in place and add details.
- Rubber bands or string to tie the towels
- Ribbon for decoration
- Scissors to cut ribbons or strings
- Small beads or buttons for the angel’s face (optional)
- Glue or needle and thread to attach decorations
Preparing The Towels
Making a kitchen angel from dish towels starts with good preparation. The towels must be clean and neat for the best look.
Take time to wash, dry, and fold the towels properly. This will help your kitchen angel hold its shape well.
Washing And Drying
Start by washing your dish towels in warm water with a mild detergent. Avoid using fabric softeners because they reduce towel absorbency.
- Use warm water to remove grease and stains
- Do not overload the washing machine
- Skip fabric softeners or dryer sheets
- Dry towels on a medium heat setting
- Remove towels promptly to avoid wrinkles
Folding Techniques
Folding the towels correctly shapes the angel’s body and wings. Use neat folds to keep the form tight and clear.
| Fold Style | Purpose |
| Rectangle Fold | Base shape for the body |
| Triangle Fold | Form the wings |
| Roll Fold | Create the arms and head |
Shaping The Angel’s Body
Making a kitchen angel from dish towels is fun and simple. The key part is shaping the body well.
This guide will help you create the torso and arms of your angel step by step.
Creating The Torso
First, fold one dish towel into a tight rectangle. This will be the main body of the angel.
- Lay the towel flat on a clean surface.
- Fold the top edge down about a third.
- Fold the bottom edge up to meet the top fold.
- Fold the sides inward to make a narrow rectangle.
- Pinch the center to create a waist shape.
Tie a piece of string or ribbon around the waist fold. This makes the torso look more defined.
Forming The Arms
Next, use the second dish towel to form the angel’s arms. Folding and shaping give the arms a soft look.
| Action | Description |
| Fold Towel | Fold the towel lengthwise into thirds. |
| Roll Ends | Roll both ends tightly toward the center. |
| Shape Arms | Bend the rolled towel in the middle to form arms. |
| Attach | Place arms over the torso and secure with string. |
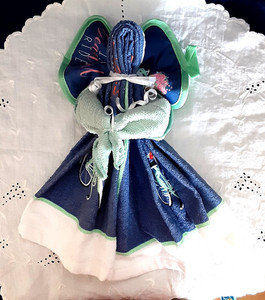
Credit: www.ebay.com
Crafting The Angel’s Head
The angel’s head is the central part of your kitchen towel angel. It sets the shape and personality of your craft.
Using simple materials like dish towels, you can create a charming head that looks neat and gentle.
Using A Towel For The Head
Start with a clean, dry dish towel. Fold it to form a round shape that will become the angel’s head. Tuck the edges carefully to avoid loose ends.
- Lay the towel flat on a surface.
- Fold it diagonally to make a triangle.
- Roll the towel from the pointed end toward the base.
- Shape the roll into a circle for the head.
- Secure the base with a rubber band or string.
Adding Facial Features
Add simple facial features to give your angel a friendly look. Use items like buttons, markers, or small fabric pieces.
| Feature | Materials | Tips |
| Eyes | Buttons or black beads | Glue them securely |
| Nose | Small fabric scrap or a bead | Center it below the eyes |
| Mouth | Red thread or marker | Draw or sew a smile |
| Cheeks | Light pink fabric or blush | Apply lightly on sides |
Making The Wings
The wings are an important part of your kitchen angel. They add charm and a soft shape. Using dish towels, you can create beautiful wings with simple folds.
This guide shows how to fold the towels and attach the wings securely to your angel. Follow each step to get perfect wings every time.
Folding The Towels For Wings
Start with clean, dry dish towels. Folding them properly gives the wings a nice shape and volume. Use these easy folds to form the wings:
- Lay one towel flat on a table.
- Fold it in half diagonally to make a triangle.
- Starting at the wide end, fold the towel back and forth in small accordion pleats.
- Pinch the center of the folded towel to create the wing’s base.
- Repeat with the second towel for the other wing.
Attaching The Wings
Attach the wings carefully to the angel’s body so they hold well. Use clips, pins, or string to secure them in place.
| Material | Use | Tips |
|---|---|---|
| Safety pins | Pin wings to fabric body | Pin through layers to keep firm |
| Clothespins | Hold wings temporarily | Good for adjusting position |
| String or ribbon | Tie wings around body | Use a bow to add decoration |
Final Assembly
Putting your kitchen angel together is the last and most fun part. Make sure all parts fit tightly and look nice.
Take your time to secure every piece. This will help your angel last longer and keep its shape well.
Securing All Parts
Use pins or small stitches to hold the dish towels in place. Focus on the head, wings, and body for stability.
- Pin the towels at the shoulders to create the wings.
- Stitch the towels around the waist to form the body.
- Secure the towel folds at the head with tight stitches or glue.
- Tuck loose ends inside or trim them carefully.
- Check all parts for firmness before moving on.
Adding Decorative Touches
Decorate your angel to give it personality and charm. Use simple items that match your kitchen style.
| Decoration | Suggestion | Placement |
| Ribbon | Soft lace or satin | Around the waist or wings |
| Buttons | Small wooden or colorful buttons | On the body or as eyes |
| Beads | Clear or pastel beads | For the halo or dress |
| Fabric Paint | White or gold | To add small details or highlights |
Display Ideas
A kitchen angel made from dish towels adds charm to any kitchen. Displaying it well makes it stand out.
Use simple ideas to show off your handmade angel. It can brighten your kitchen or serve as a lovely gift.
Placing In The Kitchen
Find a spot where your kitchen angel is easy to see. Near the sink or stove works well.
Use a small hook or a decorative stand to hold the angel. Keep it away from water and heat.
- Hang on a cabinet knob or kitchen drawer handle
- Place on a shelf with other kitchen decor
- Set near a window to catch natural light
- Use a small plate stand on the counter
Gift Presentation Tips
Wrap your kitchen angel carefully to keep it safe. Use soft tissue or a small box for protection.
Add a personal touch with a gift tag or ribbon. Choose colors that match the kitchen style.
- Use clear cellophane wrap to show the angel
- Tie with a simple ribbon or twine
- Include a small card with care instructions
- Place in a reusable gift bag with kitchen themes

Credit: www.ebay.com
Troubleshooting Common Issues
Making a kitchen angel out of dish towels is fun but can have some issues. Problems like loose parts or losing shape are common. Fixing these keeps your angel looking great.
This guide helps you solve these problems quickly. Follow easy tips to keep your angel sturdy and beautiful over time.
Fixing Loose Parts
Loose parts can make your kitchen angel fall apart. Check each joint and tie to find weak spots. Tighten knots or add small stitches to hold pieces firmly.
If a part keeps coming loose, use a small glue dot or fabric tape. These add extra hold without damaging the towel. Be gentle to keep the angel neat.
- Check knots for tightness regularly
- Add a few stitches with needle and thread
- Use fabric glue for extra hold
- Avoid heavy pulling on delicate parts
Maintaining Shape Over Time
Dish towels can lose shape after use or washing. To keep your angel looking good, reshape it gently after cleaning. Avoid wringing or twisting the towels.
Store your angel in a dry place to prevent wrinkles and sagging. You can stuff soft cotton inside parts to keep volume and form.
- Reshape gently after washing
- Do not wring or twist towels
- Store in a dry, flat place
- Use soft stuffing to keep volume

Credit: www.youtube.com
Frequently Asked Questions
What Materials Are Needed To Make A Kitchen Angel?
You need two dish towels, rubber bands, ribbons, and some decorative accents. These simple materials help create a charming kitchen angel easily and affordably.
How Do You Fold Dish Towels To Form The Angel?
Fold one towel into a triangle for the wings. Roll the other towel tightly for the body. Secure with rubber bands to shape the angel.
Can I Customize My Kitchen Angel Decorations?
Yes, you can personalize your angel with ribbons, buttons, or beads. Use colors and accessories that match your kitchen décor for a unique touch.
How Long Does It Take To Make A Kitchen Angel?
Making a kitchen angel typically takes 10 to 15 minutes. It’s a quick and fun craft perfect for beginners and holiday décor enthusiasts.
Conclusion
Creating a kitchen angel from dish towels is simple and fun. You only need a few materials and a little time. This craft adds a personal touch to your kitchen decor. It also makes a nice gift for friends or family.
Try different towel colors and styles for unique angels. Enjoy the process and let your creativity shine. Making these angels brings joy and a cozy feeling to your home. Give it a try and see how easy it is!


