

How to Install Moulding on Kitchen Cabinets Without Mistakes
Are you ready to give your kitchen a fresh, stylish upgrade without spending a fortune? Installing moulding on your kitchen cabinets is one of the easiest ways to add charm and elegance to your space.
Imagine transforming plain cabinet edges into beautiful, eye-catching details that make your kitchen feel more polished and inviting. In this guide, you’ll discover simple steps and expert tips to install moulding like a pro—even if you’ve never done it before.
Keep reading, and by the end, you’ll have the confidence to elevate your kitchen’s look with a personal touch you’ll love.

Credit: www.thisoldhouse.com
Tools And Materials Needed
Installing moulding on kitchen cabinets can improve the look of your kitchen. It takes some tools and materials to do the job well.
This guide covers the types of moulding, the tools you need, and safety gear to keep you safe.
Types Of Moulding
Moulding comes in different styles and shapes. You can pick the one that fits your kitchen style.
- Crown Moulding: Sits where the cabinet meets the ceiling.
- Decorative Moulding: Adds style to flat cabinet edges.
- Light Rail Moulding: Hides under-cabinet lighting fixtures.
- Base Moulding: Used at the bottom of cabinets near the floor.
Essential Tools
Having the right tools makes installing moulding easier and cleaner. Use tools made for woodworking.
- Miter Saw: Cuts moulding pieces at precise angles.
- Measuring Tape: Measures lengths accurately.
- Hammer or Nail Gun: Attaches moulding to cabinets.
- Level: Keeps moulding straight and even.
- Wood Glue: Secures moulding edges together.
- Sandpaper: Smooths rough edges.
- Caulk and Caulk Gun: Fills gaps for a neat finish.
- Pencil: Marks cut lines on moulding.
Safety Gear
Safety gear protects you during the installation process. Wear the right gear to avoid injuries.
- Safety Glasses: Protect your eyes from dust and wood chips.
- Ear Protection: Guards against loud saw noise.
- Dust Mask: Keeps dust out of your lungs.
- Work Gloves: Protect your hands from splinters and sharp edges.
Preparing The Cabinets
Preparing your kitchen cabinets properly makes moulding installation easier. It helps the moulding fit tightly and last longer.
This stage includes cleaning, measuring, marking, and removing old moulding if needed.
Cleaning The Surface
Clean the cabinet surfaces before installing moulding. Dirt or grease can prevent glue or nails from sticking well.
- Use a mild detergent and warm water to wash the surface.
- Remove all grease, dust, and dirt.
- Dry the surface completely with a clean cloth.
Measuring And Marking
Measure the cabinet edges carefully for the moulding length. Mark the spots to guide your cuts and placement.
| Tool | Purpose |
| Tape Measure | Measure cabinet edges |
| Pencil | Mark cutting lines and placement points |
| Square | Ensure straight and right-angle markings |
Removing Old Moulding
Remove old moulding before fitting new pieces. This prevents bumps and poor adhesion.
- Use a putty knife to gently loosen the edges.
- Slide a pry bar under the moulding carefully.
- Pull the moulding away slowly to avoid damage.
- Clean any leftover glue or nails from the surface.
Cutting Moulding Pieces
Cutting moulding pieces is an important part of installing moulding on kitchen cabinets. You need to cut the moulding accurately to fit the cabinet edges.
Good cuts make the moulding look neat and professional. This guide helps you cut moulding pieces correctly.
Measuring For Cuts
First, measure the length where you want to place the moulding. Use a tape measure for accuracy.
Mark the moulding piece where you need to cut. Double-check your measurements before cutting.
- Measure twice to avoid mistakes
- Mark cut lines clearly on the moulding
- Account for corners and angles in measurements
Using A Miter Saw
A miter saw helps you make straight and angled cuts easily. It is the best tool for cutting moulding.
Place the moulding firmly on the saw base. Align the blade with your marked line before cutting.
- Use safety goggles and gloves
- Hold the moulding steady during the cut
- Cut slowly to get a clean edge
Handling Corners
Corners need special cuts called miters. These cuts allow the moulding pieces to fit tightly together.
Set the miter saw to 45 degrees for most corners. Cut two pieces with opposite angles to join at the corner.
- Mark the corner angle on each moulding piece
- Cut one piece at 45 degrees to the left
- Cut the other piece at 45 degrees to the right
- Check the fit before attaching
Attaching The Moulding
Attaching moulding to kitchen cabinets adds a finished look. It also hides gaps and rough edges.
Use the right tools and techniques to secure the moulding firmly. This guide explains how to do it.
Applying Adhesive
Apply wood glue on the back of the moulding before placing it on the cabinet. This helps hold it tight.
Spread the glue evenly to avoid lumps. Too much glue can cause a mess and weak bonds.
- Use a small brush or glue bottle tip
- Cover the entire surface that touches the cabinet
- Wipe off any glue that squeezes out
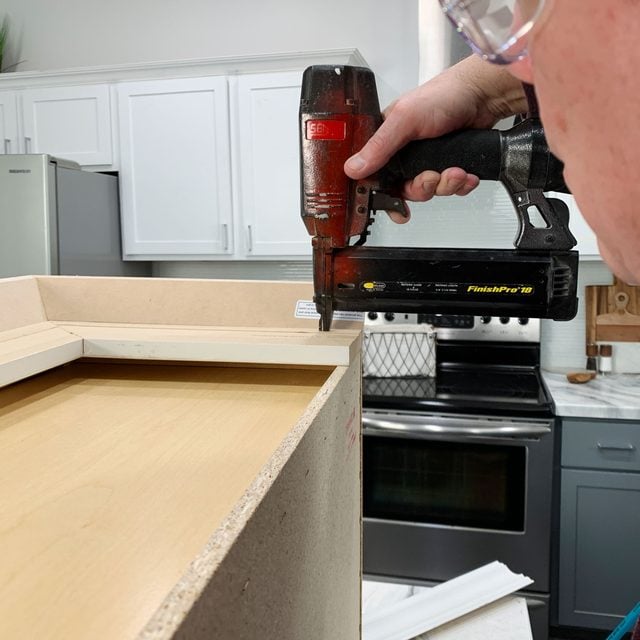
Nailing Techniques
Use finishing nails to secure the moulding to the cabinet frame. Nails keep the moulding in place while glue dries.
Drive nails at an angle for a stronger hold. Countersink nails slightly to hide them later.
- Choose nails 1 to 1.5 inches long
- Use a nail gun or hammer carefully
- Place nails about 12 inches apart
Securing With Clamps
Clamps hold the moulding tightly against the cabinet while the glue sets. This prevents gaps and shifting.
Use soft pads on clamps to avoid marks on the moulding. Leave clamps on for at least 30 minutes.
- Choose clamps that fit your moulding size
- Apply even pressure along the moulding
- Check alignment before tightening clamps fully
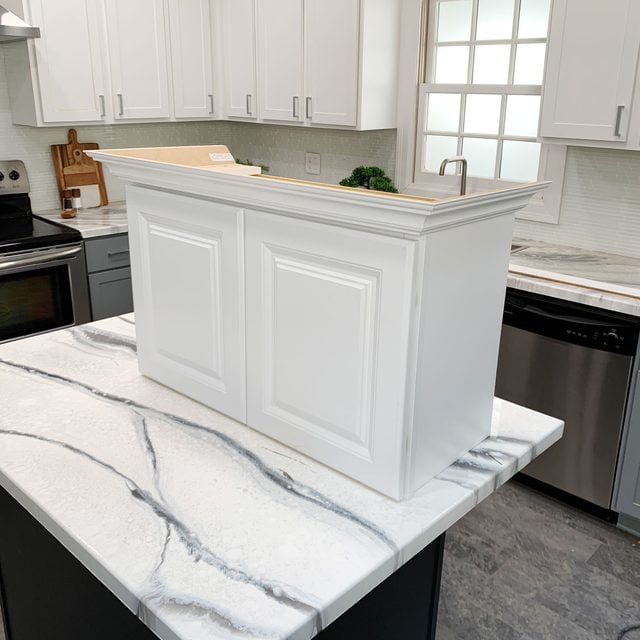
Finishing Touches
Installing moulding on kitchen cabinets adds a polished look. Finishing touches make the moulding blend perfectly.
These steps help cover gaps, smooth edges, and give a beautiful finish. Take time for each step to get great results.
Filling Gaps And Holes
Use wood filler to fill gaps and holes in the moulding. This hides nail holes and uneven spaces.
Apply the filler with a putty knife, pressing it into the gaps. Let it dry fully before moving on.
- Choose a filler close to your moulding color
- Press filler firmly into holes and cracks
- Remove excess filler with a putty knife
- Wait for the filler to dry completely
Sanding Edges
Sand the moulding edges to smooth any rough spots. This makes the surface even and ready for paint or stain.
Use fine-grit sandpaper and sand gently along the edges and filled areas. Clean off dust with a cloth after sanding.
- Use 120- to 220-grit sandpaper for best results
- Sand along the grain of the wood
- Remove all dust before painting or staining
Painting Or Staining
Choose paint or stain that matches your kitchen style. Apply evenly to protect and enhance the moulding.
Use a small brush for detailed areas. Apply thin coats and let each dry before adding more.
- Use primer before painting for better adhesion
- Apply stain with a clean cloth or brush
- Allow each coat to dry fully between applications
- Seal with a clear finish for protection
Credit: www.familyhandyman.com
Common Mistakes to Avoid
Installing moulding on kitchen cabinets can improve their look. Many people make errors that cause problems. Avoiding these mistakes saves time and money.
This guide covers common mistakes during moulding installation. Learn what to watch out for in measurements, adhesion, and safety.
Incorrect Measurements
Measuring wrong is a top error when adding moulding. If pieces are too long or short, gaps or overlaps will show.
- Always measure twice before cutting.
- Use a reliable tape measure and mark clearly.
- Account for corners and angles precisely.
- Check the cabinet surface for any uneven spots.
Poor Adhesion
Bad adhesion causes moulding to fall or peel away. The wrong glue or dirty surfaces reduce hold strength.
| Cause | Effect |
| Using weak glue | Moulding falls off quickly |
| Not cleaning cabinet surface | Glue does not stick well |
| Ignoring drying time | Moulding shifts or peels |
Use strong adhesive made for wood or trim. Clean the surface before applying glue. Let the glue dry fully before moving the cabinet.
Ignoring Safety Precautions
Ignoring safety can cause injury or damage. Power tools and sharp blades need careful handling.
- Wear safety goggles to protect eyes.
- Use gloves to avoid cuts and splinters.
- Keep fingers away from blades and saws.
- Work in a well-lit and clean area.
- Disconnect power tools when not in use.
Credit: www.familyhandyman.com
Frequently Asked Questions
What Tools Are Needed To Install Moulding On Cabinets?
You need a miter saw, measuring tape, wood glue, finishing nails, nail gun, sandpaper, and paint or stain. These tools ensure accurate cuts and secure attachment for professional results.
How Do I Measure Moulding For Kitchen Cabinets?
Measure the length of each cabinet edge where moulding will be applied. Add extra length for mitered corners to ensure precise fitting and clean joints.
Can I Install Moulding On Existing Kitchen Cabinets?
Yes, moulding can be added to existing cabinets to enhance appearance. Ensure the surface is clean and dry for proper adhesion and secure fastening.
What Type Of Moulding Is Best For Kitchen Cabinets?
Crown moulding and decorative trim are popular choices. Choose wood or MDF moulding that matches your cabinet style and paint or stain for a cohesive look.
Conclusion
Installing moulding on kitchen cabinets transforms your space beautifully. It’s a simple, rewarding project. With a few tools and some patience, you can do it. Measure carefully, cut precisely, and attach securely. Your kitchen will look amazing with added character.
Moulding enhances the overall design. Don’t rush the process. Take your time for the best results. Enjoy the satisfaction of completing this DIY task. Your efforts will pay off with stunning cabinets. Happy decorating!


