
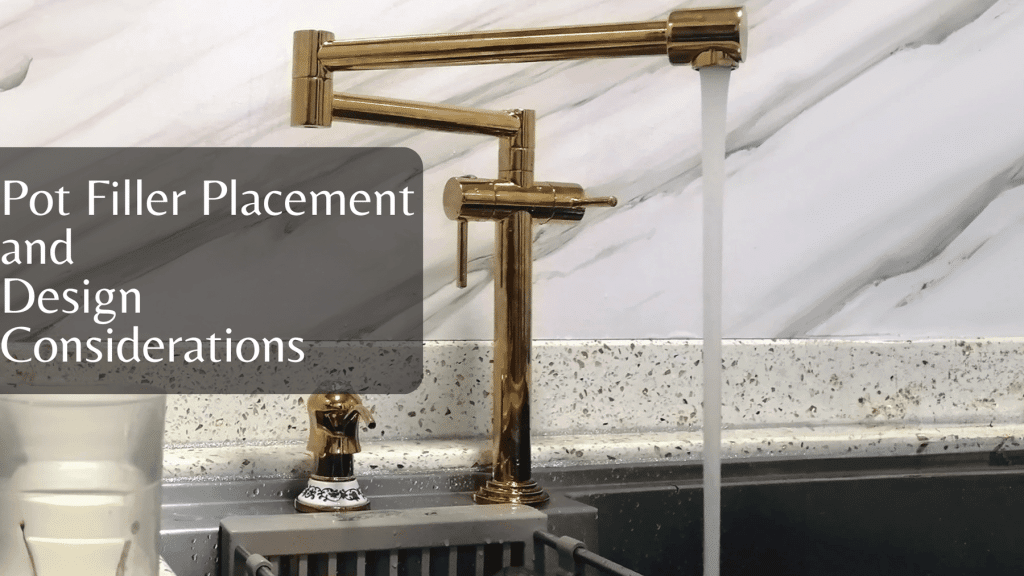
Imagine having hot water ready right at your stove, saving you trips back and forth to the sink. Installing a kitchen pot filler can make cooking easier and faster, especially when you’re handling big pots or multiple dishes.
If you’ve ever wished for this simple convenience, you’re in the right place. In this guide, you’ll learn exactly how to install a kitchen pot filler yourself—step by step, without any confusion or hassle. Ready to upgrade your kitchen and make mealtime smoother?
Let’s get started!
Benefits Of A Kitchen Pot Filler
Installing a kitchen pot filler offers many advantages. It makes cooking easier by providing water right at the stove.
This faucet adds style and helps save water in the kitchen. Let’s explore its main benefits.
Convenience In Cooking
A pot filler faucet lets you fill pots directly on the stove. This saves you from carrying heavy pots across the kitchen.
- Fill large pots without lifting
- Save time during meal prep
- Reduce spills and messes
- Keep your kitchen counters dry
Water Conservation
Pot fillers help control water use. They allow you to fill only the amount needed without wasting water.
| Feature | Benefit |
| Separate faucet at stove | Easy access to water |
| Swivel arm design | Precise filling control |
| Quick shut-off valve | Prevents water waste |
Enhanced Kitchen Aesthetics
A pot filler adds a modern look to your kitchen. It complements your sink and stove area with style and function.
- Match finish with other fixtures
- Choose a foldable arm for a neat look
- Select a sleek, minimalist style
Choosing The Right Pot Filler
Installing a kitchen pot filler can make cooking easier. You need to pick the right one for your kitchen.
Think about the materials, size, and plumbing to find the best fit. This guide helps you decide.
Material And Finish Options
Pot fillers come in different materials like brass, stainless steel, and chrome. Each material affects durability and style.
- Brass offers a classic look and is very durable.
- Stainless steel resists rust and fits modern kitchens.
- Chrome finishes look shiny and are easy to clean.
- Nickel finishes provide a softer, matte look.
Size And Reach Considerations
Measure the space above your stove to find the right size pot filler. The arm length matters for reaching pots easily.
| Arm Length | Typical Use |
| 12 inches | Small stoves or tight spaces |
| 18 inches | Standard kitchens and most pots |
| 24 inches | Large stoves or wide pots |
Compatibility With Existing Plumbing
Check your current plumbing before buying a pot filler. Most use standard water lines but some need extra work.
Here are some plumbing points to check:
- Is there a cold water supply near the stove?
- Do you need a shut-off valve for the pot filler?
- Is the water pressure suitable for the new fixture?
- Will the installation require new pipes or adapters?
Tools And Materials Needed
Installing a kitchen pot filler needs the right tools and parts. This guide lists what you need to prepare before starting the work.
Gathering these items helps the installation go smoothly and safely. Check each category carefully to avoid missing anything important.
Essential Plumbing Tools
You need some basic plumbing tools to install the pot filler correctly. These tools help you cut, fit, and seal pipes.
- Pipe wrench
- Adjustable wrench
- Pipe cutter
- Teflon tape
- Plumber’s putty
- Level tool
- Drill with bits
- Measuring tape
Safety Equipment
Safety is important when working with plumbing. Use proper safety gear to protect yourself from injury.
| Safety Item | Purpose |
| Safety glasses | Protect eyes from debris |
| Gloves | Keep hands safe and clean |
| Dust mask | Prevent inhaling dust |
| Ear protection | Reduce noise from drills |
Pot Filler Components
The pot filler comes with several parts. Make sure you have all these to complete the installation.
- Pot filler faucet
- Mounting hardware (screws, brackets)
- Supply pipe
- Shut-off valve
- Wall flange
- Pipe connectors and fittings

Credit: www.angi.com
Preparing For Installation
Installing a kitchen pot filler needs careful preparation. This helps avoid problems later.
Before starting, gather tools and understand the steps for a smooth process.
Locating The Water Supply
Find where the water supply line is under your kitchen wall. This is where the pot filler will connect.
Look for existing pipes near the stove or sink area to ensure easy access.
- Check under the kitchen sink cabinet
- Look behind the stove or countertop walls
- Use a stud finder to locate pipes inside the wall
Marking The Installation Spot
Choose a spot on the wall above your stove for the pot filler. Mark it clearly with a pencil.
Make sure the spot is near the water supply and at a good height for filling pots.
- Measure about 6 to 12 inches above the stove
- Use a level to keep your mark straight
- Mark the center point for drilling
Shutting Off Water Supply
Turn off the main water supply to avoid leaks during installation. This step is very important.
Open a nearby faucet to release any water left in the pipes before you start working.
- Locate the main water valve in your home
- Turn the valve clockwise to close it
- Open a faucet to drain the pipes
Step-by-step Installation Guide
Installing a kitchen pot filler is a smart way to add convenience to your cooking space. This guide helps you install it safely and correctly.
Follow these simple steps to mount the pot filler, connect water lines, and test the fixture for leaks.
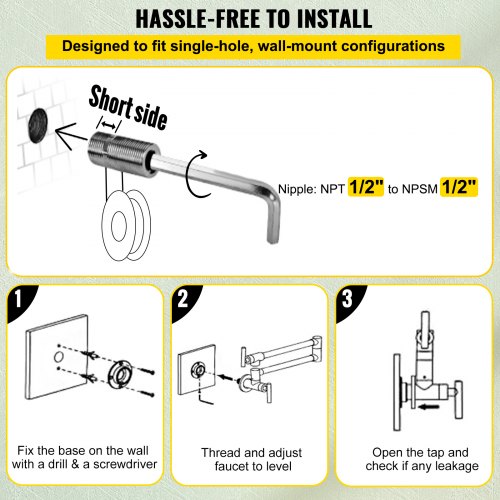
Mounting The Pot Filler
Start by choosing the right spot on the wall near your stove. Make sure the area is free from electrical wires and studs.
Mark the mounting holes on the wall using the pot filler bracket as a template. Drill holes and insert wall anchors if needed.
- Hold the bracket against the wall and mark holes
- Drill holes based on the bracket marks
- Insert anchors for extra support
- Screw the bracket securely to the wall
Connecting Water Lines
Turn off the main water supply before connecting the water lines. This prevents leaks and water damage.
Attach the hot and cold water supply lines to the pot filler’s valves. Use plumber’s tape on threads to stop leaks.
- Shut off the main water valve
- Connect supply lines to the pot filler valves
- Wrap threads with plumber’s tape
- Tighten connections with a wrench
Securing Fixtures And Testing
Once the water lines are connected, secure all parts of the pot filler. Check that the arms move smoothly.
Turn on the main water supply and test the pot filler for leaks. Open and close the faucet to confirm water flows correctly.
- Tighten all fixture screws and bolts
- Ensure the faucet arms swing freely
- Turn on water supply slowly
- Check all joints for leaks
- Operate faucet to test water flow

Credit: www.youtube.com
Common Installation Challenges
Installing a kitchen pot filler can improve your cooking space. It adds convenience by letting you fill pots right at the stove.
Some challenges come up during installation. These problems need careful attention to avoid damage and ensure the pot filler works well.
Dealing With Limited Space
Kitchen walls near the stove may have little room for a pot filler. This makes it hard to fit the plumbing and fixture.
Measure the space carefully before buying. You might need to choose a smaller model or adjust your kitchen layout slightly.
- Check for studs and pipes inside the wall
- Use flexible piping to save space
- Consider wall reinforcement for heavy fixtures
Managing Water Pressure Issues
Pot fillers need the right water pressure to work well. Too low pressure means weak flow, too high can cause leaks or damage.
Test your home’s water pressure before installation. Use a pressure regulator if the pressure is too high.
- Ideal water pressure is usually between 40 and 60 psi
- Install a pressure regulator to protect the fixture
- Check local codes for pressure requirements
Fixing Leaks
Leaks are common if connections are loose or sealed poorly. They can cause water damage and increase your bills.
Use plumber’s tape on all threaded connections. Tighten fittings carefully without overdoing it to prevent cracks.
- Inspect all joints after installation
- Replace damaged washers or seals
- Test the pot filler by turning the water on and off
Maintenance Tips For Longevity
Installing a kitchen pot filler adds convenience to your cooking space. To keep it working well, regular maintenance is important.
Proper care helps your pot filler last longer and prevents costly repairs. Follow these simple tips to maintain it.
Regular Cleaning
Clean your pot filler often to stop dirt and mineral build-up. Use a soft cloth and mild soap to wipe it.
Avoid harsh chemicals or abrasive scrubbers. They can damage the finish and parts.
- Wipe the spout and handles weekly
- Use a vinegar solution to remove mineral deposits
- Dry all parts after cleaning to prevent water spots
Checking For Leaks
Leaks can cause water waste and damage your kitchen. Check your pot filler for leaks regularly.
Look around joints and the spout for drips or moisture. Tighten fittings if needed but do not force them.
- Inspect connections monthly
- Turn on the water and watch for drips
- Call a plumber if leaks continue after tightening
Replacing Worn Parts
Over time, parts like washers and seals can wear out. Replace these parts to keep your pot filler working well.
Use parts made for your model to avoid fitting problems. Check the manufacturer’s guide for part numbers.
- Replace washers if water leaks when off
- Change seals if handles feel loose or stiff
- Keep extra parts handy for quick fixes
Credit: www.vevor.ca
Frequently Asked Questions
What Tools Are Needed To Install A Kitchen Pot Filler?
You need a drill, adjustable wrench, pipe cutter, Teflon tape, and a level. Safety gear is also recommended.
Where Should I Mount The Kitchen Pot Filler Faucet?
Mount it above the stove or near the cooking area for easy water access and convenience.
Can I Install A Pot Filler Without Professional Help?
Yes, if you have basic plumbing skills and follow instructions carefully, DIY installation is possible.
How Do I Connect The Pot Filler To Water Supply?
Shut off water, connect the pot filler to existing supply lines using proper fittings and sealants.
Conclusion
Installing a kitchen pot filler is a rewarding task. It adds convenience to your cooking area. Follow the steps carefully to ensure success. Check your tools and materials before starting. Safety first: turn off the water supply. Measure twice, cut once, and take your time.
Secure the pot filler firmly to avoid leaks. Test it after installation to ensure it works well. Enjoy the ease of filling pots right at the stove. This small upgrade makes cooking more enjoyable. Transform your kitchen with this simple addition.
Happy installing!


