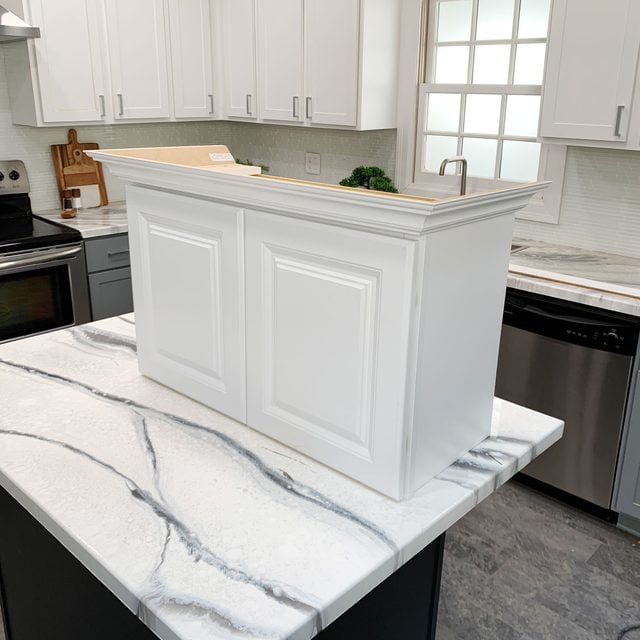
Are you ready to give your kitchen cabinets a stunning, finished look? Cutting crown moulding might seem tricky at first, but with the right steps, you can master it quickly.
Imagine the satisfaction of seeing perfectly fitted moulding that transforms your kitchen into a stylish, polished space. In this guide, you’ll learn simple, clear techniques on How to Cut Crown Moulding for Kitchen Cabinets like a pro—no confusion, no wasted materials. Keep reading, and you’ll discover tips that save time and avoid common mistakes, making your DIY project smooth and successful.
Tools And Materials Needed
Cutting crown moulding for kitchen cabinets needs the right tools. Gathering materials first makes the job easier and safer.
Below are the essential tools and safety gear you need before starting to cut crown moulding.
Essential Cutting Tools
You need precise and sturdy tools to cut crown moulding accurately. The right tools help you avoid mistakes and save time.
- Miter saw with a fine-tooth blade
- Measuring tape or ruler
- Pencil for marking cuts
- Protractor or angle finder
- Clamps to hold moulding in place
- Sandpaper or sanding block
- Wood glue and finishing nails
- Workbench or stable surface
Types Of Crown Moulding
Crown moulding comes in different shapes and sizes. Knowing your type helps choose the right cutting angles and tools.
| Type | Description | Common Use |
|---|---|---|
| Traditional | Simple curved or angled design | Classic cabinet tops |
| Ornate | Detailed patterns and carvings | Decorative kitchens |
| Modern | Sleek, straight lines | Contemporary cabinet styles |
| Flexible | Bendable moulding for curves | Rounded corners or arches |
Safety Equipment
Safety gear protects you while cutting moulding. Always wear these items to reduce injury risk.
- Safety glasses to shield your eyes
- Ear protection from loud saw noise
- Dust mask to avoid breathing wood dust
- Work gloves to protect your hands
- Close-toed shoes for foot safety
Credit: www.familyhandyman.com
Measuring Your Cabinets
Measuring your cabinets correctly is important before cutting crown moulding. Accurate measurements help you avoid mistakes and waste.
Take your time to get the exact dimensions of your cabinets. This will make fitting the moulding easier and look better.
Taking Accurate Dimensions
Start by measuring the width and height of each cabinet. Use a tape measure and write down each number clearly. Measure from edge to edge to get the full size.
- Measure the top width of the cabinet where the crown moulding will sit.
- Record the height from the top edge of the cabinet to the ceiling or upper wall.
- Check for any irregular shapes or angles on your cabinets.
- Measure inside corners and outside corners carefully.
- Double-check your numbers before cutting.
Marking Cut Lines
Mark the cut lines clearly on your crown moulding pieces. Use a pencil and a square tool to draw straight lines at the exact length.
| Cabinet Side | Measured Length (inches) | Cut Angle (degrees) |
|---|---|---|
| Left Side | 24 | 45 |
| Right Side | 24 | 45 |
| Front Side | 36 | 90 |
Use the table above as a guide to note your cut lengths and angles. This helps keep your cuts consistent and fits your cabinets well.
Choosing The Right Cutting Angles
Cutting crown moulding for kitchen cabinets requires precise angles. Picking the correct angles helps the pieces fit well.
This guide covers inside and outside corners and common angle settings to make cutting easier.
Inside Vs Outside Corners
Inside corners are where two walls meet to form an inward angle. Outside corners are where the moulding wraps around an outward edge.
Each type needs a different cutting method. Inside corners usually require coping or miter cuts angled to fit tightly. Outside corners need precise miter cuts that meet perfectly around the corner.
- Inside corners: Cut at an angle that fits the inner corner, often 45° or less.
- Outside corners: Cut at angles that wrap the outside edge smoothly.
- Use a miter saw to set the correct angle for each corner type.
Common Angle Settings
Most kitchen cabinet corners have standard angles. The most common are 90-degree corners, but some kitchens use 135-degree or other angles.
| Corner Type | Wall Angle | Miter Saw Angle | Notes |
|---|---|---|---|
| Inside Corner | 90° | 45° | Cut one piece with a coping saw or both at 45° miter |
| Outside Corner | 90° | 45° | Cut both pieces at 45° to wrap around corner |
| Inside Corner | 135° | 67.5° | Adjust saw to half of wall angle |
| Outside Corner | 135° | 67.5° | Same as inside but on opposite direction |
Cutting Crown Moulding Pieces
Cutting crown moulding for kitchen cabinets needs careful work. Proper cuts help the moulding fit tightly and look neat.
This guide explains how to set up your miter saw and make precise cuts for the best results.
Setting Up The Miter Saw
Start by adjusting the miter saw angle to match the crown moulding's angle. Most crown mouldings need a 45-degree cut, but check your moulding’s profile first.
- Place the moulding upside down on the saw fence.
- Set the saw blade to the correct angle.
- Secure the moulding to avoid movement.
- Test the angle with a scrap piece before cutting the real moulding.
Making Precise Cuts
Use slow and steady saw movements to avoid splintering. Measure twice and cut once to reduce errors.
| Tip | Details |
|---|---|
| Measure | Double-check lengths before cutting each piece. |
| Mark | Use a pencil to mark cut lines clearly on the moulding. |
| Support | Hold the moulding firmly to prevent slipping. |
| Cut | Make smooth, even cuts with the saw blade. |
| Check | Fit pieces together before final installation. |
Fitting And Adjusting Moulding
Fitting crown moulding around kitchen cabinets takes care and patience. Each piece must fit tightly to avoid gaps and uneven joints.
Dry fitting helps you check the shape and length before final installation. Adjustments often improve the overall look and alignment.
Dry Fitting Pieces
Place each crown moulding piece against the cabinets without glue or nails. This step shows if the angles and lengths are correct.
- Check corners for tight seams
- Ensure moulding follows cabinet edges closely
- Look for any gaps or uneven spots
- Mark problem areas with a pencil
- Make note of pieces needing trimming or sanding
Trimming For A Perfect Fit
Trim moulding edges carefully to remove small gaps. Use a miter saw or sanding block for smooth cuts.
| Tool | Use | Tip |
| Miter Saw | Cut angles precisely | Double-check angle before cutting |
| Sanding Block | Fine-tune edges | Sand gently to avoid damage |
| Utility Knife | Score paint or small adjustments | Use with light pressure |

Credit: www.thisoldhouse.com
Installing Crown Moulding
Installing crown moulding on kitchen cabinets gives a polished look. It adds style and hides gaps between cabinets and walls.
Proper installation needs careful measuring and secure attachment. This guide covers how to fasten moulding and finish seams.
Securing To Cabinets
Attach the crown moulding firmly to cabinets for a lasting hold. Use the right tools and follow these tips for best results.
- Measure the length of the cabinet tops carefully.
- Cut the moulding pieces to size with precise angles.
- Apply wood glue to the back of the moulding for extra grip.
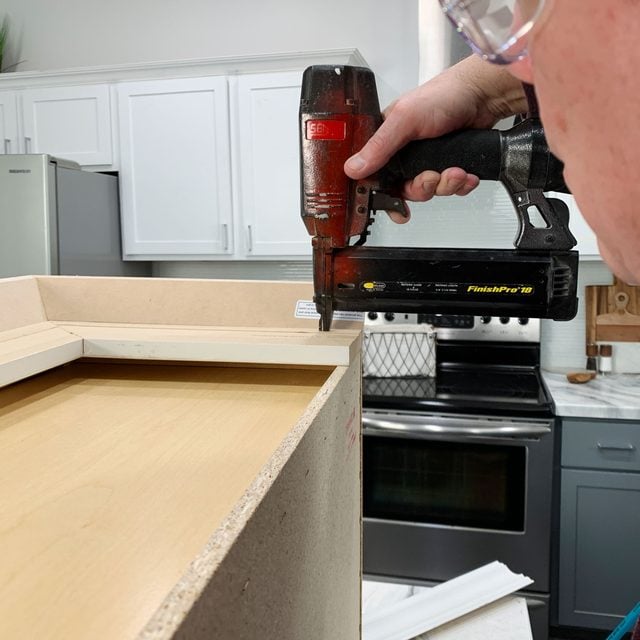
- Use a nail gun or finish nails to fasten the moulding to the cabinet frame.
- Check that all pieces fit tightly and adjust if needed.
Filling Gaps And Seams
Gaps and seams can appear after installation. Filling them creates a smooth, seamless look on your kitchen cabinets.
| Material | Use | Tip |
| Caulk | Fill small gaps between moulding and wall | Choose paintable caulk for easy finishing |
| Wood filler | Fill nail holes and seams | Sand smooth before painting |
| Painter's tape | Protect cabinet surfaces during filling | Remove tape before filler dries |
Finishing Touches
Cutting crown moulding is just the start. Finishing touches make it look perfect. Proper sanding, painting, and cleaning improve your kitchen cabinets’ final look.
These steps help your work last longer and look neat. Take time to finish carefully for the best results.
Sanding And Painting
After cutting, sanding smooths out rough edges. Use fine-grit sandpaper to avoid damage. Sand all surfaces that will show.
Painting protects the wood and gives a clean look. Apply paint evenly with a brush or spray. Let each coat dry before adding another.
- Sand with 120 to 220 grit sandpaper
- Remove dust before painting
- Use primer for better paint adhesion
- Apply thin, even paint coats
- Allow full drying time between coats
Cleaning Up The Workspace
Cleaning your workspace keeps the area safe and organized. Remove sawdust and scrap pieces after finishing your cuts.
Clean tools and store materials properly. This helps you work faster next time and keeps your kitchen neat.
- Sweep or vacuum sawdust regularly
- Wipe down surfaces with a damp cloth
- Store unused moulding pieces safely
- Keep tools in their proper place
- Dispose of scraps and trash properly
Credit: www.familyhandyman.com
Frequently Asked Questions
How Do You Measure Crown Moulding For Cabinets?
Measure the cabinet width and height accurately. Add extra length for angled cuts. Use a protractor for precise corner angles.
What Tools Are Needed To Cut Crown Moulding?
You need a miter saw, measuring tape, protractor, pencil, and safety glasses. These tools ensure accurate and safe cuts.
How Do You Make Inside Corner Cuts For Crown Moulding?
Set the miter saw to 45 degrees. Cut the moulding upside down for accuracy. Test fit before final installation.
Can You Cut Crown Moulding Without A Miter Saw?
Yes, but it’s harder. Use a handsaw and miter box for straight cuts. Accuracy might decrease without power tools.
Conclusion
Cutting crown moulding for kitchen cabinets can seem challenging. But with practice, it becomes easier. Follow the steps carefully. Use the right tools. Measure twice, cut once. Patience is key. This ensures a neat finish. Your kitchen will look polished and stylish.
Remember, precision matters. A small mistake can affect the look. So, take your time. Practice on scrap pieces first. This builds confidence. Soon, you'll see great results. Your kitchen will have a professional touch. Enjoy the process and the transformation.
Happy woodworking!