
Are you tired of that annoying leak under your kitchen sink? Or perhaps you’re dealing with a stubborn, clogged drain that just won’t cooperate?
If so, you’re not alone. The kitchen sink drain basket, though often overlooked, plays a crucial role in your daily kitchen routine. When it starts to malfunction, it can quickly become a source of frustration. But don’t worry—learning how to change kitchen sink drain basket is easier than you might think.
Imagine the satisfaction of knowing that you fixed it yourself, saving time and money. In this guide, you’ll discover a step-by-step process to replace that troublesome drain basket, and you’ll do it with confidence. Whether you’re a DIY newbie or a seasoned home repair enthusiast, this task is within your reach. So grab your tools and let’s transform your kitchen into a space where everything flows smoothly again. Dive into the details below and reclaim your kitchen’s functionality today!

Credit: www.youtube.com
Tools And Materials Needed
Changing a kitchen sink drain basket requires some basic tools and materials. Having everything ready makes the job easier and faster.
This guide lists common tools and materials used for this simple plumbing task.
Adjustable Wrench
An adjustable wrench helps loosen and tighten nuts under the sink. It fits different sizes of bolts and nuts.
Using the right wrench size prevents damage to plumbing parts.
Bucket Or Container
A bucket catches water that may spill when removing the old drain basket. It keeps the area clean and dry.
Place the bucket under the sink drain before starting the work.
Plumber’s Putty
Plumber’s putty seals the drain basket to prevent leaks. It creates a watertight barrier between the sink and basket.
Apply a thin ring of putty around the drain opening before installing the new basket.
Screwdriver
A screwdriver helps remove or tighten screws on the drain assembly. Use a flathead or Phillips screwdriver depending on the screws.
Keep the screws safe to reuse them if needed.
Replacement Drain Basket
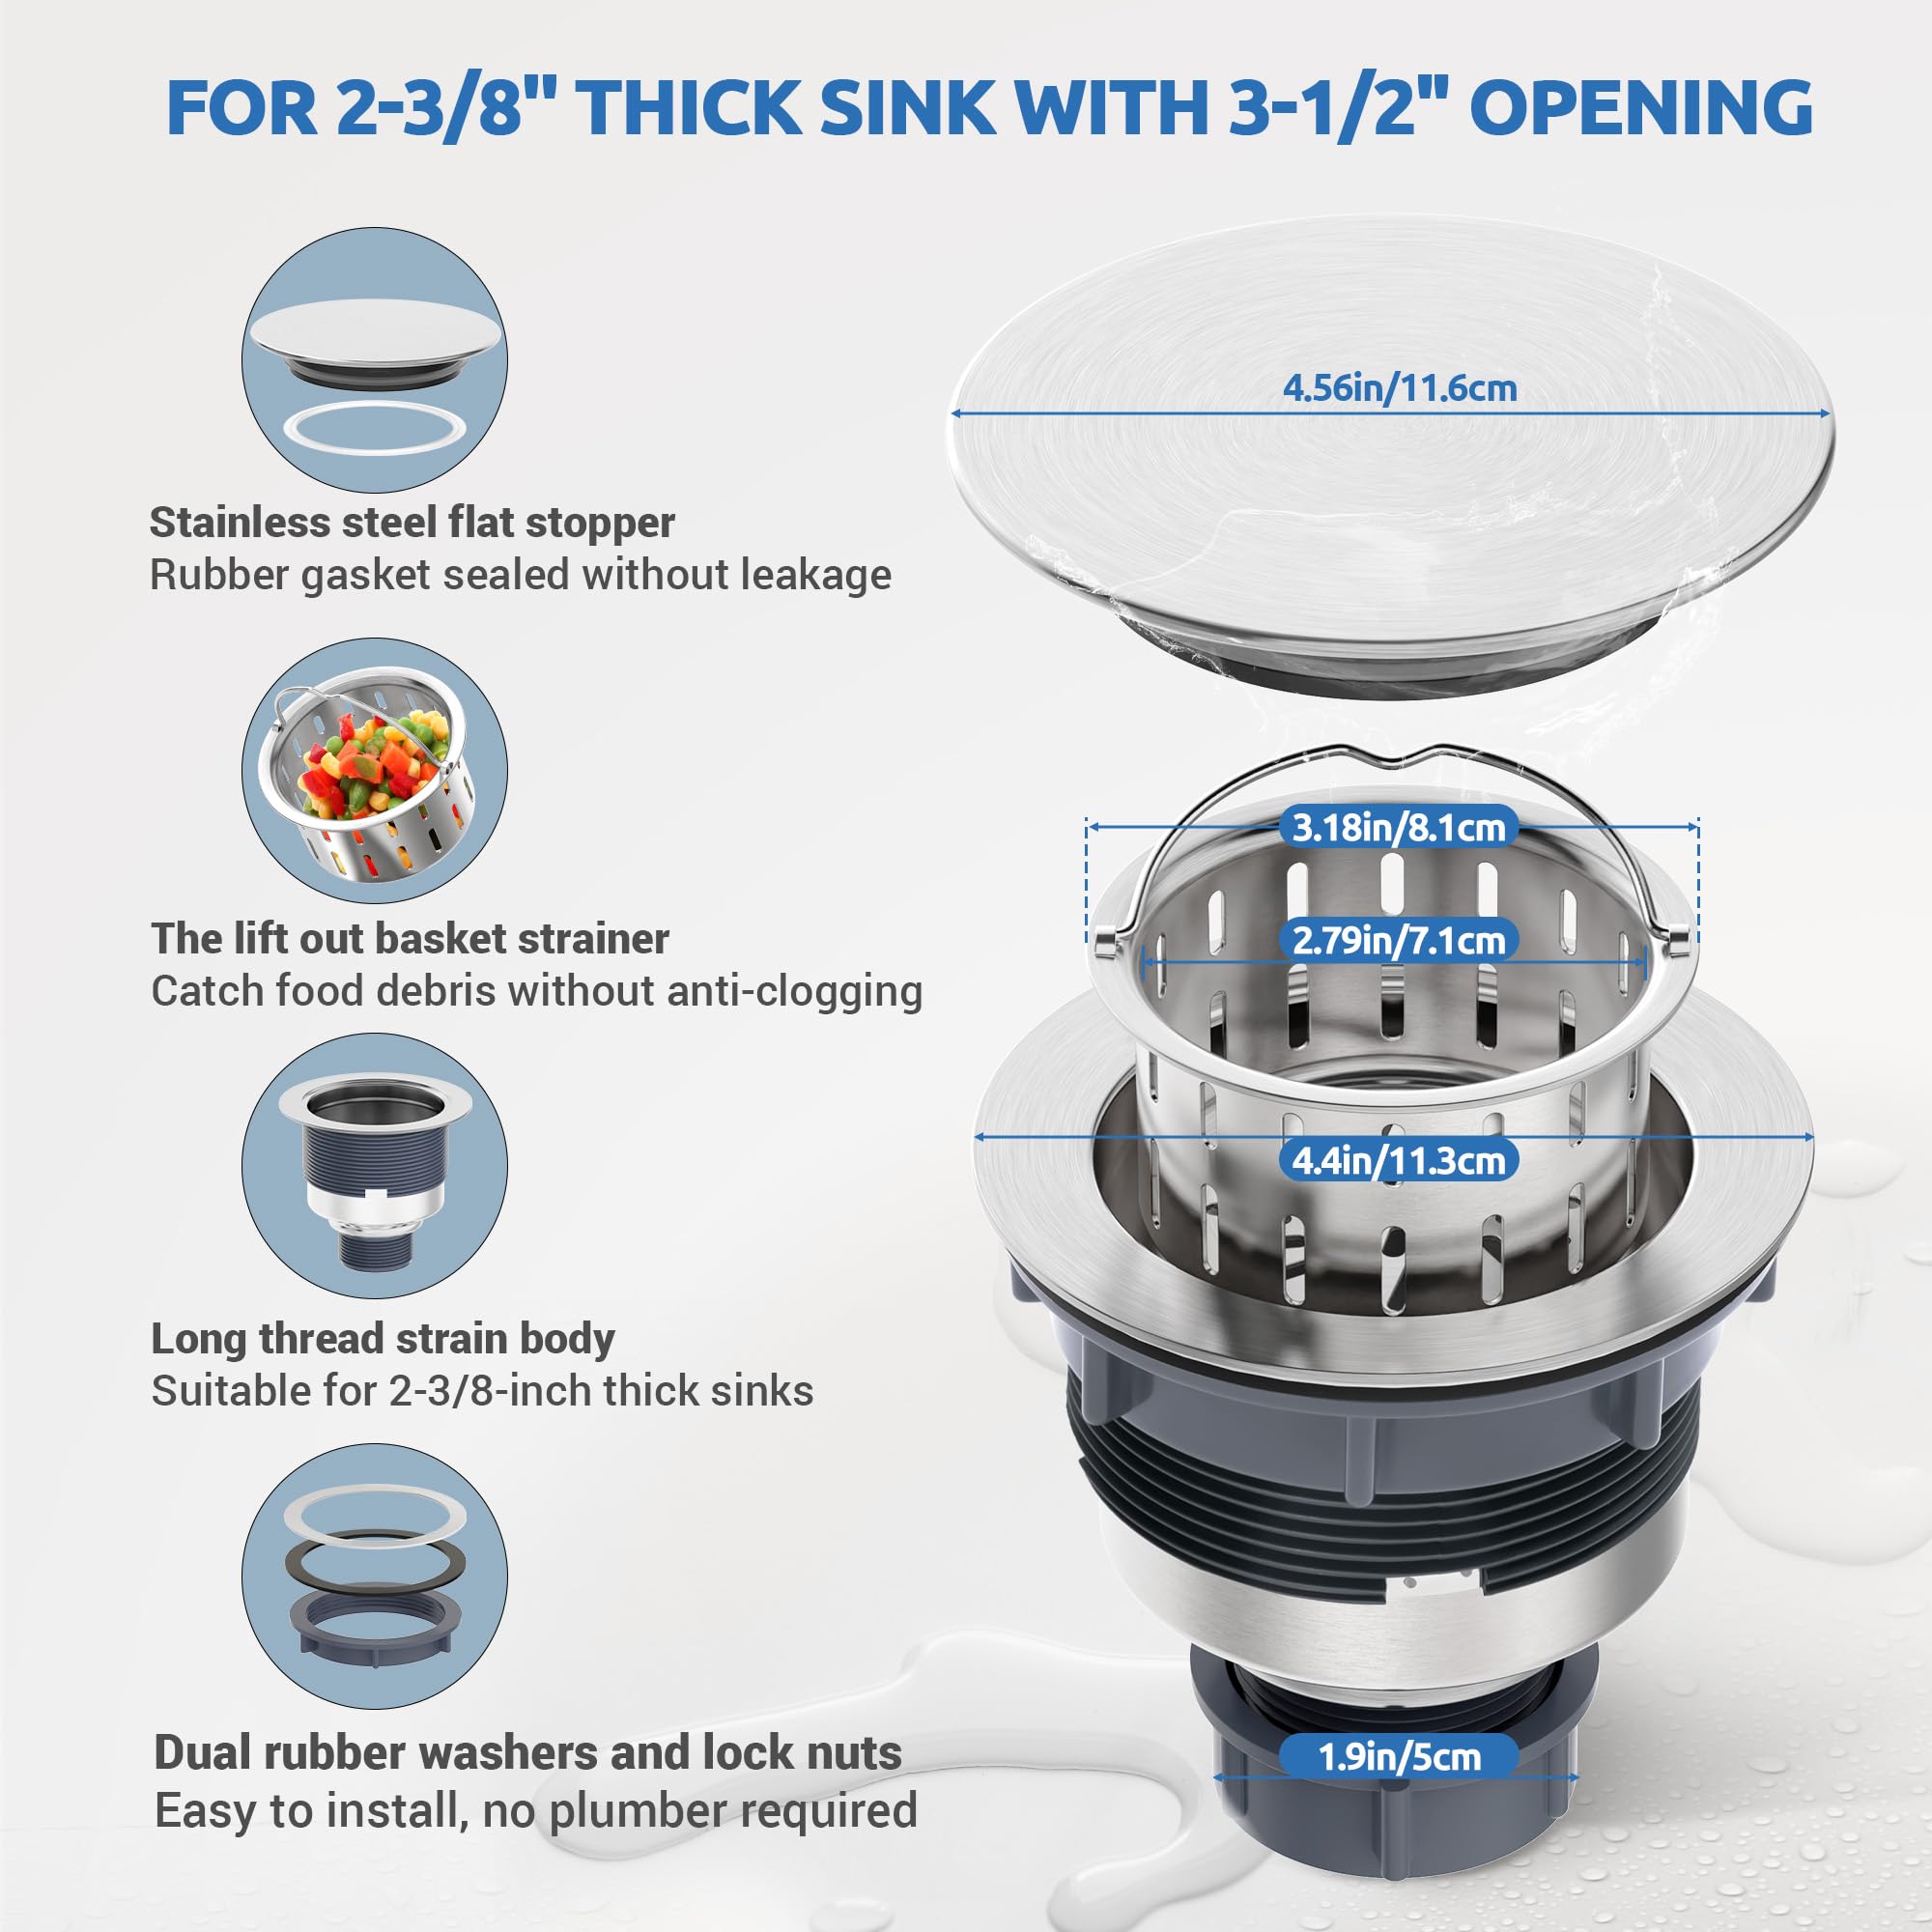
Choose a drain basket that fits your sink size and style. The new basket replaces the old, worn-out one.
Check the product details to ensure compatibility with your sink.
Cleaning Cloth
A clean cloth helps wipe away old putty and dirt from the sink drain area. It ensures a smooth surface for the new drain basket.
Use the cloth to dry the area before installing the new basket.

Credit: www.familyhandyman.com
Preparing The Sink Area
Before changing your kitchen sink drain basket, you need to prepare the sink area. Proper preparation makes the task safer and easier.
Start by focusing on two key steps: turning off the water supply and clearing the area under the sink.
Turn Off Water Supply
Turning off the water supply prevents leaks and water damage while you work. Locate the shut-off valves below the sink or the main water valve.
- Find the cold and hot water valves under the sink.
- Turn each valve clockwise to close it.
- Open the faucet to drain any remaining water.
- Check that no water flows from the faucet.
Clear The Area Under The Sink
Clearing the area under the sink gives you enough space to work comfortably. Remove any stored items and clean the space.
| Item | Reason to Remove |
| Cleaning supplies | Prevent spills and allow space |
| Trash bins | Free up room for tools |
| Food storage | Avoid contamination risk |
Removing The Old Drain Basket
Changing a kitchen sink drain basket helps keep your sink clean and working well. Removing the old basket is the first step. It is important to do it carefully to avoid damage.
This guide explains how to remove the old drain basket in three clear parts. Follow each to make the process easy and safe.
Disconnect The Drain Pipes
Before removing the drain basket, turn off the water supply. Then, disconnect the drain pipes under the sink. This gives you clear access to the basket.
Use a bucket to catch any water left in the pipes. Loosen the slip nuts by hand or with pliers. Carefully remove the pipes from the drain.
- Turn off water supply
- Place a bucket under pipes
- Loosen slip nuts on drain pipes
- Remove pipes carefully
Loosen The Locknut
The drain basket is held by a locknut under the sink. Use a wrench or pliers to turn the locknut counterclockwise. This loosens the basket from the sink.
Be gentle to avoid scratching or bending the sink. If the locknut is stuck, apply some penetrating oil and wait a few minutes before trying again.
- Find the locknut under the drain
- Use wrench to turn it counterclockwise
- Apply penetrating oil if stuck
- Remove locknut carefully
Lift Out The Old Basket
Once the locknut is loose, lift the old drain basket from the sink drain hole. It may need a little wiggling to come free. Clean the area under the sink after removing it.
Check the sink hole for any old putty or debris. Remove any leftover material before installing the new drain basket.
- Lift the basket from the drain hole
- Wiggle gently if it is stuck
- Clean the sink hole and surrounding area
- Remove old putty and debris
Cleaning The Sink Drain Opening
Cleaning the sink drain opening is important before changing the drain basket. A clean drain helps the new basket fit well and stops leaks.
Removing dirt and grime from the drain opening also prevents bad smells. It makes the whole process easier and cleaner.
Remove Any Debris From The Drain
Start by clearing out any food or debris inside the drain opening. Use gloves to keep your hands clean.
You can use a small brush or a cloth to wipe away the loose dirt carefully.
Scrub The Drain Opening
Apply a mild cleaning solution or dish soap around the drain opening. Scrub gently with a brush to remove grime and buildup.
Rinse well with warm water to wash away soap and loosened dirt before drying the area.
Check For Any Damage Or Old Sealant
Look closely at the drain opening for cracks or worn-out sealant. Old sealant can stop the new basket from fitting tightly.
Remove any old sealant with a putty knife or scraper. Clean the surface again before installing the new drain basket.
Installing The New Drain Basket
Replacing a kitchen sink drain basket is a simple task you can do yourself. Installing the new basket correctly stops leaks and keeps water flowing well.
Follow these steps carefully to ensure a tight fit and a clean finish under your sink.
Apply Plumber’s Putty
Plumber’s putty creates a watertight seal between the sink and the drain basket. Roll a small amount into a rope shape before placing it.
Press the putty around the drain opening on the sink. Make sure it covers the entire edge evenly.
Position The New Basket
Place the drain basket into the sink’s drain hole. Press it down firmly to spread the putty and seal the area.
Check that the basket sits flat and is aligned properly before moving to the next step.
Secure The Locknut
Under the sink, screw the locknut onto the drain basket’s threaded section. Tighten it by hand first.
Use a wrench to make it snug. Do not overtighten to avoid damaging the sink or basket.
- Hand-tighten the locknut
- Use a wrench for final tightening
- Check for leaks after installation
Reconnecting The Drain Pipes
Reconnecting the drain pipes is a key part of changing your kitchen sink drain basket. This step ensures water flows correctly and prevents leaks.
You will need to carefully join the pipes back together after replacing the basket. Follow these simple instructions to do it right.
Prepare The Pipes And Fittings
Before reconnecting, clean all pipe ends and fittings. Remove any old plumber’s putty, dirt, or debris. Check for cracks or damage that might cause leaks.
Attach The Drain Basket Tailpiece
First, screw the drain basket tailpiece onto the new drain basket. Hand-tighten it, then use a wrench to secure it gently. Avoid overtightening to prevent damage.
Connect The Trap And Drain Pipes
The drain trap connects the tailpiece to the house drain pipe. Align the trap and slide it onto the tailpiece. Use slip nuts and washers to secure the connection.
- Place a washer inside the slip nut
- Slide the nut and washer over the pipe end
- Push the trap firmly against the tailpiece
- Hand-tighten the slip nut to seal the joint
Check For Proper Alignment
Make sure all pipes are straight and aligned. Misaligned pipes can cause leaks or slow drainage. Adjust the trap or pipes as needed before tightening all fittings.
Tighten All Connections Securely
| Connection | Tool Needed | Tightening Tip |
| Tailpiece to Drain Basket | Adjustable Wrench | Firm but not too tight |
| Slip Nuts on Trap | Hand Tightening | Tighten evenly to prevent leaks |
| Trap to Drain Pipe | Hand Tightening | Check alignment before final tightening |
Test The Drain For Leaks
Turn on the water and watch the connections closely. Look for drips or moisture. If you see leaks, tighten the fittings carefully until the leak stops.
Testing For Leaks
After you change the kitchen sink drain basket, it is important to check for leaks. Leaks can cause water damage under your sink. Testing helps you find and fix leaks early.
Two key steps help you test for leaks: running water through the sink and checking all connections. Follow these steps carefully for a safe kitchen.
Run Water Through The Sink
Turn on the faucet and let the water run for a few minutes. Use both hot and cold water to test the drain basket fully. Watch under the sink carefully.
- Run cold water for 2–3 minutes.
- Switch to hot water and run for 2–3 minutes.
- Look for any dripping or wet spots.
- Feel around the drain basket and pipes for moisture.
Check All Connections
Check every joint and connection under the sink. Tighten any loose nuts. Use a flashlight to see hard-to-reach areas.
| Connection | What to Check | Action if Leak Found |
| Drain Basket | Seals and gaskets | Replace or reseat gasket |
| Tailpiece | Slip nuts tightness | Tighten slip nuts |
| P-Trap | Joints and washers | Replace washers or tighten joints |
| Water Supply Lines | Fittings and valves | Tighten fittings or replace damaged parts |
Maintenance Tips For Drain Baskets
Drain baskets help catch food and debris in your kitchen sink. Keeping them clean stops clogs and bad smells.
Regular care makes your drain basket last longer and keeps your sink working well.
Clean The Drain Basket Often
Remove the drain basket from the sink. Wash it with warm water and soap to remove grease and food scraps.
Use a small brush or old toothbrush to clean hard-to-reach areas. Rinse well before placing it back.
Check For Damage Or Rust
Look at the drain basket for cracks, bends, or rust spots. Damaged baskets can cause leaks or block water flow.
Replace the drain basket if you see signs of wear. A good basket keeps your sink safe and clean.
Avoid Pouring Grease Down The Drain
Grease can stick to the drain basket and pipes. This buildup causes slow drainage and clogs.
Let grease cool and throw it in the trash instead of the sink. This keeps your drain basket cleaner.
Use Baking Soda And Vinegar For Deep Cleaning
Pour baking soda into the drain basket, then add vinegar. Let it fizz for 10 minutes to remove odors and buildup.
Rinse with hot water to clear away loosened dirt. This natural method keeps the basket fresh and clean.
Remove The Basket Carefully When Changing
Turn off the water supply before removing the drain basket. Use tools gently to avoid damaging sink parts.
Clean the sink opening and check the seal before installing a new basket. This prevents leaks and ensures a good fit.
Credit: www.amazon.ca
Frequently Asked Questions
How Do I Remove A Kitchen Sink Drain Basket?
To remove the drain basket, first turn off the water supply. Use pliers to loosen the locknut beneath the sink. Then, unscrew and lift the old drain basket out carefully without damaging the sink surface.
What Tools Are Needed To Change A Drain Basket?
You typically need pliers, a wrench, plumber’s putty, and a bucket. These tools help loosen fittings, seal the new basket, and catch any water spills.
How To Prevent Leaks When Installing A New Drain Basket?
Apply plumber’s putty around the drain basket’s flange before placing it. Tighten the locknut securely but avoid over-tightening. Check for leaks by running water after installation.
Can I Change The Drain Basket Without A Plumber?
Yes, changing the drain basket is a DIY task with basic tools. Follow the step-by-step guide carefully, and ensure proper sealing to avoid leaks.
Conclusion
Changing your kitchen sink drain basket can save time and money. Follow each step carefully for best results. Use the right tools and avoid rushing the process. Check for leaks once the new basket is in place. Regular maintenance helps keep your sink working well.
Small fixes like this improve your kitchen’s function. You can do this yourself with patience and care. A simple task, but it makes a big difference. Try it and see how easy it can be.


