Wondering how to bake a rainbow layer cake? It’s easier than you think—and the results are as stunning as they are delicious.
Have you ever wanted to add a splash of color to your baking? A rainbow layer cake might just be the perfect way to do it!
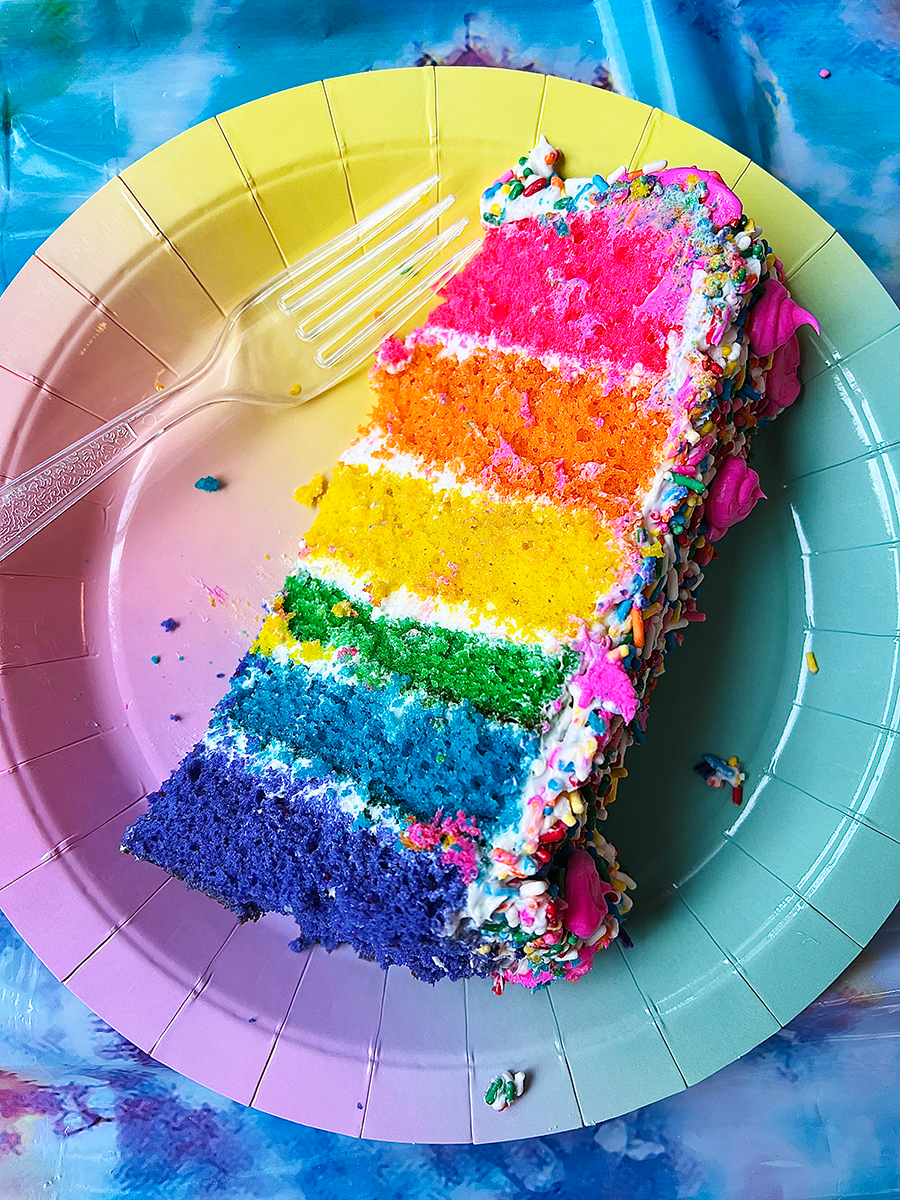
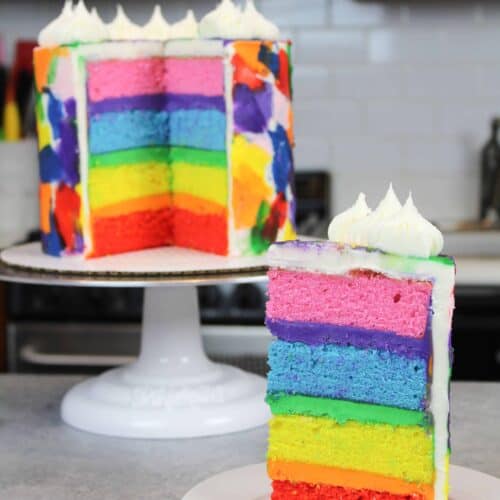
Imagine slicing into a cake to reveal vibrant, colorful layers that bring smiles to everyone’s faces. It's not just a treat for the taste buds but a feast for the eyes too. In this guide, you'll discover how simple it can be to create this masterpiece in your own kitchen.
Whether it's for a birthday, a special celebration, or just because, this rainbow cake is sure to impress. Stick around, and you’ll learn all the tips and tricks to bake a stunning cake that looks like it came straight from a bakery. Your next baking adventure is just a few steps away, and the rewards are as sweet as they are colorful.

Credit: bakingwithblondie.com
Choosing The Right Ingredients
Picking good ingredients is key for a colorful and tasty rainbow layer cake. Each choice affects the cake's texture, color, and flavor.
This guide covers how to select cake flour, food coloring, butter, and sugar for the best results.
Selecting Cake Flour
Cake flour has less protein than all-purpose flour. This makes your cake soft and light. It helps layers rise evenly and stay tender.
Look for cake flour labeled as "soft" or "fine." Avoid using bread flour or whole wheat flour for this recipe.
Picking Food Coloring
Choose food coloring that gives bright, true colors without changing the batter's texture. Gel and paste colors work well because they are strong and need less liquid.
- Gel colors: concentrated and less messy
- Paste colors: very rich, great for vivid layers
- Liquid colors: easy to find but may thin the batter
- Natural colors: made from plants but may be less bright
Best Butter And Sugar
| Ingredient | Type | Why It Works |
|---|---|---|
| Butter | Unsalted | Controls salt level and adds rich flavor |
| Butter | Salted | May add unwanted saltiness, avoid if possible |
| Sugar | Granulated | Dissolves well and helps cake rise |
| Sugar | Confectioners' | Too fine for this cake, avoid use |

Credit: www.youtube.com
Preparing The Batter
Making a rainbow layer cake starts with preparing the batter well. Good batter creates soft and colorful cake layers.
Follow simple steps to measure, mix, and color the batter for the best results.
Measuring Ingredients Accurately
Accurate measuring helps the cake bake evenly and taste great. Use the right tools for each ingredient.
Dry ingredients like flour and sugar need dry measuring cups. Liquids need liquid measuring cups or spoons.
- Level off dry ingredients with a flat edge
- Fill liquid cups to the right line at eye level
- Use teaspoons and tablespoons for small amounts
Mixing Techniques For Fluffy Cake
Mixing the batter the right way makes the cake light and soft. Avoid overmixing to keep air in the batter.
Start by creaming butter and sugar until fluffy. Add eggs one at a time and mix well. Then add dry and wet ingredients alternately.
- Cream butter and sugar for 3-5 minutes
- Add eggs slowly to keep batter smooth
- Mix dry and wet ingredients in parts
- Stop mixing as soon as ingredients combine
Dividing And Coloring The Batter
To make colorful layers, divide the batter evenly into bowls. Use a spoon or scale for equal parts.
Add a few drops of food coloring to each bowl. Stir gently to spread the color without overmixing.
- Use separate bowls for each color
- Add food coloring drop by drop
- Mix gently for even color
- Use bright colors for clear layers
Baking Each Layer
Baking each layer of a rainbow cake takes care and patience. Each colored layer needs even heat and proper timing. This guide helps you bake perfect layers for a bright and tasty cake.
Follow the tips below to set your oven, time the baking well, and cool the layers before stacking. These steps keep your cake smooth and colorful.
Setting Oven Temperature
Set your oven to 350°F (175°C) for baking rainbow cake layers. This temperature cooks the cake evenly without drying it out. Preheat the oven before placing the pans inside.
Use an oven thermometer to check if your oven runs hot or cold. Adjust the temperature accordingly to keep layers consistent in texture and color.
Baking Time Tips
Each cake layer usually bakes in about 12 to 15 minutes. Watch closely because thinner layers cook faster. Insert a toothpick in the center; if it comes out clean, the layer is done.
- Fill each pan with batter evenly for uniform layers.
- Place pans in the center of the oven racks.
- Check layers at 12 minutes to avoid overbaking.
- Remove layers as soon as a toothpick comes out clean.
- Let layers cool in pans for 5 minutes before removing.
Cooling Layers Properly
| Cooling Method | Time Needed | Purpose |
|---|---|---|
| In the pan | 5 minutes | Helps layers firm up for easy removal |
| On wire rack | 30 minutes | Allows air to circulate and cool layers fully |
| Refrigerate (optional) | 15 minutes | Chills layers for easier frosting and stacking |
After baking, cool the layers first in their pans. Then move them to a wire rack. Cooling stops baking and keeps layers moist and soft.
Making The Frosting
Frosting is important for a rainbow layer cake. It adds taste and holds the layers together.
Making frosting can be simple if you know the right steps. This guide helps you make perfect frosting.
Choosing The Frosting Type
Pick a frosting that suits your cake. Common types include buttercream, cream cheese, and whipped cream.
Buttercream is sweet and smooth. Cream cheese is tangy and soft. Whipped cream is light and fluffy.
- Buttercream: easy to color and spread
- Cream cheese: adds a slight tang
- Whipped cream: best for a lighter taste
Whipping The Frosting
Whip the frosting until it is light and fluffy. Use a hand mixer or stand mixer for best results.
Start slow, then increase speed. Stop when stiff peaks form. Do not overwhip or it will break.
- Use cold ingredients for cream cheese or whipped cream
- Mix buttercream at room temperature
- Check texture often to avoid overmixing
Adding Flavor And Color
Add flavor using extracts like vanilla, almond, or lemon. Use a small amount to keep balance.
Mix gel food coloring for bright colors. Avoid liquid colors to keep frosting thick.
- Start with a little color, add more if needed
- Mix colors well for even shade
- Use natural flavors for a mild taste
Assembling The Cake
After baking the colorful layers, it is time to put them together. Assembling the cake carefully helps it look beautiful and taste great.
Follow these steps to make sure your rainbow layer cake stands tall and looks smooth.
Leveling The Layers
Each cake layer may have a dome on top. Leveling means cutting off this dome to make the layer flat. This helps the cake stack evenly.
Use a serrated knife or cake leveler to trim the tops carefully. Keep the layers even in height for a stable cake.
- Place the cake layer on a flat surface.
- Hold a serrated knife horizontally.
- Cut off the dome in a smooth, gentle motion.
- Repeat for all layers before stacking.
Stacking With Frosting
Place the first layer on your cake board or plate. Spread a thick, even layer of frosting on top. This helps the layers stick together.
Continue stacking the layers, adding frosting between each one. Press layers gently to secure but do not squish the cake.
- Start with the bottom layer on a sturdy surface.
- Use an offset spatula to spread frosting evenly.
- Add the next layer and press lightly.
- Repeat until all layers are stacked.
Smoothing And Decorating
After stacking, cover the whole cake with a thin layer of frosting. This is the crumb coat that traps crumbs and smooths the surface.
Chill the cake briefly to set the crumb coat. Then add a final smooth layer of frosting and decorate as you like.
- Apply a thin crumb coat over the cake.
- Use a bench scraper to smooth sides and top.
- Chill the cake for 15-30 minutes.
- Add the final frosting layer and decorate.
Serving And Storing
Serving a rainbow layer cake is a joyful moment. Proper storing keeps it fresh for days.
Learn how to cut the cake for the best look. Also, find tips to store leftovers safely.
Cutting For Best Presentation
Cut the cake with a sharp knife for clean slices. Warm the knife in hot water before cutting.
- Use a long, sharp knife.
- Warm the knife under hot water, then dry it.
- Cut slowly and gently through all layers.
- Wipe the knife clean between cuts.
- Cut slices about 2 inches wide for a nice serving size.
Storing Leftovers
Keep leftover cake fresh by wrapping it well. Store it in the fridge or freezer depending on how long you want to keep it.
| Storage Method | How to Store | Storage Time |
| Room Temperature | Cover with cake dome or wrap in plastic wrap | 1-2 days |
| Refrigerator | Wrap in plastic wrap and place in airtight container | Up to 5 days |
| Freezer | Wrap in plastic wrap and foil, then freeze in airtight container | Up to 3 months |
Tips For Freshness
- Bring chilled cake to room temperature before serving.
- Keep cake covered to avoid drying out.
- Avoid storing cake near strong-smelling foods.
- Use airtight containers for best moisture retention.
- Freeze extra slices if you do not plan to eat soon.
Troubleshooting Common Issues
Baking a rainbow layer cake can be fun but tricky. Some common problems may happen during baking or decorating.
Knowing how to fix these issues helps you get a beautiful and tasty cake every time.
Fixing Dry Layers
Dry cake layers happen when the batter bakes too long or the oven is too hot. This makes the cake crumb hard and crumbly.
Use simple tips to keep layers moist and soft for a better cake experience.
- Check oven temperature with a thermometer to avoid overheating.
- Use a timer and test cakes early with a toothpick for doneness.
- Add a little sour cream or yogurt to your batter for extra moisture.
- Brush layers with simple syrup after baking to add moisture.
Preventing Color Bleed
Color bleed makes your rainbow layers mix and look messy. It happens when wet batter or frosting touches the colors.
Follow these tips to keep each color bright and separate.
- Use gel food coloring for vibrant and thicker colors.
- Pour batter carefully to avoid mixing layers.
- Chill each layer in the fridge before adding the next one.
- Apply a thin crumb coat frosting to seal in colors before final icing.
Avoiding Cracked Frosting
Cracked frosting looks rough and dry. It happens if the frosting dries too fast or the cake is too cold.
Use these tips to keep frosting smooth and fresh-looking.
- Apply frosting at room temperature, not too cold or hot.
- Use a smooth spatula and work gently when spreading frosting.
- Add a little milk or cream to frosting if it feels too thick.
- Store the cake in a cool place, but avoid the fridge for long times.
Credit: chelsweets.com
Frequently Asked Questions
How Do You Create Vibrant Rainbow Cake Layers?
Use gel food coloring for bright, vivid colors. Mix colors evenly into batter for consistent hues. Avoid liquid dyes; they thin the batter.
What Is The Best Cake Type For Layering?
A sturdy, moist cake like butter or sponge works best. These hold shape well and absorb frosting flavors nicely.
How To Prevent Rainbow Cake Layers From Drying Out?
Bake layers until just done, not overbaked. Wrap cooled layers in plastic wrap to retain moisture before frosting.
Can I Use Homemade Frosting For A Rainbow Cake?
Yes, homemade buttercream or cream cheese frosting complements rainbow layers perfectly. It spreads smoothly and enhances flavor.
Conclusion
Baking a rainbow layer cake brings joy and color to any event. Each step is simple and fun to follow. Mixing the batter and adding colors creates excitement. Baking the layers carefully ensures a perfect texture. Stacking and frosting make the cake look beautiful.
This cake is great for celebrations or just a sweet treat. Give it a try and enjoy your colorful creation. Sharing this cake will bring smiles to everyone’s faces. Baking can be easy and rewarding with the right guide. Your rainbow cake will shine bright and taste delicious.