

How to Add a Water Filter to Your Kitchen Faucet: Easy Installation Guide for Cleaner Drinking Water
How to Add Water Filter to Kitchen Faucet? Are you tired of worrying about the quality of your tap water? Adding a water filter to your kitchen faucet is one of the easiest ways to ensure cleaner, better-tasting water right at home.
You might think it’s complicated or expensive, but it’s actually simple and affordable. In this guide, you’ll discover step-by-step how to install a water filter without any hassle. Imagine having fresh, pure water whenever you need it—no more bottled water or strange tastes.
Keep reading, and you’ll learn exactly how to make this small change that can improve your health and your daily routine.
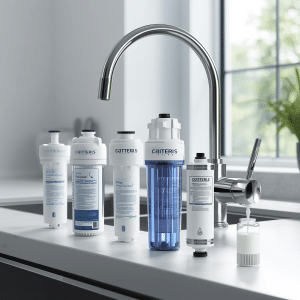
Choosing The Right Water Filter
Selecting the right water filter for your kitchen faucet is important. It helps you get clean and safe water for cooking and drinking.
This guide explains key points to consider before adding a water filter to your kitchen faucet.
Types Of Kitchen Faucet Filters
There are several types of water filters for kitchen faucets. Each type works differently to clean your water.
- Activated Carbon Filters:Remove chlorine, bad taste, and odor.
- Reverse Osmosis Filters:Remove many impurities by pushing water through a membrane.
- Ceramic Filters:Block bacteria and sediment.
- Ultraviolet (UV) Filters:Kill bacteria and viruses using UV light.
Filter Capacity And Lifespan
Filter capacity tells you how much water a filter can clean before it needs a change. Lifespan means how long the filter lasts.
| Filter Type | Capacity | Lifespan |
|---|---|---|
| Activated Carbon | Up to 100 gallons | 2 to 3 months |
| Reverse Osmosis | Up to 300 gallons | 6 to 12 months |
| Ceramic | Up to 1000 gallons | 6 to 12 months |
| UV | Varies by system | 1 year for bulb |
Compatibility With Faucets
Not all filters fit every faucet. Check your faucet type before buying a filter.
- Look for filters that attach to your faucet’s thread size.
- Some filters require an adapter for installation.
- Pull-out or spray faucets may not fit some filter models.
- Check the filter’s installation instructions carefully.
Tools And Materials Needed
Adding a water filter to your kitchen faucet improves water quality. You need the right tools and materials for a smooth installation.
This guide lists essential tools and extra supplies to help you prepare.
Essential Tools
You will use basic tools to install the water filter. These tools help connect the filter to your faucet safely.
- Adjustable wrench – to tighten fittings
- Screwdriver (flat or Phillips) – to remove faucet parts
- Teflon tape – to seal threaded connections
- Utility knife – to cut tubing if needed
- Bucket or bowl – to catch drips during installation
Additional Supplies
Besides tools, some extra supplies make the job easier. These items help ensure a leak-free and clean setup.
- Water filter kit – includes filter cartridge and housing
- Flexible water supply line – if replacement is needed
- Clean cloth – to wipe spills and clean faucet parts
- Plumber’s putty – for sealing non-threaded joints
- Safety gloves – to protect your hands
Preparing The Faucet
Before adding a water filter to your kitchen faucet, you need to prepare the faucet properly. This helps ensure a smooth and leak-free installation.
Preparing the faucet involves two main tasks: turning off the water supply and removing the existing aerator. Both steps are simple but important.
Turning Off Water Supply
Turn off the water supply to avoid leaks while working on your faucet. You can do this at the main water valve or under the sink.
Look for the cold and hot water valves under the sink. Turn them clockwise to close the water flow.
- Locate water valves under the sink
- Turn valves clockwise to close
- Check if water is off by turning on faucet
Removing Existing Aerator
The aerator is the small screen at the faucet’s tip. You need to remove it to attach the water filter.
Unscrew the aerator by turning it counterclockwise. Use pliers if it is tight, but protect the aerator with a cloth.
- Grip aerator with your hand or cloth
- Turn counterclockwise to unscrew
- Use pliers carefully if needed
- Keep the aerator for future use
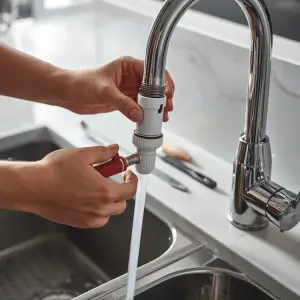
Installing The Filter
Adding a water filter to your kitchen faucet improves water quality. Installing the filter is simple and requires few tools.
This guide covers attaching the filter adapter, connecting the cartridge, and securing the filter in place.
Attaching The Filter Adapter
Start by removing the aerator from your faucet. Check that the filter adapter fits your faucet’s threading.
Use plumber’s tape on the adapter threads to prevent leaks. Screw the adapter onto the faucet until tight. Avoid overtightening to protect threads.
Connecting The Filter Cartridge
Insert the filter cartridge into the adapter housing. Align the cartridge tabs with the slots inside the adapter.
- Push the cartridge firmly into place.
- Turn the cartridge clockwise until it locks.
- Check that the cartridge is secure and does not move.
Securing The Filter In Place
| Task | Details |
|---|---|
| Check for leaks | Turn on water slowly. Look for drips around the adapter and cartridge. |
| Tighten connections | Use a wrench if needed. Do not overtighten. |
| Test flow | Run water through the filter for several minutes to clear air and debris. |
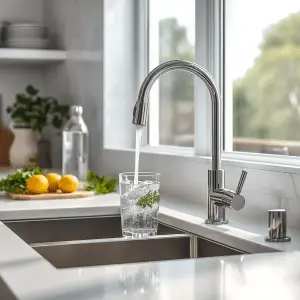
Testing The Installation
After adding a water filter to your kitchen faucet, it is important to test the installation. Testing helps ensure everything works well and there are no problems. Follow these simple steps to check your setup.
Make sure the filter is properly connected and water flows correctly. Check for leaks and flush the filter before use.
Turning On Water Supply
Start by turning on the water supply to your kitchen faucet. Open the valve slowly to avoid sudden pressure.
Watch the faucet carefully as the water flows through the filter. Check that water flows smoothly and at normal pressure.
Checking For Leaks
Look closely at all connections around the filter and faucet. Leaks can cause water damage and reduce filter performance.
- Inspect joints and hoses for drips or moisture
- Wipe around the filter and faucet base
- Tighten any loose fittings if needed
- Replace damaged parts if leaks appear
Flushing The Filter
Flush the filter by letting water run through it for several minutes. This clears out any dust or carbon particles.
Run cold water through the filter until it flows clear and has no strange taste or smell.
- Run water for 3 to 5 minutes
- Check water clarity and smell
- Repeat flushing if necessary
- Use filtered water only after flushing
Maintenance Tips
Keeping your kitchen faucet water filter in good shape helps it work well. Regular care extends the filter’s life. It also ensures clean, fresh water for your family.
Simple maintenance steps can prevent problems. Learn when to replace the filters and how to clean the system properly.
When To Replace Filters
Filters do not last forever. They get clogged with dirt and lose their ability to clean water. Replacing filters on time keeps your water pure and safe.
Check the filter package for recommended replacement times. Usually, filters need changing every 3 to 6 months. If water flow slows down or tastes bad, replace the filter sooner.
- Replace filters every 3 to 6 months
- Change filter if water flow decreases
- Replace if water tastes or smells strange
- Follow manufacturer’s instructions for best results
Cleaning The Filter System
Cleaning the filter system keeps it working smoothly. Dirt and minerals can build up on the faucet and filter housing. Clean these parts regularly to avoid blockages.
Turn off water before cleaning. Remove the filter and rinse it with clean water. Wipe the faucet and housing with a soft cloth. Avoid using harsh chemicals that can damage parts.
- Turn off water supply before cleaning
- Rinse filter with clean water only
- Wipe faucet and filter housing gently
- Do not use strong cleaners or brushes
- Clean every 1 to 2 months for best performance
Frequently Asked Questions
How Do I Connect A Water Filter To My Kitchen Faucet?
First, turn off the water supply. Attach the filter’s adapter to the faucet. Connect the filter unit securely. Turn the water back on and check for leaks.
What Tools Are Needed To Install A Kitchen Faucet Filter?
You need an adjustable wrench, plumber’s tape, and a screwdriver. These tools help secure connections and prevent leaks during installation.
Can I Install A Water Filter On Any Kitchen Faucet?
Most filters fit standard faucets, but check compatibility first. Some faucets need special adapters or may not support filters.
How Often Should I Change My Kitchen Faucet Water Filter?
Replace filters every 3 to 6 months for optimal performance. Check the manufacturer’s instructions for specific replacement intervals.
Conclusion
Adding a water filter to your kitchen faucet is simple. It enhances water quality and ensures safety. With clear steps, you can do it yourself. No need for professional help. Just gather the right tools and follow instructions. This small change offers big health benefits.
Enjoy cleaner, tastier water every day. Keep your family safe from contaminants. A wise choice for every home. Your kitchen becomes a healthier space. Start today and see the difference.


