

Crown Moulding on Top of Kitchen Cabinets: DIY Installation Guide for a Stylish Kitchen Upgrade
Are you looking to add a touch of elegance to your kitchen without a major renovation? Installing Crown Moulding on Top of Kitchen Cabinets could be the answer.
This simple upgrade can transform your space, making it look more polished and sophisticated. Imagine walking into your kitchen and being greeted by a seamless blend of style and architecture. It’s a small change with a big impact, and you can do it yourself.
Curious about how to achieve this stunning effect? Stay with us, and we’ll guide you through the step-by-step process, ensuring you have all the tips and tricks to make your project a success. Ready to elevate your kitchen’s aesthetic? Let’s dive in and get started!
Tools And Materials Needed
Installing crown moulding above kitchen cabinets adds a classy finish. Getting the right tools and materials helps you work smoothly and safely.
This guide lists what you need before starting your crown moulding project.
Essential Tools
Using the proper tools makes cutting and fitting crown moulding easier and more accurate.
- Miter saw for precise angle cuts
- Measuring tape to get exact lengths
- Level to ensure straight installation
- Stud finder to locate wall studs
- Hammer and finishing nails or nail gun
- Caulking gun to seal gaps
- Sandpaper for smoothing edges
- Safety glasses and ear protection
Recommended Materials
Choose quality materials that match your kitchen décor and fit well above the cabinets.
| Material | Description |
| Wood crown moulding | Traditional look, easy to paint or stain |
| MDF crown moulding | Cost-effective, smooth surface for painting |
| Polyurethane moulding | Lightweight, resistant to moisture |
| Wood filler | Fills nail holes and small gaps |
| Paint or stain | Finishing touch to match cabinets |
| Construction adhesive | Extra hold for moulding pieces |
Credit: www.familyhandyman.com
Preparing The Kitchen Cabinets
Installing crown moulding on top of kitchen cabinets needs careful preparation. This helps the moulding fit well and look neat.
Start by getting your cabinets ready. Clean and measure them to make sure the moulding will attach properly.
Measuring And Marking
Measure the length of your kitchen cabinets from one end to the other. Use a tape measure to get exact numbers.
Mark the spots where the crown moulding will go. Use a pencil to make light marks on the cabinet tops.
- Measure each cabinet section separately
- Note any corners or uneven edges
- Mark where moulding will meet walls
- Check for any obstacles like vents or lights
Cleaning And Sanding Surfaces
Clean the top edges of the cabinets before installing moulding. Remove dust, grease, and dirt using a mild cleaner.
Lightly sand the surfaces where the moulding will attach. This helps glue or nails hold better.
- Use a soft cloth and cleaner for wiping
- Sand gently with fine-grit sandpaper
- Remove sanding dust with a dry cloth
- Ensure surfaces are dry before installation
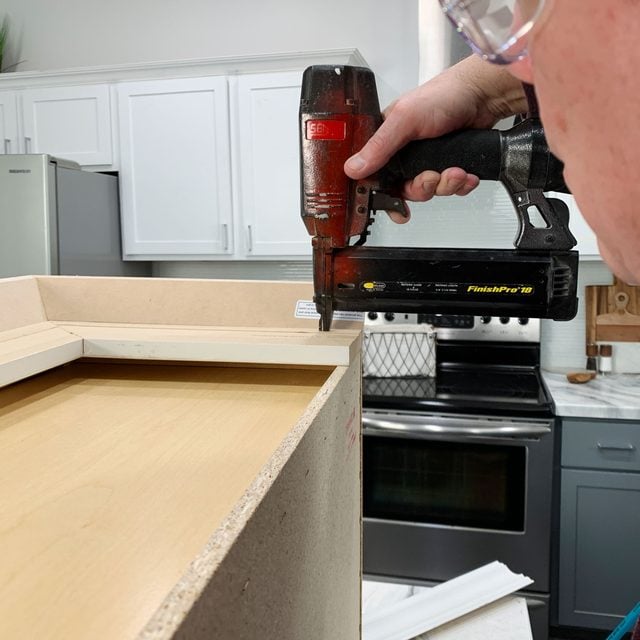
Cutting The Crown Moulding
Cutting crown moulding correctly is key to a neat fit on top of kitchen cabinets. You need to measure and cut with care to avoid gaps and uneven edges.
This guide shows how to measure for accuracy and make miter and coping cuts for a perfect finish.
Measuring For Accuracy
Start by measuring the length of the cabinet tops where the crown moulding will go. Use a tape measure and write down each measurement.
Measure twice to avoid mistakes. Mark the moulding pieces with a pencil where you will cut. Accurate measurements make the cutting easier and the fit better.
Making Miter And Coping Cuts
Miter cuts are angled cuts that help the moulding fit around corners. Use a miter saw set to 45 degrees to make these cuts. This angle helps the moulding pieces join neatly.
Coping cuts are used to fit one piece of moulding over another inside corners. Use a coping saw to cut along the profile of the moulding. This creates a tight, clean joint.
- Set the miter saw to 45 degrees for corner cuts
- Cut the moulding at the marked measurement
- Use a coping saw to shape inside corner joints
- Check each cut by holding the pieces in place before installation
Credit: www.familyhandyman.com
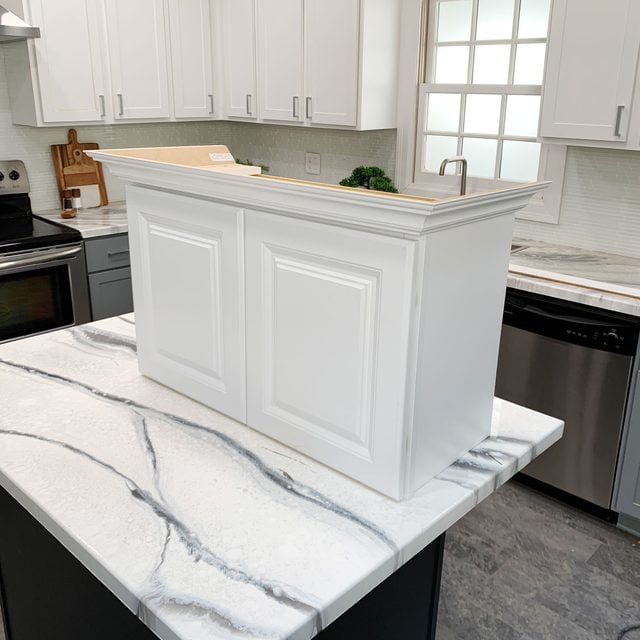
Attaching The Moulding
Attaching crown moulding on top of kitchen cabinets gives a polished look to your space. This process needs careful alignment and secure fastening.
Use the right tools and materials to make sure the moulding stays in place and looks neat.
Aligning The Pieces
Before fixing the moulding, place each piece on top of the cabinet. Check that corners fit tightly and edges line up well.
- Hold the moulding at the cabinet edge to see how it fits.
- Use a level to keep the moulding straight.
- Mark any spots that need trimming or adjusting.
- Dry fit all pieces to avoid gaps when attaching.
Using Adhesive And Nails
To secure the moulding, use wood adhesive and finishing nails. This combination holds the pieces firmly without damage.
| Material | Purpose | Tips |
|---|---|---|
| Wood adhesive | Creates strong bond | Apply a thin, even layer for best hold |
| Finishing nails | Keeps moulding fixed while glue dries | Use a nail gun or hammer carefully to avoid splitting |
| Wood filler | Fills nail holes and gaps | Match filler color to moulding |
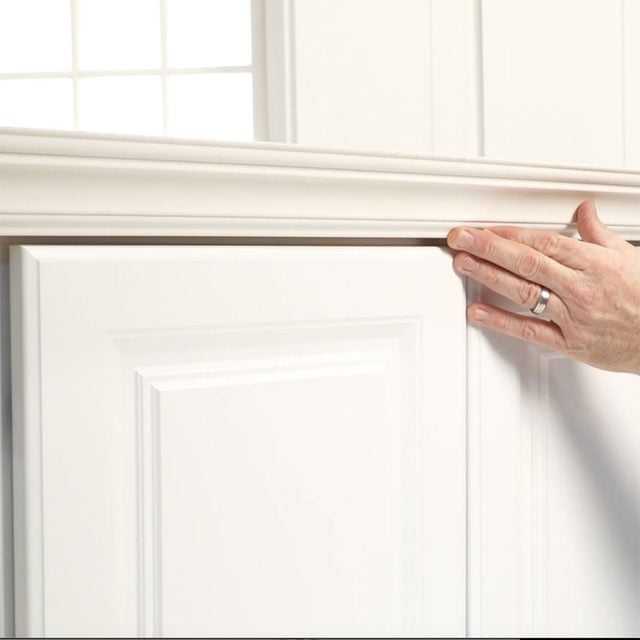
Finishing Touches
Adding crown moulding above kitchen cabinets looks great. The final steps make sure it fits well and looks smooth. These finishing touches include filling gaps and nail holes, then painting or staining.
Taking time with these details helps your cabinets look like part of the kitchen design. Follow the simple tips below for a clean finish.
Filling Gaps And Nail Holes
Small gaps and holes are normal after installing moulding. Filling them makes the trim look seamless and neat. Use wood filler or caulk to cover these spots.
- Apply wood filler to nail holes with a putty knife.
- Fill gaps between moulding and cabinets with paintable caulk.
- Let filler dry completely before sanding.
- Sand the filled spots smooth using fine-grit sandpaper.
- Clean dust off before painting or staining.
Painting Or Staining
Choose paint or stain to match your kitchen style. Painting brightens the space, while staining shows wood grain. Both options protect the moulding.
| Finish Type | Best Use | Tips |
|---|---|---|
| Paint | Modern or bright kitchens | Use primer for better adhesion |
| Stain | Natural wood look | Test on scrap wood first |
| Clear Sealer | Protects without color change | Apply thin coats evenly |
Tips For A Professional Look
Installing crown moulding on top of kitchen cabinets adds style and depth. A neat finish makes your kitchen look polished and elegant.
Use the right techniques to ensure the moulding fits well and looks smooth. Small details help achieve a professional appearance.
Dealing With Uneven Surfaces
Kitchen cabinets and walls are often not perfectly even. This can cause gaps or uneven edges when you install crown moulding.
- Use a flexible caulk to fill small gaps between moulding and cabinet tops.
- Sand down high spots on the cabinet edges for a better fit.
- Cut moulding pieces slightly longer and trim as needed for tight joints.
- Test fit all pieces before nailing them in place.
- Consider adding a thin shim behind the moulding to level it out.
Safety Precautions
Working with power tools and heavy materials requires care. Follow these safety tips to avoid injury while installing moulding.
| Safety Tip | Reason |
| Wear safety glasses | Protect your eyes from flying debris |
| Use ear protection | Reduce noise damage from saws and nail guns |
| Keep fingers clear of blades | Prevent cuts and serious injuries |
| Work in a well-lit area | See clearly to make accurate cuts |
| Secure moulding before cutting | Stop slipping and uneven cuts |
Credit: www.familyhandyman.com
Frequently Asked Questions
What Tools Do I Need To Install Crown Moulding?
You need a miter saw, measuring tape, nail gun, level, adhesive, and caulk for a smooth installation process.
How Do I Measure For Crown Moulding Above Cabinets?
Measure the length of your cabinet tops carefully. Add extra inches for mitered corners to ensure accurate cuts.
Can I Install Crown Moulding Without Removing Cabinets?
Yes, you can install moulding directly on cabinets. Use precise measurements and secure it firmly for a clean look.
What Type Of Crown Moulding Suits Kitchen Cabinets?
Choose lightweight, decorative moulding made from MDF or wood. It should complement your cabinet style and kitchen design.
Conclusion
Adding crown moulding on top of kitchen cabinets brings a fresh, stylish look. It hides gaps and adds a finished touch to your space. With careful measuring and cutting, the process is simple and rewarding. Take your time to fit pieces well for a clean result.
This small upgrade can lift your kitchen’s appearance easily. Enjoy the satisfaction of a DIY project done right. Your kitchen will look neat and elegant, impressing guests and family alike.


