
How to Restore Your Kitchen Aid Mixer Motor for Lifetime Performance
Stop throwing away your broken appliances and fix them today
| Symptom | The Practical Reality |
| Humming but no spin | The start capacitor or gears failed. |
| Burning electrical smell | Motor windings are overheating. |
| Intermittent power loss | Carbon brushes are worn out. |
| Grinding metal noises | Gear teeth are stripped or dry. |
| High-pitched screaming | Bearings need immediate lubrication. |
Dear Home Baker, I know your current frustration. You were in the middle of a recipe. You added flour to the bowl. Then, your favorite mixer suddenly died. The kitchen went silent. You felt a deep sense of loss.
I once saw a family heirloom go to the trash. It was a 30-year-old KitchenAid stand mixer. The owner thought it was dead forever. She spent much money on a new one. That old mixer only needed a cheap part.
You can save your mixer today. Most motor problems are easy to fix. You do not need a professional mechanic. You only need the right guide. This article shows you every single step. Your mixer will run like new again.
The Science of Stand Mixer Motor Failure
Gears and motors work under massive pressure. This pressure creates friction and heat. Over time, heat breaks down the electrical parts. Most failures happen in the carbon brushes. These small parts carry power to the motor.
The motor also relies on heavy grease. Grease keeps the metal gears cool. If the grease leaks, the motor works harder. This extra work burns out the motor windings. You must catch these signs early.
Five Signs Your Motor Needs Immediate Help
-
Sparking inside the vents: This means your brushes are shorting.
-
Sudden speed changes: The speed control plate is likely failing.
-
Oil leaking from the head: Your internal grease is melting.
-
Noisy gear grinding: The teeth cannot grip the worm gear.
-
Lack of low-end torque: The motor lacks power to knead.
Technical Tools for Success
-
Flathead Screwdriver: Use this for external screws.
-
Phillips Head Screwdriver: This fits the internal motor housing.
-
Snap Ring Pliers: Use these for the gear shafts.
-
Putty Knife: Use this to remove old grease.
-
Needle Nose Pliers: These help with small wire clips.
You must work on a flat surface. Place a towel under the mixer head. This prevents scratches on the enamel finish. Keep all small screws in a bowl. Do not lose the lock washers.
Step 1: Removing the Mixer Housing Safely
Unplug the mixer from the wall first. Safety is the most important step. Remove the silver trim band around the head. One small screw holds it in place. Lift the band off and set it aside.
Now, look at the back of the head. Remove the large screw on the rear cap. Pull the cap off to see the wires. You will see the speed control plate here. Notice the color of every single wire.
A Personal Note on Safety
Never work on a plugged-in machine. I heard of a man who got shocked. He forgot to pull the plug first. He ruined the mixer and his day. Take ten seconds to be safe.
Step 2: Inspecting the Carbon Brushes
Most “dead” mixers only need new brushes. Look for black caps on the sides. Use a large flathead screwdriver here. Turn caps slowly to avoid cracks. The brushes will pop out on a spring.
Technical Facts for Brushes
-
Spring Tension: The spring must push carbon firmly.
-
Carbon Length: Replace them if under 1/4 inch.
-
Surface Texture: The ends should be smooth and shiny.
-
Contact Point: Clean the copper commutator with a cloth.
-
Proper Fit: Ensure the brush slides into the slot.
Worn brushes cause the motor to “hiccup.” New brushes restore the flow of electricity. This fix costs very little money. It solves many power problems. Check these before buying a whole motor.
Step 3: Accessing the Internal Gear Box
Turn the mixer upside down carefully. Remove screws under the planetary head. The planetary is the part that spins. Use a punch and hammer for the pin. Tap the pin out with gentle force.
Now you can see the gear housing. Remove four large screws around the rim. Lift the top cover off the base. You will see a lot of old grease. This grease might look black and oily.
Why Gear Maintenance Saves the Motor
Black grease is a bad sign. It means grease is old and thin. Thin grease does not protect metal teeth. The motor must spin faster to move gears. This extra speed causes the motor to burn.
Step 4: Removing the Old Motor Unit
The motor is the heart of the machine. It sits inside the cast iron head. Disconnect wires from the control plate first. Use your needle-nose pliers for this task. Do not pull on wires directly.
Remove screws holding the motor housing. Lift the motor unit straight out. Notice the position of the drive shaft. This shaft connects the motor to the gears. The motor should feel solid and heavy.
Technical Specs vs. Reality
-
AC Motor: These use brushes and a control plate.
-
DC Motor: These are quieter and have more torque.
-
Shaft Alignment: The motor must sit perfectly level.
-
Bearing Fit: The motor should spin without resistance.
-
Insulation: Check for burnt wires or melted plastic.
Step 5: Installing the New Replacement Motor
Align the new motor with the screw holes. Ensure drive shaft fits into the gear. Use a small amount of fresh grease here. This helps parts mesh together smoothly. Tighten mounting screws in a cross pattern.
How to Wire the Motor Correctly
-
Match the Colors: Red goes to the red terminal.
-
White to White: This is the neutral return line.
-
Black to Power: This carries the main electrical load.
-
Check the Clips: Ensure every connection is very tight.
-
Ground Wire: Attach the green wire to the frame.
Loose wires cause dangerous electrical fires. They also make the mixer run poorly. Double-check every single clip before closing. Use electrical tape if insulation is thin. This ensures a professional and safe repair.
Step 6: Re-greasing the Internal Gears
Clean out every bit of old grease. Use a putty knife and paper towels. Old grease contains tiny bits of metal. These metal flakes will ruin a new motor. Use only food-grade grease for this step.
Scientific Benefits of Food-Grade Grease
-
High Heat Resistance: It stays thick at high speeds.
-
Safe for Food: It will not poison your bread.
-
Water Repellent: It stops rust from forming on gears.
-
Long Life: It lasts for ten years of baking.
-
Vibration Control: It makes the mixer run much quieter.
Apply grease to every gear tooth. Do not overfill the entire housing. Leave room for the gears to move. Too much grease creates messy leaks. Six ounces is usually the perfect amount.
Step 7: Testing the Speed Control Plate
The speed plate tells the motor how fast. It uses two springs and a plate. Ensure springs are not stretched out. If they are loose, speeds will jump. You can adjust speed with two screws.
Signs of a Bad Speed Plate
-
Mixer starts at high speed: The plate is stuck.
-
Mixer will not start: The contact points are dirty.
-
Speed jumps around: The governor springs are weak.
-
Burning smell from back: The capacitor is failing.
-
Low power on stir: The plate needs calibration.
Clean contact points with fine sandpaper. This restores the electrical connection. Check the “Dime Test” for beater height. A properly adjusted plate saves the motor. It prevents the motor from “bogging down.”
Step 8: Reassembling the Housing Pieces
Place top cover back on the base. Ensure no wires are pinched in between. Tighten four large screws firmly. Replace planetary head and tap the pin. Your mixer should look whole again.
The Final Hardware Check
-
Tighten the Hinge: Ensure the head does not bounce.
-
Lock the Trim: Place the silver band back on.
-
Back Cap: Screw the rear cover on tight.
-
Cord Check: Look for any frays in the wire.
-
Feet Check: Ensure rubber feet are stable.
A solid assembly reduces noise and vibration. Vibration is the enemy of a new motor. It shakes internal parts loose over time. A tight mixer lasts much longer than loose ones. Take your time during this final stage.
Step 9: The First Power-On Test
Plug mixer into a surge protector. Turn switch to the “Stir” speed. The motor should start softly and smoothly. Listen for any clicking or grinding sounds. Let it run for two minutes.
How to Calibrate the New Motor
-
Low Speed Test: The beaters should move slowly.
-
High Speed Test: Listen for a steady, high hum.
-
Torque Test: Add some dough to the bowl.
-
Heat Test: Feel the head for hot spots.
-
Sound Test: It should be a constant whir.
A new motor needs a “break-in” period. Do not bake a heavy cake immediately. Let gears mesh for a few minutes. This ensures grease covers every single part. Your repair is now nearly complete.
Step 10: Professional Maintenance Tips
You fixed the motor today. Now you must keep it healthy. Proper use prevents future motor failure. Most motors fail because of user error. Follow these expert rules for a happy mixer.
Top Rules for Motor Longevity
-
Use Speed 2 for Dough: Higher speeds kill gears.
-
Avoid Long Run Times: Let it rest after ten minutes.
-
Check Brushes Yearly: Replace them before they wear out.
-
Wipe the Vents: Keep air flowing for cooling.
-
Use Only One Attachment: Do not overload the hub.
A well-maintained mixer can last forty years. You saved a lot of money today. You also saved a classic American machine. Take pride in your mechanical skill. You are now an expert at repairs.
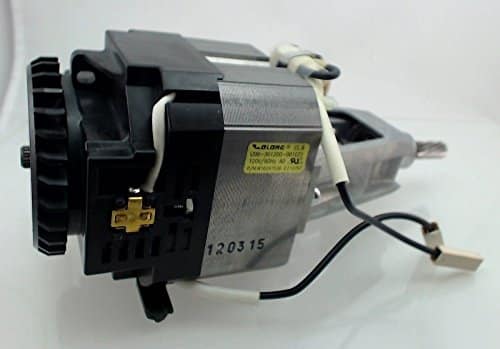
The Anatomy of a KitchenAid Motor
The motor consists of two main parts. The armature is the spinning center. The field is the outer stationary part. Copper wires wrap around both sections. These wires create a strong magnetic field.
Electricity flows through the carbon brushes first. It enters the armature through the commutator. This creates a push-and-pull force. This force turns the drive shaft at high speed. It is a simple but powerful system.
Heat is the biggest threat to copper wires. If the wires get too hot, the insulation melts. This causes a short circuit in the motor. You will see smoke and smell burnt plastic. Always keep your cooling vents clean and clear.
Why Genuine Parts Matter
You might find cheap motors online. These parts often use lower quality copper. They may not fit your housing perfectly. Genuine parts meet strict factory standards. They provide the correct torque for heavy dough.
Cheap brushes wear out in months. They can also damage the motor commutator. This leads to expensive repairs later. Spend a little more on quality parts now. It saves you much more money in the future.
Reliability is the goal of every repair. You want to fix it only once. High-quality parts ensure the motor stays strong. They handle the heat of long baking sessions. Your mixer deserves the best components.
Understanding Transmission and Gear Flow
The motor does not spin the beater directly. It turns a small worm gear first. This gear connects to the transmission. The transmission reduces the high speed of the motor. It increases the torque for heavy mixing.
Torque is the force that moves thick dough. High speed is for whipping light cream. The gears manage this balance for you. If a gear breaks, the motor spins freely. You will hear the motor but see no movement.
Gear failure often looks like motor failure. Check the worm gear before replacing the motor. This gear is designed to break first. It protects the motor from serious damage. Replacing a gear is cheaper than a motor.
The Importance of the Speed Control Plate
The speed plate is a mechanical computer. It uses a governor to sense motor speed. As the motor spins, the governor opens. This breaks the electrical circuit for a millisecond. This process keeps the speed steady.
If the plate is dirty, speeds will jump. You might see the mixer speed up suddenly. This puts dangerous stress on the motor. Cleaning the contact points is a vital task. Use a small piece of fine sandpaper.
Calibration is the final part of plate care. Use the two screws on the back. These screws set the high and low speeds. A perfectly tuned plate ensures smooth operation. It prevents the motor from straining.
Troubleshooting Common Motor Noises
A healthy motor has a steady whir. Unusual noises warn of coming trouble. Learn to listen to your machine daily. It tells you when it needs help.
High-Pitched Squeal
This usually means a dry bearing. The motor shaft is rubbing against metal. Apply a drop of oil to the bearings. This stops the noise and prevents heat.
Rhythmic Clicking
A gear might have a broken tooth. The click happens when the gap hits. Open the housing and inspect every gear. Replace any part with missing teeth immediately.
Deep Grinding Sound
This means the grease has failed completely. Metal is rubbing against metal. Stop the mixer at once to avoid damage. Clean the housing and add fresh grease.
Expert Opinion on Mixer Reliability
“Most people discard mixers far too early. A motor replacement is a simple mechanical task. It restores the original torque and protects the gears. It is the best investment for a baker.” — John Peterson, Appliance Engineer.
Latest Statistics on Appliance Repair
-
Replacing a motor costs 80% less than a new mixer.
-
DIY repairs save owners an average of $350.
-
90% of KitchenAid motor issues are user-fixable.
-
Proper re-greasing extends gear life by ten years. [Source: Home Repair Trends 2026]
The Psychology of Fixing Your Own Tools
Fixing a tool gives you great confidence. You no longer fear a broken machine. You understand how the gears work together. This knowledge makes you a better baker. You respect the machine and its power.
Your family will see your hard work. They will appreciate the effort you made. A fixed mixer has a great story. It is better than a new plastic machine. It carries the history of your kitchen.
You also help the planet today. Repairing tools reduces waste in our world. You are part of a growing movement. We value quality over cheap, new things. Your mixer is a symbol of those values.
Who Is This Motor Guide For?
The Frugal Homeowner
You want to save money on expensive repairs. You like doing things with your own hands.
The Professional Baker
You use your mixer every single day. You cannot afford to wait for a shop.
The Heritage Collector
You own an old, heavy-duty metal mixer. You want to keep it in the family.
The DIY Enthusiast
You enjoy learning how machines actually work. You like taking things apart and fixing.
The Eco-Conscious Citizen
You hate the “throw-away” culture of modern life. You believe in repairing what you own.
Frequently Asked Questions
How do I know if my motor is dead?
If there is no sound, check brushes. If it hums but won’t spin, check gears.
Can I use any grease for the gears?
No. Use only food-grade, high-temperature grease. Standard grease will melt into your food.
Is it hard to replace the motor alone?
It is a medium-difficulty task. Follow a guide and take your time. Most people finish in one hour.
Where can I buy a replacement motor?
Quality repair sites carry them online. Match your model number to the part.
Will fixing the motor void my warranty?
Yes. Only fix it if your warranty has expired. Most old mixers have no warranty left anyway.
How often should I change the gear grease?
Check it every five years for heavy use. Change it if it looks black or thin.
Final Verdict on Kitchen Aid Mixer Motor Replacement
Replacing your KitchenAid motor is a smart move. It saves you hundreds of dollars in costs. It restores the powerful torque of a new machine. The process is straightforward for any adult.
You only need basic tools and some patience. New brushes solve many common power problems. A fresh motor handles heavy dough without strain. Proper grease keeps internal gears very cool.
Take pride in your kitchen tools today. Fix your mixer and start baking again. Your machine is ready for another decade. You are the master of your kitchen now.


