Have you ever taken your bread out of the oven only to realize it’s overproofed? That moment can be frustrating, leaving you wondering if all your hard work was wasted.
But here’s the good news: you might still be able to save your dough and bake a tasty loaf. You’ll discover simple ways to handle overproofed bread and turn it into something delicious. Keep reading, because your next bake could be better than you think—even if your dough seems ruined.

Credit: www.reddit.com
Why Over Proofing Happens
Overproofing bread occurs when the dough rises too long or under the wrong conditions. This makes the dough collapse or lose shape.
Understanding why overproofing happens helps bakers avoid it and get better bread results.
Yeast Activity
Yeast causes dough to rise by producing gas. If yeast is too active, dough can rise too much. This leads to over proofed bread that is weak and falls flat.
- Too much yeast speeds up fermentation.
- Old or damaged yeast can behave unpredictably.
- High sugar content feeds yeast rapidly.
- Too much water can boost yeast action.
Temperature Effects
Temperature controls how fast yeast works. Warm temperatures speed it up. Cold temperatures slow it down.
| Temperature | Effect on Dough |
| Above 80°F (27°C) | Yeast works very fast, risk of over proofing |
| 60°F-75°F (15°C-24°C) | Ideal temperature for steady rise |
| Below 60°F (15°C) | Yeast slows, dough rises slowly |
Timing Mistakes
Proofing time is critical. Leaving dough too long causes overproofing. Not watching the clock or dough signs can cause errors.
Common timing mistakes:
- Ignoring dough size and type differences
- Not adjusting the time for the room temperature
- Skipping the poke test to check readiness
- Rushing the process or letting the dough sit too long
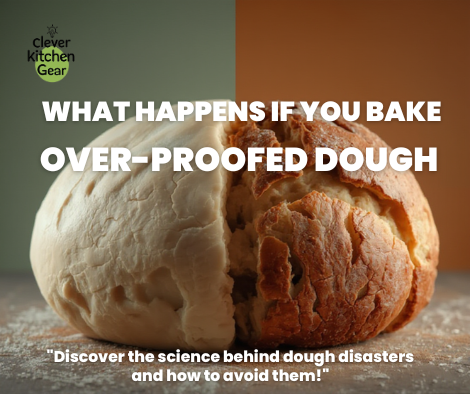
Impact On Baking Results
Baking over proofed bread can change how the bread turns out. The dough has risen too much before baking.
This affects the bread's texture, size, and taste. Understanding these changes helps adjust baking steps.
Crumb Structure
Over-proofed dough often has a weak crumb structure. The air pockets become too large and uneven.
The bread can be very soft but crumbly. It may fall apart easily when sliced or handled.
Rise And Volume
Overproofed bread might rise less in the oven. The dough can collapse and lose volume.
The final bread looks flat and dense. It does not have the usual light and fluffy texture.
Flavor Profile
Too much proofing changes the bread’s flavor. It can taste sour or overly fermented.
The natural sweetness of bread may be reduced. The flavors become sharp and less balanced.

Credit: www.reddit.com
How To Rescue Over-Proofed Dough
Over proofed dough can lead to bread that is flat and dense. You can still save it and bake good bread. Knowing the right steps helps you fix the dough.
This guide explains how to gently deflate dough, shape it properly, and adjust baking time and temperature for better results.
Gently Deflating Dough
Handle the dough with care to keep some air inside. Press down slowly to remove excess gas. Avoid rough handling that can ruin the dough’s texture.
- Use your fingertips to press the dough gently.
- Work on a floured surface to prevent sticking.
- Do not squeeze too hard; keep some air pockets.
- Fold the dough over itself for a better structure.
Shaping Techniques
After deflating, shape the dough to help it rise evenly. Proper shaping supports good crumb and crust development during baking.
Shaping Method Description
Round Ball Stretch edges and tuck under to form a smooth ball.
Oval Loaf Flatten dough slightly, fold edges, and roll gently.
Baguette Roll the dough into a tight cylinder for a long shape.
Adjusting Baking Time And Temperature
Over-proofed dough may need changes in baking to avoid a dense or burnt crust. Lower temperatures and longer times help finish baking inside.
Try this baking adjustment:
- Preheat oven to 350°F (175°C).
- Bake bread for 35 to 45 minutes.
- Check for a golden crust and hollow sound when tapped.
Preventing Over Proofing
Over proofed bread dough can lose its shape and taste. Preventing over proofing helps keep bread fresh and tasty.
Controlling how long and where the dough rests is key. Small changes can make a big difference in baking results.
Proper Timing
Watch the dough closely as it rises. Bread dough usually doubles in size within the right time.
Set a timer to check the dough often. Do not let it rise for too long, or it will become weak.
- Check the dough after 30 minutes for the first rise
- Look for dough that has doubled in size
- Use the finger test: poke the dough gently; it should bounce back slowly
Controlling Environment
Keep dough in a warm, but not hot, place. Ideal temperature is around 75°F (24°C).
Too much heat makes the dough rise too fast. Cold slows it down but gives better flavor.
- Cover the dough to keep moisture in
- Avoid direct sunlight or drafts
- Use a proofing box or a warm spot like an oven with the light on
Using Starter And Yeast Wisely
Use the right amount of yeast or starter. Too much makes the dough rise fast and overproof.
Check the age of your yeast. Old yeast can cause uneven rising and weak dough.
- Measure yeast accurately with a scale or spoon
- Keep yeast in a cool, dry place
- Use a fresh starter and feed it regularly for the best results
Expert Tips For Better Loaves
Baking bread can be tricky, especially if the dough is over proofed. Over proofed dough can affect the texture and rise of your bread. Knowing how to handle it can save your loaf.
These tips will help you monitor your dough, use the right tools, and develop skills for better bread-baking results.
Monitoring Dough
Watch your dough closely during proofing. The windowpane test is a simple way to check gluten development. Press the dough gently to see if it springs back.
- Look for dough that doubles in size.
- Check if the dough holds its shape but feels soft.
- Avoid letting the dough collapse or feel sticky.
Using Tools And Timers
Use timers to track proofing times accurately. A kitchen scale helps measure ingredients for consistent results. Thermometers check dough temperature, which affects yeast activity.
| Tool | Purpose |
| Timer | Track proofing duration |
| Kitchen Scale | Measure ingredients precisely |
| Thermometer | Monitor dough temperature |
Practice And Patience
Practice helps you learn how dough feels and behaves. Patience is key to avoiding rushing the process. Each loaf teaches you something new.
- Tips for Practice: Keep a baking journal to note proofing times and results.
- Try different flours to see how they affect dough behavior.
- Observe the environment; temperature changes can speed or slow proofing.
Frequently Asked Questions
Can You Bake Bread After It’s Over-Proofed?
Yes, you can bake overproofed bread. It may have a denser texture and less rise. Baking will still cook the dough, but expect a flatter loaf with a stronger yeast flavor.
How To Fix Over-Proofed Bread Dough Before Baking?
Gently deflate the dough to remove excess gas. Shape it again and allow a shorter second rise. This helps restore structure and improve final bread texture.
Will Over-Proofed Bread Taste Different?
Overproofed bread can taste more sour or yeasty. The extended fermentation breaks down sugars differently, altering flavor. It may also feel chewier or gummier in texture.
How To Prevent Bread From Over-Proofing?
Monitor dough rise closely and follow recipe times. Keep dough in a cool, stable environment. Use proper yeast amounts and avoid long fermentation without refrigeration.
Conclusion
Baking over-proofed bread is possible with a few adjustments. Check the dough's texture and shape it gently. Bake it at the right temperature to rescue the loaf. You might not get perfect bread, but it's still tasty. Enjoy experimenting with different techniques.
Each loaf teaches you something new. Don't worry about mistakes. They are part of learning to bake. Keep practicing and have fun with your baking journey. Remember, every loaf has its own story. Your homemade bread will always be special.
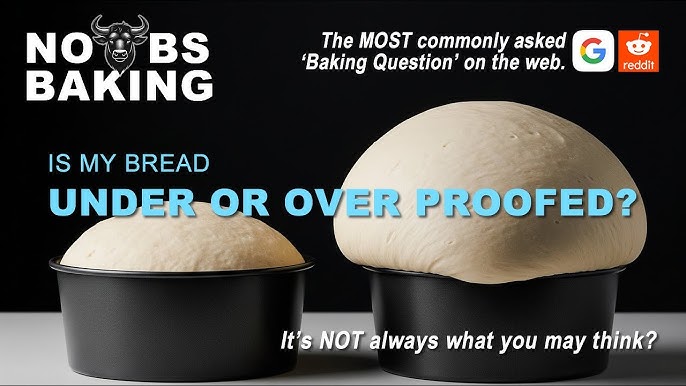
Signs Of Over-Proofed Bread
Over proofed bread happens when dough rises too long. It can change how bread looks, feels, and tastes.
Knowing these signs helps you decide if you can still bake the bread or need to start again.
Visual Clues
Overproofed bread dough looks very puffy and soft. It may have large air bubbles on the surface.
The dough can also look wrinkled or sag when touched, not holding its shape well.
- The dough is very swollen and loose
- The surface shows big air bubbles
- Dough appears wrinkled or collapsed
Texture Changes
The dough feels sticky and weak when overproofed. It may tear easily when shaped or handled.
After baking, the bread is usually very soft but crumbly inside. It can also have large holes from gas.
- Dough is sticky and fragile
- Bread crumb is soft but crumbly
- Large holes appear inside the bread
Smell And Taste
Overproofed bread can smell sour or fermented. This happens because the yeast works for too long.
The taste may be sharp or bitter instead of mild and fresh. This can make bread less enjoyable.
- Sour or fermented smell
- Sharp or bitter taste
- Lacks fresh bread flavor

Credit: www.reddit.com
Why Over Proofing Happens
Overproofing bread occurs when the dough rises too long or under the wrong conditions. This makes the dough collapse or lose shape.
Understanding why overproofing happens helps bakers avoid it and get better bread results.
Yeast Activity
Yeast causes dough to rise by producing gas. If yeast is too active, dough can rise too much. This leads to over proofed bread that is weak and falls flat.
- Too much yeast speeds up fermentation.
- Old or damaged yeast can behave unpredictably.
- High sugar content feeds yeast rapidly.
- Too much water can boost yeast action.
Temperature Effects
Temperature controls how fast yeast works. Warm temperatures speed it up. Cold temperatures slow it down.
| Temperature | Effect on Dough |
| Above 80°F (27°C) | Yeast works very fast, risk of over proofing |
| 60°F-75°F (15°C-24°C) | Ideal temperature for steady rise |
| Below 60°F (15°C) | Yeast slows, dough rises slowly |
Timing Mistakes
Proofing time is critical. Leaving dough too long causes overproofing. Not watching the clock or dough signs can cause errors.
Common timing mistakes:
- Ignoring dough size and type differences
- Not adjusting the time for the room temperature
- Skipping the poke test to check readiness
- Rushing the process or letting the dough sit too long
Impact On Baking Results
Baking over proofed bread can change how the bread turns out. The dough has risen too much before baking.
This affects the bread's texture, size, and taste. Understanding these changes helps adjust baking steps.
Crumb Structure
Over-proofed dough often has a weak crumb structure. The air pockets become too large and uneven.
The bread can be very soft but crumbly. It may fall apart easily when sliced or handled.
Rise And Volume
Overproofed bread might rise less in the oven. The dough can collapse and lose volume.
The final bread looks flat and dense. It does not have the usual light and fluffy texture.
Flavor Profile
Too much proofing changes the bread’s flavor. It can taste sour or overly fermented.
The natural sweetness of bread may be reduced. The flavors become sharp and less balanced.
Credit: www.reddit.com
How To Rescue Over-Proofed Dough
Over proofed dough can lead to bread that is flat and dense. You can still save it and bake good bread. Knowing the right steps helps you fix the dough.
This guide explains how to gently deflate dough, shape it properly, and adjust baking time and temperature for better results.
Gently Deflating Dough
Handle the dough with care to keep some air inside. Press down slowly to remove excess gas. Avoid rough handling that can ruin the dough’s texture.
- Use your fingertips to press the dough gently.
- Work on a floured surface to prevent sticking.
- Do not squeeze too hard; keep some air pockets.
- Fold the dough over itself for a better structure.
Shaping Techniques
After deflating, shape the dough to help it rise evenly. Proper shaping supports good crumb and crust development during baking.
Shaping Method Description
Round Ball Stretch edges and tuck under to form a smooth ball.
Oval Loaf Flatten dough slightly, fold edges, and roll gently.
Baguette Roll the dough into a tight cylinder for a long shape.
Adjusting Baking Time And Temperature
Over-proofed dough may need changes in baking to avoid a dense or burnt crust. Lower temperatures and longer times help finish baking inside.
Try this baking adjustment:
- Preheat oven to 350°F (175°C).
- Bake bread for 35 to 45 minutes.
- Check for a golden crust and hollow sound when tapped.
Preventing Over Proofing
Over proofed bread dough can lose its shape and taste. Preventing over proofing helps keep bread fresh and tasty.
Controlling how long and where the dough rests is key. Small changes can make a big difference in baking results.
Proper Timing
Watch the dough closely as it rises. Bread dough usually doubles in size within the right time.
Set a timer to check the dough often. Do not let it rise for too long, or it will become weak.
- Check the dough after 30 minutes for the first rise
- Look for dough that has doubled in size
- Use the finger test: poke the dough gently; it should bounce back slowly
Controlling Environment
Keep dough in a warm, but not hot, place. Ideal temperature is around 75°F (24°C).
Too much heat makes the dough rise too fast. Cold slows it down but gives better flavor.
- Cover the dough to keep moisture in
- Avoid direct sunlight or drafts
- Use a proofing box or a warm spot like an oven with the light on
Using Starter And Yeast Wisely
Use the right amount of yeast or starter. Too much makes the dough rise fast and overproof.
Check the age of your yeast. Old yeast can cause uneven rising and weak dough.
- Measure yeast accurately with a scale or spoon
- Keep yeast in a cool, dry place
- Use a fresh starter and feed it regularly for the best results
Expert Tips For Better Loaves
Baking bread can be tricky, especially if the dough is over proofed. Over proofed dough can affect the texture and rise of your bread. Knowing how to handle it can save your loaf.
These tips will help you monitor your dough, use the right tools, and develop skills for better bread-baking results.
Monitoring Dough
Watch your dough closely during proofing. The windowpane test is a simple way to check gluten development. Press the dough gently to see if it springs back.
- Look for dough that doubles in size.
- Check if the dough holds its shape but feels soft.
- Avoid letting the dough collapse or feel sticky.
Using Tools And Timers
Use timers to track proofing times accurately. A kitchen scale helps measure ingredients for consistent results. Thermometers check dough temperature, which affects yeast activity.
| Tool | Purpose |
| Timer | Track proofing duration |
| Kitchen Scale | Measure ingredients precisely |
| Thermometer | Monitor dough temperature |
Practice And Patience
Practice helps you learn how dough feels and behaves. Patience is key to avoiding rushing the process. Each loaf teaches you something new.
- Tips for Practice: Keep a baking journal to note proofing times and results.
- Try different flours to see how they affect dough behavior.
- Observe the environment; temperature changes can speed or slow proofing.
Frequently Asked Questions
Can You Bake Bread After It’s Over-Proofed?
Yes, you can bake overproofed bread. It may have a denser texture and less rise. Baking will still cook the dough, but expect a flatter loaf with a stronger yeast flavor.
How To Fix Over-Proofed Bread Dough Before Baking?
Gently deflate the dough to remove excess gas. Shape it again and allow a shorter second rise. This helps restore structure and improve final bread texture.
Will Over-Proofed Bread Taste Different?
Overproofed bread can taste more sour or yeasty. The extended fermentation breaks down sugars differently, altering flavor. It may also feel chewier or gummier in texture.
How To Prevent Bread From Over-Proofing?
Monitor dough rise closely and follow recipe times. Keep dough in a cool, stable environment. Use proper yeast amounts and avoid long fermentation without refrigeration.
Conclusion
Baking over-proofed bread is possible with a few adjustments. Check the dough's texture and shape it gently. Bake it at the right temperature to rescue the loaf. You might not get perfect bread, but it's still tasty. Enjoy experimenting with different techniques.
Each loaf teaches you something new. Don't worry about mistakes. They are part of learning to bake. Keep practicing and have fun with your baking journey. Remember, every loaf has its own story. Your homemade bread will always be special.