

How to Install Crown Moulding on Kitchen Cabinets: Complete Guide
Transforming your kitchen into a space that exudes elegance and charm doesn’t have to be complicated or costly. One of the simplest yet most impactful ways to enhance your kitchen’s aesthetic appeal is by installing crown moulding on your kitchen cabinets.
You might be wondering if this is a project you can tackle on your own. The answer is yes! With a few tools, a bit of patience, and our step-by-step guide, you can learn How to Install Crown Moulding Kitchen Cabinets and add a touch of sophistication to your kitchen that will leave your guests in awe.
Imagine the satisfaction of seeing your kitchen cabinets framed with beautiful crown moulding, creating a polished and cohesive look. Let’s dive into the process, so you can transform your kitchen into the stylish space you’ve always dreamed of.
Tools And Materials Needed
Installing crown moulding on kitchen cabinets gives a polished look. You need the right tools and materials to do the job well.
This guide covers essential tools, how to choose moulding, and extra supplies you may need.
Essential Tools
Having the correct tools makes installing crown moulding easier and more precise. You need tools for measuring, cutting, and fastening.
- Miter saw for angled cuts
- Measuring tape
- Speed square or protractor
- Hammer or nail gun
- Finishing nails
- Wood glue
- Caulk gun and caulk
- Sandpaper or sanding block
- Stud finder
- Level
Choosing The Right Crown Moulding
Select moulding that fits your cabinet style and kitchen size. The shape and size affect the look and installation.
| Type | Description | Best For |
| Wood | Easy to paint or stain | Traditional kitchens |
| MDF | Smooth surface, budget-friendly | Modern kitchens |
| Polyurethane | Lightweight and moisture resistant | Humid kitchens |
| Polystyrene | Inexpensive and easy to cut | DIY projects |
Additional Supplies
You will need some extra materials to finish the installation cleanly and securely.
- Wood filler to cover nail holes
- Primer and paint matching your cabinets
- Painter’s tape for neat edges
- Drop cloth to protect surfaces
- Safety glasses and ear protection
Credit: www.familyhandyman.com
Preparing The Kitchen Cabinets
Installing crown moulding on kitchen cabinets starts with good preparation. This step helps the moulding fit well and look neat.
Take time to clean, measure, and mark before you begin cutting or attaching the moulding.
Cleaning And Measuring
Clean the cabinets to remove dust and grease. A clean surface helps the moulding stick better.
Measure the top edges of the cabinets carefully. Accurate measurements prevent gaps or overlaps in the moulding.
- Use a damp cloth to wipe cabinets clean
- Allow cabinets to dry fully
- Measure length and width of cabinet tops
- Record measurements for each cabinet section
Removing Old Moulding
Remove any old moulding from the cabinets before installing new pieces. This creates a smooth surface.
Use a pry bar or putty knife to gently lift the old moulding. Be careful to avoid damaging the cabinets.
- Start at one end of the moulding
- Insert pry tool between moulding and cabinet
- Lift slowly to detach the moulding
- Remove nails or glue residue from the surface
Marking Cut Lines
Mark the cut lines on the moulding before cutting. This helps get exact fits around corners and edges.
Use a pencil and measuring tape to draw the lines. Double-check measurements before cutting the moulding pieces.
- Measure the cabinet edges again
- Mark lengths on the moulding
- Indicate angles for corner cuts
- Use a square or angle finder tool
Cutting Crown Moulding
Cutting crown moulding for kitchen cabinets needs care and accuracy. The right cuts make the moulding fit perfectly around corners and edges.
Understanding different types of cuts and how to use a miter saw helps you achieve clean and precise results.
Types Of Cuts
Crown moulding requires three main types of cuts: straight, miter, and coping cuts. Each type fits specific parts of the cabinet.
Straight cuts are simple and used for the ends of moulding. Miter cuts create angled edges for corners. Coping cuts help join pieces inside corners smoothly.
- Straight cuts:Cut straight across the moulding end.
- Miter cuts:Cut at an angle to join corners.
- Coping cuts:Cut along the moulding shape to fit inside corners.
Using A Miter Saw
A miter saw helps you make accurate angled cuts on crown moulding. Set the saw to the correct angle before cutting.
Hold the moulding firmly and cut slowly to avoid splintering. Always measure twice before cutting to reduce mistakes.
- Set the saw angle for the type of cut.
- Secure the moulding in place.
- Cut smoothly and steadily.
- Check the fit before final installation.
Handling Inside And Outside Corners
Inside corners need coping cuts or precise miter cuts to fit tightly. Outside corners require miter cuts angled outward.
For inside corners, use a coping saw after a miter cut to shape the moulding edge. For outside corners, cut both pieces at the correct miter angles to meet cleanly.
- Inside corners:Use coping or tight miter cuts.
- Outside corners:Cut matching miter angles outward.
- Test fit pieces before nailing or gluing.
Credit: www.familyhandyman.com
Attaching The Crown Moulding
Attaching crown moulding to kitchen cabinets adds a polished look. This step needs care to fit the moulding tightly and securely.
Use the right tools and methods to keep the moulding stable and aligned with your cabinets.
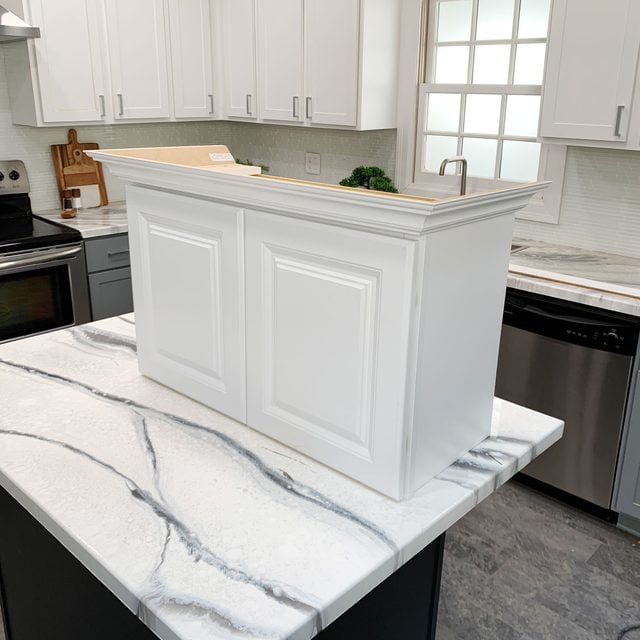
Positioning The Moulding
Start by placing the crown moulding on top of the cabinets. Align it so the edges match the cabinet corners. Check the fit before attaching.
- Hold the moulding against the cabinet top edge.
- Make sure the bottom edge of the moulding is flush with the cabinet face.
- Use a level to keep the moulding straight along the length.
- Mark the positions lightly with a pencil for reference.
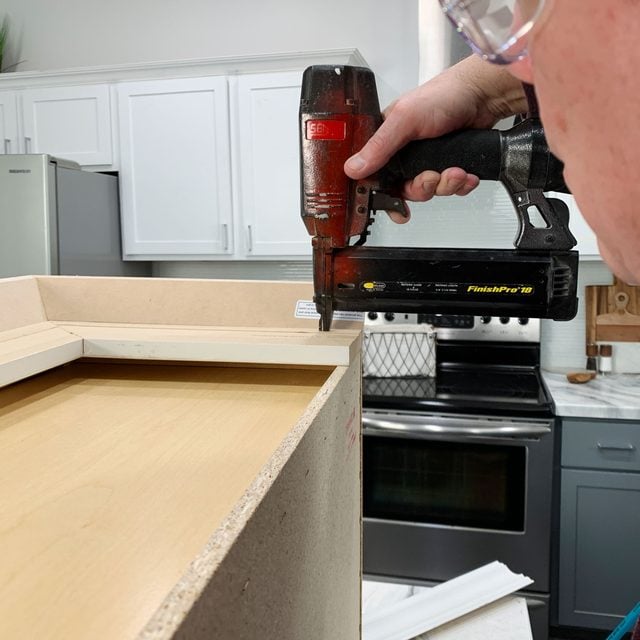
Nailing Techniques
Nails keep the crown moulding attached firmly. Use finishing nails and a hammer or nail gun for best results.
| Nail Type | Size | Placement | Tip |
|---|---|---|---|
| Finishing nails | 1 ¼ inch | Top and bottom edges of moulding | Drive nails at a slight angle for a tighter hold |
| Brad nails | 18 gauge, 1 ½ inch | Every 12 inches along moulding | Use nail set to avoid surface damage |
Make sure to nail into the cabinet wood, not just the moulding. This prevents loosening over time.
Securing With Adhesive
Use adhesive to add extra strength. Apply a thin line on the back of the moulding before positioning it.
- Choose a strong wood glue or construction adhesive.
- Apply evenly along the moulding’s back edge.
- Press the moulding firmly to the cabinet surface.
- Hold in place with clamps or tape until dry.
Finishing Touches
Installing crown moulding on kitchen cabinets adds style and charm. The final steps make the moulding look smooth and complete. These finishing touches cover small gaps and imperfections.
Taking time to fill nail holes, caulk gaps, and apply paint or stain gives the cabinets a polished look. This guide covers these important details.
Filling Nail Holes
Use wood filler to fill all nail holes in the crown moulding. This hides the nails and creates a smooth surface. Choose a filler that matches your moulding color.
- Apply filler with a putty knife.
- Press firmly to fill the hole completely.
- Let the filler dry according to the instructions.
- Sand the filled spots lightly until smooth.
Caulking Gaps
Caulking closes gaps between the moulding and the wall or cabinet. This step prevents dust and moisture from getting in. Use painter’s caulk for easy cleanup and paintability.
To apply caulk smoothly, follow these tips:
- Cut the caulk tube tip at a 45-degree angle.
- Use a caulking gun for steady pressure.
- Run a bead of caulk along all gaps and seams.
- Smooth the bead with a wet finger or a caulk tool.
- Wipe excess caulk quickly with a damp cloth.
Painting And Staining
Painting or staining the crown moulding completes the look. Use a finish that matches or complements your kitchen cabinets.
| Finish Type | Best Use | Dry Time |
| Latex Paint | Easy cleanup, many colors | 1-2 hours |
| Oil-Based Paint | Durable, smooth finish | 6-8 hours |
| Wood Stain | Shows wood grain, natural look | 4-6 hours |
| Polyurethane | Protects paint or stain | 2-4 hours |
Common Mistakes To Avoid
Installing crown moulding on kitchen cabinets can improve the look of your kitchen. Many people make simple mistakes that cause problems later. Avoiding these errors helps the moulding fit well and last longer.
Below are some common mistakes to watch out for. Each one can affect the final result and your satisfaction with the project.
Incorrect Measurements
Measuring wrong is the biggest mistake. Even a small error can cause gaps or uneven fitting. Take your time and double check all measurements before cutting.
- Measure twice, cut once
- Use a reliable tape measure or ruler
- Mark measurements clearly on the moulding
- Account for inside and outside corners
- Include extra length for mistakes or adjustments
Improper Cutting Angles
Cutting crown moulding at the wrong angle causes poor joints and gaps. Understanding the angles needed for corners is important to get clean seams.
| Type of Corner | Cutting Angle | Notes |
| Inside Corner | 45° | Cut both pieces at 45° for a tight joint |
| Outside Corner | 45° | Reverse the angle for outside corners |
| Wall End | 90° | Cut straight for a clean edge at wall ends |
Weak Attachment
Not securing the moulding properly can cause it to fall off or look loose. Use the right tools and fasteners to keep it in place.
- Use finishing nails or screws suitable for wood
- Apply wood glue for extra hold
- Check that nails do not split the moulding
- Use clamps to hold pieces while glue dries
- Fill nail holes with wood filler for a smooth look
Tips For A Professional Look
Installing crown moulding on kitchen cabinets adds a polished finish. It can make your kitchen look more elegant and complete.
To get a professional look, focus on matching styles, seamless joints, and consistent height. These tips help your cabinets stand out.
Matching Moulding Styles
Choose crown moulding that matches your cabinet style. This keeps the design balanced and visually pleasing.
Look at the cabinet edges and details. Pick moulding with similar lines and curves to fit well.
- Use simple moulding for modern cabinets
- Choose ornate moulding for traditional cabinets
- Match the paint or stain color to your cabinets
Ensuring Seamless Joints
Cut moulding pieces carefully to fit tightly together. Gaps make the installation look unfinished.
Use a miter saw to cut angles precisely. Test fit pieces before attaching them.
- Cut inside corners at 45-degree angles
- Use wood glue and finishing nails for strong joints
- Fill any small gaps with wood filler or caulk
Maintaining Consistent Height
Keep the crown moulding height the same all around the cabinets. This makes the moulding look even and neat.
Measure from the cabinet top to the bottom of the moulding before cutting. Mark a guide line for placement.
- Use a level to check moulding alignment
- Secure moulding at the same height on each cabinet
- Adjust as needed to avoid uneven gaps or tilts

Credit: www.thisoldhouse.com
Frequently Asked Questions
What Tools Are Needed To Install Crown Moulding On Cabinets?
You need a miter saw, measuring tape, nail gun, wood glue, and a level. These tools ensure precise cuts and secure attachment for a professional look.
How Do You Measure For Crown Moulding Installation?
Measure the top perimeter of your kitchen cabinets carefully. Add extra length for miter cuts to ensure a perfect fit and seamless corners.
Can Crown Moulding Be Installed On Already Mounted Cabinets?
Yes, crown moulding can be added to installed cabinets. Use a ladder and clamps to hold moulding in place before nailing it securely.
What Type Of Crown Moulding Works Best For Kitchen Cabinets?
Lightweight wood or MDF crown moulding is best. These materials are easy to cut, paint, and install on kitchen cabinets.
Conclusion
Installing crown moulding on kitchen cabinets adds style and value. Take your time measuring and cutting pieces carefully. Use a level to keep everything straight and even. Nail the moulding securely for a strong fit. Sand and paint the edges for a smooth finish.
Small details make a big difference in the final look. Enjoy your refreshed kitchen with a classic touch. This simple upgrade can change the whole room’s feel. Try it yourself and see the difference it brings!


