
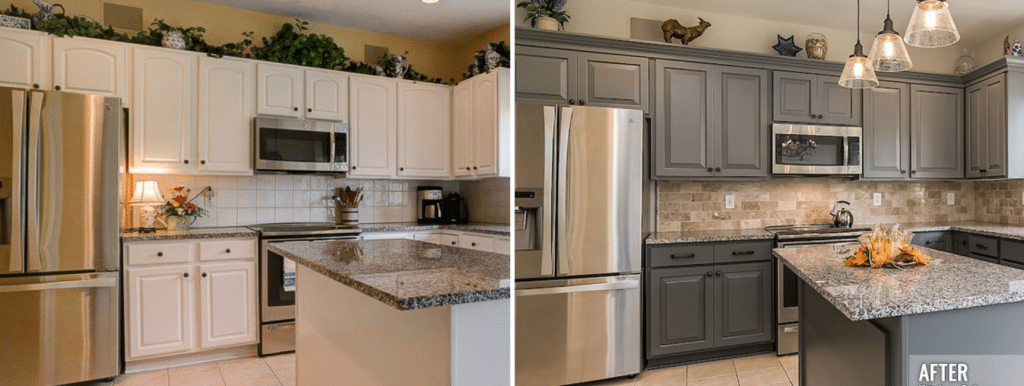
Are you tired of looking at your outdated kitchen cabinets but dread the thought of a full renovation? Replacing just the cabinet doors and drawer fronts might be the perfect solution for you.
It’s an affordable way to give your kitchen a fresh, new look without the hassle of a complete overhaul. Imagine walking into a kitchen that feels brand new, where every cabinet reflects your style and taste. You’re about to discover how this simple change can transform your space.
Stay with us as we guide you step-by-step through the process, ensuring you achieve the kitchen of your dreams with ease and confidence.
Credit: www.nhance.com
Tools And Materials Needed
Replacing kitchen cabinet doors and drawer fronts is a simple way to update your kitchen look. You need the right tools and materials to do the job well.
This guide will help you gather everything before starting your project. Having all supplies ready saves time and effort.
Essential Tools
You need basic hand tools to remove old doors and install new ones. These tools help you work safely and accurately.
- Screwdriver set (flat and Phillips head)
- Drill with drill bits
- Measuring tape
- Level
- Clamps
- Pliers
- Hammer
- Utility knife
Choosing Replacement Doors And Fronts
Pick doors and drawer fronts that fit your cabinet style and size. Measure carefully to get the right fit.
Materials vary from wood to laminate. Choose a material that matches your kitchen design and budget.
- Measure width and height of doors and fronts
- Match style with your kitchen decor
- Choose durable materials like wood or MDF
- Consider pre-finished or paint-ready options
- Order extra hinges if not included
Additional Supplies
Besides tools and doors, gather supplies that help with installation and finishing. These items improve the quality of your work.
- Screws and mounting hardware
- Wood glue or adhesive
- Sandpaper or sanding sponge
- Paint or stain (if needed)
- Painter’s tape
- Cleaning cloths
Preparing Your Kitchen Cabinets
Replacing kitchen cabinet doors and drawer fronts starts with good preparation. You need to get your cabinets ready before installing new parts.
This guide explains how to remove old doors, clean and check your cabinets, and measure for new pieces.
Removing Old Doors And Drawer Fronts
First, take off the cabinet doors and drawer fronts carefully. Use a screwdriver to remove all screws holding them in place. Keep the screws if you plan to reuse them.
- Open cabinet doors fully before removing
- Remove hinges by unscrewing them
- Take off drawer fronts by removing screws inside drawers
- Label doors and drawers to remember their spots
- Store old parts safely in case you need them
Cleaning And Inspecting Cabinets
After removing the old parts, clean the cabinet frames well. Use a mild cleaner and a soft cloth to remove dust and grease. Let the cabinets dry fully before the next step.
| Cleaning Task | Tool Needed | Tip |
| Remove dust and dirt | Soft cloth | Wipe gently to avoid damage |
| Clean grease stains | Mild soap and water | Use small amounts of soap |
| Dry surfaces | Dry towel | Air dry if possible |
| Inspect for damage | Good lighting | Look for cracks or rot |
Check the cabinet frames for damage like cracks or loose parts. Fix any problems before adding new doors and fronts.
Measuring For New Parts
Measure your cabinet openings to buy new doors and drawer fronts that fit well. Use a tape measure for accuracy.
- Measure the width of each cabinet opening
- Measure the height of each cabinet opening
- Write down all measurements clearly
- Double-check measurements to avoid errors
- Note the door and drawer style you want
Installing New Cabinet Doors
Replacing kitchen cabinet doors gives your kitchen a fresh look. Installing new doors is a simple task with the right steps. This guide helps you install new cabinet doors properly.
Follow these instructions carefully to attach, align, and adjust your new cabinet doors. Taking your time will ensure a neat and functional finish.
Attaching Hinges
Start by attaching the hinges to the new cabinet doors. Use screws that come with the hinges. Make sure the hinges are placed in the correct spots to match the cabinet frame.
- Hold the hinge against the door edge.
- Mark the screw holes with a pencil.
- Drill small pilot holes to prevent wood splitting.
- Secure the hinges with screws tightly.
- Repeat for all hinges on each door.
Aligning And Mounting Doors
After attaching hinges, mount the doors to the cabinet frame. Align the doors so they hang evenly and open smoothly. Use clamps or help from another person to hold doors in place.
| Tip | Details |
| Check Level | Use a level to ensure the door is straight. |
| Spacing | Maintain even gaps between doors and cabinet edges. |
| Secure Hinges | Tighten screws on the cabinet frame side firmly. |
| Test Door | Open and close to check smooth movement. |
Adjusting Door Fit
Adjust the doors for a perfect fit after mounting. Most hinges have screws to move the door up, down, left, or right. Use these screws to fix any misalignment.
- Move doors closer or farther from the cabinet frame.
- Adjust height so doors line up at the top and bottom.
- Correct side-to-side gaps for a uniform look.
- Tighten all screws once the fit is right.

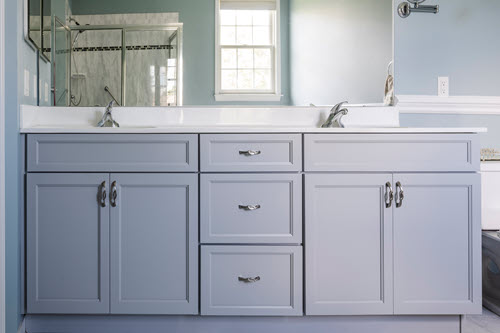
Credit: www.nhance.com
Replacing Drawer Fronts
Replacing drawer fronts can refresh the look of your kitchen. It is a simple project that improves style and function.
This guide focuses on removing old fronts, attaching new ones, and making sure they align well.
Removing Drawer Fronts
Start by opening the drawer fully. Look inside for screws that hold the front panel.
Use a screwdriver to remove all screws carefully. Keep screws safe to reuse or replace if needed.
Attaching New Fronts
Place the new drawer front on a flat surface. Line it up with the drawer box to check size fit.
- Hold the new front in place on the drawer.
- Insert screws through the inside of the drawer into the new front.
- Tighten screws evenly to avoid warping the wood.
- Check that the front is secure and sits flush with the drawer edges.
Ensuring Proper Alignment
Proper alignment prevents drawers from sticking or looking uneven. Measure gaps between drawer fronts.
| Check Point | Ideal Gap |
| Top Edge | 1/8 inch |
| Bottom Edge | 1/8 inch |
| Sides | 1/16 inch |
| Between Drawers | 1/8 inch |
Use a level and measuring tape to adjust the front if gaps are uneven. Loosen screws slightly and shift the front.
Tighten screws again after adjustments. Test the drawer by opening and closing it several times.
Finishing Touches
After replacing kitchen cabinet doors and drawer fronts, the final steps make a big difference. These touches help everything look neat and work well.
Focus on adding hardware, fixing small paint or stain issues, and checking your work. These steps complete your kitchen update.
Installing Handles And Knobs
Handles and knobs give cabinets a finished look and make them easy to open. Choose hardware that fits the style of your kitchen.
Use a drill or screwdriver to attach handles or knobs. Make sure they are tight and aligned properly for a clean look.
- Measure carefully before drilling holes
- Use the right size screws
- Check that all handles are straight
Touching Up Paint Or Stain
Replacing doors might leave small marks or scratches. Use matching paint or stain to fix these spots.
Apply paint or stain in thin coats. Let each coat dry before adding another. This helps the finish look smooth and even.
- Check edges and corners for missed spots
- Use a small brush for better control
- Match the color exactly for best results
Final Inspection And Adjustments
Look over all your cabinet doors and drawers carefully. Open and close them to make sure they work well.
Tighten any loose screws and fix gaps or misalignments. Small changes can improve how your cabinets look and feel.
- Check door alignment and spacing
- Test all hardware for tightness
- Adjust hinges if doors don’t close properly
- Clean the cabinets to remove dust and fingerprints
Tips For A Smooth Diy Project
Replacing kitchen cabinet doors and drawer fronts can refresh your kitchen’s look. Doing it yourself saves money and gives you control over the process.
Planning carefully helps avoid problems and keeps the project running smoothly. Follow these tips to make your DIY experience better.
Working Safely
Safety is important when working with tools and cabinets. Use the right safety gear to protect yourself from injuries.
- Wear safety goggles to protect your eyes from dust and debris.
- Use gloves to avoid cuts and splinters.
- Turn off power if you remove electrical switches or outlets near cabinets.
- Keep your work area clean to prevent trips and falls.
- Handle tools carefully and follow their instructions.
Staying Organized
Organizing your work saves time and reduces stress. Keep track of all parts and tools during the project.
| Tip | Why It Helps |
| Label each door and drawer front | Keeps parts matched to correct spots |
| Store screws and hinges in small containers | Prevents losing small pieces |
| Take photos before removal | Helps remember how parts fit together |
| Set tools in one place | Easy to find what you need |
| Work in stages | Reduces confusion and errors |
Common Mistakes To Avoid
Knowing common mistakes helps you avoid delays and extra costs. Watch out for these errors during your project.
- Not measuring doors and drawers before buying replacements.
- Removing all doors at once without labeling them.
- Forgetting to check hinge types and sizes before purchase.
- Using the wrong screws that damage the wood.
- Skipping sanding or cleaning before painting or staining.
- Ignoring safety rules and rushing the work.

Credit: www.familyhandyman.com
Frequently Asked Questions
How Do I Remove Old Kitchen Cabinet Doors Safely?
Start by removing cabinet door screws using a screwdriver. Support the door while unscrewing to avoid damage. Label each door for easy reinstallation. Keep hardware organized for reuse or replacement later. Handle doors carefully to prevent chipping or warping during removal.
What Tools Are Needed To Replace Cabinet Drawer Fronts?
You need a drill, screwdriver, measuring tape, clamps, and wood glue. Also, have replacement fronts and screws ready. A level helps ensure proper alignment. These tools simplify removing old fronts and attaching new ones accurately and securely.
How Do I Measure Cabinet Doors For Replacement?
Measure the height and width of the existing doors carefully. Measure from edge to edge on the outside. Double-check measurements to ensure accuracy. Accurate sizing helps avoid fitting issues during installation. Write down all measurements clearly before ordering replacements.
Can I Paint Cabinet Doors Instead Of Replacing Them?
Yes, painting is a budget-friendly option to refresh cabinets. Sand doors lightly, clean thoroughly, and use primer. Apply high-quality paint suitable for wood surfaces. Painting extends cabinet life and changes kitchen style without full replacement.
Conclusion
Replacing kitchen cabinet doors and drawer fronts can refresh your space. It saves money compared to a full remodel. Take time to measure and choose the right style. Use basic tools and follow steps carefully for good results. Small changes make a big difference in how your kitchen looks.
Now, enjoy your updated kitchen with a fresh, clean feel. Simple updates bring new life to old cabinets. You can do this yourself and feel proud of the outcome.


