
Is your kitchen faucet not working as efficiently as it used to? You might be dealing with a clogged faucet filter.
Removing and cleaning the filter can significantly improve water flow and quality, saving you from unnecessary frustration. This simple maintenance task can make a world of difference in your daily kitchen routine. But where do you start? You may feel uncertain about handling it, but don’t worry—we’ve got you covered.
In this guide, you’ll discover step-by-step instructions that will show you how to remove your kitchen faucet filter with ease. By the end, you’ll feel empowered to tackle this task confidently, knowing it leads to a better kitchen experience. Dive in to learn how you can restore your faucet’s performance quickly and effortlessly.
Tools Needed
Removing a kitchen faucet filter needs a few simple tools. These tools help you work safely and easily.
Gathering the right tools before you start saves time and prevents damage to your faucet.
Adjustable Wrench
An adjustable wrench fits different sizes of nuts and bolts. It helps loosen the faucet filter housing without scratching it.
Bucket Or Bowl
Keep a bucket or bowl nearby to catch any water left in the faucet. This prevents spills and keeps your work area dry.
Towel Or Rag
A towel or rag helps wipe up water drips. It also protects the faucet finish when using tools.
Replacement Filter
Have the correct replacement filter ready. Check the model number on your faucet to get the right fit.
Optional Tools
- Slip-joint pliers for extra grip
- Flashlight to see inside tight spaces
- Small brush to clean the filter housing
Locate The Faucet Filter
Removing a kitchen faucet filter starts with finding where it is. The filter cleans water, so it is often near the faucet or under the sink.
Knowing the exact location helps you remove it safely without causing damage to your plumbing.
Check Under The Sink
Many faucet filters are installed under the sink. Look for a small cylindrical or rectangular device attached to the water line.
Examine The Faucet Spout
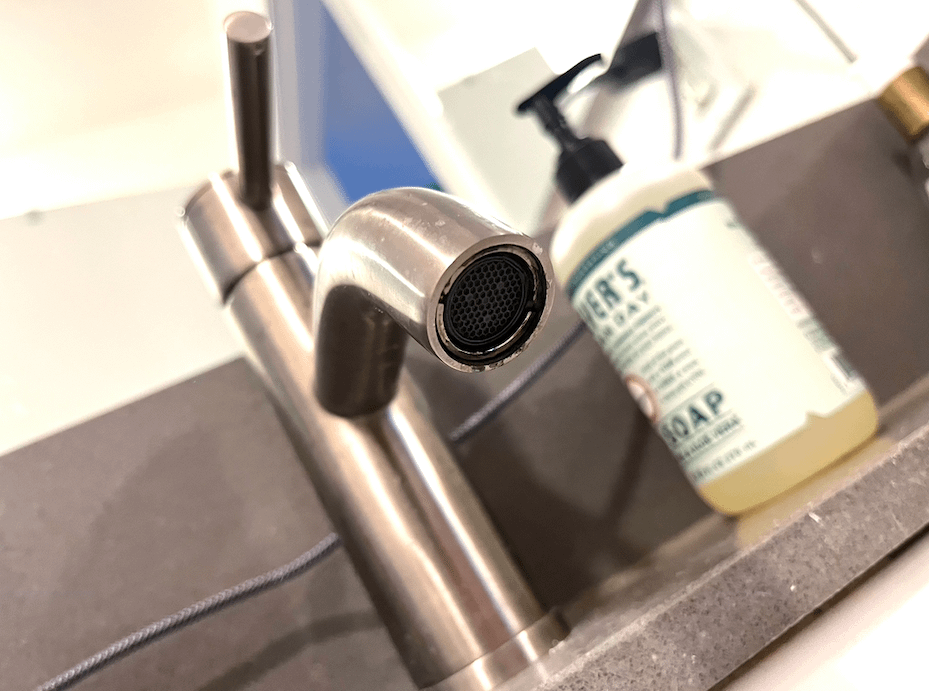
Some kitchen faucets have filters inside the spout. Remove the aerator at the end of the faucet to see if the filter is there.
Look For A Filter Housing
The filter housing holds the filter cartridge. It is usually a small plastic or metal casing connected to the water line.
- Check for a clear or opaque casing near the faucet or under the sink.
- Look for a cap or cover that can be unscrewed.
- Follow the water supply line from the faucet to find any attached filter.
Use A Flashlight For Better Visibility
Under the sink can be dark. Use a flashlight to see small parts clearly and find the filter housing without trouble.
| Location | What to Look For | Tools Needed |
|---|---|---|
| Under the Sink | Filter housing on water line | Flashlight, wrench |
| Faucet Spout | Aerator with built-in filter | Wrench or pliers |
Turn Off Water Supply
Turning off the water supply is the first step to safely remove a kitchen faucet filter. This stops water flow and prevents leaks.
It is important to know where the water shut-off valves are under your sink. These valves control water to the faucet.
Locate The Shut-off Valves
Look under your kitchen sink for two valves. One controls hot water, the other controls cold water.
They are usually small, round handles or lever-style valves attached to pipes.
- Hot water valve is usually on the left
- Cold water valve is usually on the right
- Both valves are close to the wall or sink base
Turn The Valves Off
Turn both valves clockwise to close them. This stops water flow to the faucet.
Turn slowly and gently to avoid damaging the valves.
- Turn until you feel resistance
- Do not force the valve if it is stuck
- Use a cloth for better grip if needed
Check That Water Is Off
Open the kitchen faucet to confirm water stops flowing. If water still runs, the valves may not be fully closed.
Close the faucet after checking to avoid water wastage.
- Turn on faucet handle slowly
- Watch for water flow or drops
- If water flows, turn valves more
Remove The Faucet Aerator
The faucet aerator is the small filter at the end of your kitchen faucet. Removing it helps clean the filter and fix water flow problems.
Here are two easy ways to remove the faucet aerator safely without damaging it.
Unscrew By Hand
Try to unscrew the aerator by hand first. Most aerators can be removed this way easily.
Grip the aerator firmly and turn it counterclockwise. If it feels stuck, do not force it too hard.
- Make sure your hands are dry for a better grip
- Use a cloth to protect the aerator from scratches
- Turn slowly to avoid damaging the threads
Use A Wrench For Stubborn Filters
If the aerator is tight or stuck, use a wrench to loosen it. This gives extra grip and power.
Wrap a cloth around the aerator before using the wrench. This will prevent scratches and damage.
- Use an adjustable wrench or a pair of pliers
- Turn the wrench slowly counterclockwise
- Stop if you feel too much resistance to avoid breaking the faucet
Extract The Filter Cartridge
Removing the filter cartridge from your kitchen faucet is easy. This guide helps you extract it safely and quickly.
Follow the instructions below to avoid damage to the faucet or the cartridge. Keep your water clean by changing the filter regularly.
Turn Off The Water Supply
Before you start, shut off the water supply under the sink. This prevents water from spilling when you remove the cartridge.
Remove The Faucet Handle
Use a screwdriver or an Allen wrench to loosen the screw on the faucet handle. Carefully lift the handle off to access the filter cartridge.
Unscrew The Filter Cartridge Housing
Grip the cartridge housing firmly. Turn it counterclockwise to unscrew. If it is tight, use a cloth for a better grip and to protect the finish.
Once the housing is loose, pull the filter cartridge straight out. Avoid twisting or forcing it. If stuck, gently wiggle the cartridge to loosen.
- Check the cartridge for dirt or damage
- Clean the cartridge if reusable
- Replace the cartridge if worn out
- Reinsert the cartridge carefully
Reassemble The Faucet
| Action | Details |
| Insert Cartridge | Place the cartridge back in the housing aligned properly |
| Screw Housing | Turn housing clockwise until secure but not tight |
| Attach Handle | Fix the handle and tighten the screw |
| Turn On Water | Open the water supply and check for leaks |

Credit: www.reddit.com
Clean Or Replace The Filter
Keeping your kitchen faucet filter clean helps maintain water flow. Sometimes, you need to replace the filter for better performance.
This guide shows how to clean the filter using vinegar and when to replace it.
Cleaning With Vinegar
Vinegar removes mineral buildup and cleans the faucet filter well. Follow these steps to clean it safely.
- Turn off the water supply under the sink.
- Unscrew the faucet aerator or filter housing carefully.
- Remove the filter and soak it in white vinegar for one hour.
- Use a soft brush to scrub away loosened debris.
- Rinse the filter with clean water before reinstalling.
- Screw the parts back and turn on the water supply.
When To Replace
Filters do not last forever. Replace them if cleaning does not restore water flow or if the filter is damaged.
| Condition | Action |
| Filter clogged after cleaning | Replace the filter |
| Filter shows cracks or breaks | Replace immediately |
| Water flow is weak but filter looks clean | Check faucet or plumbing |
| Filter is older than 1 year | Consider replacement |
Reinstall The Filter And Aerator
After cleaning or replacing the kitchen faucet filter, you need to reinstall it properly. Reinstalling the filter and aerator ensures your faucet works well and saves water.
Follow simple steps to put the filter and aerator back in place without damaging the parts.
Prepare The Filter And Aerator
Before reinstalling, check the filter and aerator for dirt or damage. Clean them if needed to keep water flow smooth.
Make sure all parts are dry and ready to fit back on the faucet.
- Rinse the filter under running water
- Use a soft brush to remove debris
- Dry parts with a clean cloth
Attach The Filter To The Faucet
Place the filter into the faucet opening. Align it carefully to avoid cross-threading.
Turn the filter clockwise to tighten it by hand. Do not use tools that might damage the threads.
- Check that the filter fits snugly
- Hand-tighten only, avoid over-tightening
- Ensure no gaps are visible
Reinstall The Aerator
Next, screw the aerator onto the filter or faucet spout. The aerator helps control water flow and reduce splashing.
Turn the aerator clockwise until it is secure. Use your fingers to tighten it gently.
- Align the aerator threads with the faucet
- Hand-tighten carefully
- Check for leaks by turning on the water

Credit: www.sumarse.org.pa
Test The Faucet
Testing the faucet after removing the kitchen faucet filter ensures it works properly. It helps check for leaks and water flow issues.
This step is important to confirm the faucet is clean and ready for use without the filter.
Turn On The Water
Open the faucet slowly to let water flow through. Watch for any unusual noises or changes in pressure.
Check For Leaks
Look under the sink and around the faucet base. Make sure no water drips or pools in these areas.
Observe Water Flow
Water should flow evenly and steadily from the faucet spout. Weak or uneven flow may mean debris is still inside.
- Watch for steady water pressure
- Check if water sprays or drips irregularly
- Note any strange smells or colors
Use Water Quality Table
| Water Quality Check | What to Look For |
| Clear Water | Normal flow and appearance |
| Cloudy Water | Possible leftover filter debris |
| Colored Water | Indicates rust or sediment |
| Low Pressure | Blockage or valve issue |
Troubleshooting Tips
Removing a kitchen faucet filter can be tricky if you do not know what to expect. Some common problems include stuck filters, leaks, or difficulty accessing the filter.
These tips will help you solve issues and safely remove the filter without damage to your faucet.
Check Water Supply Before Removal
Always turn off the water supply before trying to remove the filter. This prevents water from spraying out and causing a mess or damage.
Use Proper Tools For Stuck Filters
Some filters get stuck due to mineral build-up or tight installation. Use the right tools carefully to avoid breaking parts.
- Use an adjustable wrench with a soft cloth to protect the faucet.
- Try applying a penetrating oil and wait a few minutes.
- Gently tap around the filter to loosen it.
- A rubber strap wrench can help grip the filter firmly without damage.
Inspect For Leaks After Removal
Leaks can happen if the filter or faucet parts get damaged during removal. Check all seals and washers closely.
| Problem | Cause | Solution |
| Water Leak | Damaged O-ring | Replace O-ring before reinstalling |
| Loose Filter | Worn Threads | Clean or replace the filter housing |
| Low Water Pressure | Clogged Filter | Clean or replace filter cartridge |
Clean The Filter Area Thoroughly
Before installing a new filter, clean the faucet’s filter housing area. Dirt or mineral deposits can cause poor fit or leaks.
Use white vinegar or a mild cleaner to soak and scrub the filter seat. Rinse well before installing the new filter.

Credit: www.leftonhome.com
Frequently Asked Questions
How Do I Remove A Kitchen Faucet Filter Easily?
Turn off the water supply first. Unscrew the faucet aerator or filter housing carefully. Use pliers if needed, but protect the finish with a cloth. Remove the filter cartridge and clean or replace it as necessary. Reassemble and turn the water back on.
What Tools Are Needed To Remove A Kitchen Faucet Filter?
You typically need adjustable pliers or a wrench. A cloth or tape protects the faucet finish. Sometimes, no tools are required if the filter housing is hand-tightened. Having a bucket or towel handy helps catch any water drips during removal.
How Often Should I Replace My Kitchen Faucet Filter?
Replace the filter every 3 to 6 months. Frequency depends on water quality and usage. Regular replacement ensures clean, safe water and optimal faucet performance. Check manufacturer guidelines for specific recommendations to maintain effective filtration.
Can I Clean And Reuse A Kitchen Faucet Filter?
Yes, some filters are reusable after cleaning. Rinse the filter under running water to remove debris. Use a soft brush for thorough cleaning. However, replace the filter if damaged or heavily clogged for best results.
Conclusion
Removing a kitchen faucet filter is simple and quick. Start by turning off the water supply. Then, unscrew the filter carefully. Clean or replace it as needed. Make sure to reassemble all parts tightly. Regular filter cleaning helps keep water fresh and clean.
A well-maintained faucet lasts longer and works better. Try this easy task to improve your kitchen water quality today.


