

Are your kitchen drawers giving you trouble? Struggling with that annoying glide that just won’t cooperate?
You’re not alone. Many homeowners face the same issue, and the solution is often simpler than you might think. In this guide, you’ll discover straightforward steps to remove those stubborn kitchen drawer glides. Imagine the satisfaction of having smooth, effortlessly opening drawers once again.
It’s easier than you think, and you’ll be amazed at how a small change can make a big difference in your daily routine. So, if you’re ready to tackle this common kitchen nuisance, read on to learn how to get your drawers back on track.
Tools Needed
Removing kitchen drawer glides requires some basic tools. Having the right tools makes the job easier and faster.
Gathering all tools before starting helps avoid delays and frustration during the process.
Screwdrivers
You will need screwdrivers to remove screws holding the glides in place. Usually, a Phillips head screwdriver is needed, but a flathead might be useful too.
Pliers
Pliers help to grip and pull out stubborn parts or nails. Needle-nose pliers are best for tight spaces inside the drawer.
Utility Knife
A utility knife can cut any caulk or paint sealing the drawer glides. It also helps to score around the edges for easier removal.
Measuring Tape
Measuring tape is useful to check the size of the drawer and glides. This helps when buying replacement parts or reinstalling.
Safety Gear
- Work gloves protect your hands from sharp edges
- Safety glasses shield your eyes from dust and debris
Summary Of Tools
| Tool | Purpose |
|---|---|
| Screwdrivers | Remove screws securing glides |
| Pliers | Grip and pull parts |
| Utility Knife | Cut caulk and sealant |
| Measuring Tape | Measure drawer and glide size |
| Work Gloves | Protect hands |
| Safety Glasses | Protect eyes |
Types Of Drawer Glides
Kitchen drawers use different types of glides to open and close smoothly. Knowing the type helps in removing or replacing them. The three main types are side-mounted, under-mounted, and center-mounted glides.
Each type has a unique design and installation method. Understanding these will make your work easier and faster.
Side-mounted Glides
Side-mounted glides attach to the sides of the drawer and the cabinet. They are visible when the drawer is open. This type is common in many kitchens because they are strong and easy to install.
- Made of metal or plastic
- Support heavy loads
- Can have ball bearings for smooth movement
- Easy to remove by unscrewing side screws
Under-mounted Glides
Under-mounted glides sit beneath the drawer, hidden from view. They offer a clean look and often have soft-close features. These glides are attached to the bottom of the drawer and the cabinet frame.
| Feature | Description |
| Visibility | Hidden under the drawer |
| Installation | Mounted under drawer and cabinet |
| Benefits | Cleaner look, soft-close option |
| Removal | Slide out and release clips or screws |
Center-mounted Glides
Center-mounted glides are fixed under the center of the drawer. They allow the drawer to slide straight in and out. This type is less common but works well for light to medium loads.
Key points about center-mounted glides:
- One glide strip under the drawer center
- Usually made of metal
- Simple design and easy to remove
- Not ideal for very heavy drawers
Preparing The Drawer
Before removing kitchen drawer glides, you need to prepare the drawer. Proper preparation makes the process easier and safer.
Start by clearing everything inside the drawer. Then, check for any stops that block the drawer from sliding out fully.
Empty The Drawer
Remove all items from the drawer to avoid damage and make handling easier. A light, empty drawer is simpler to take out and work with.
- Take out utensils, tools, or any stored items.
- Check corners and sides for small objects.
- Set items aside safely to prevent loss or breakage.
Remove Drawer Stops
Drawer stops keep the drawer from sliding completely out. Removing them helps you take out the drawer easily.
| Type of Stop | How to Remove | Notes |
|---|---|---|
| Plastic Clips | Press or squeeze clips to release | Usually near drawer sides |
| Metal Tabs | Bend tabs up or down with screwdriver | May require gentle force |
| Screws | Use screwdriver to unscrew stops | Keep screws safe for reassembly |
Credit: www.ifixit.com
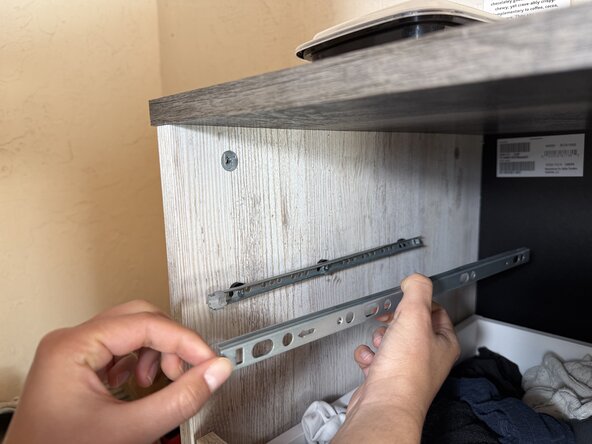
Removing Side-mounted Glides
Side-mounted glides help kitchen drawers slide smoothly. Removing them is simple with the right steps. This guide explains how to remove these glides safely and easily.
Before starting, gather a screwdriver and keep the drawer empty for easier handling. Follow each step carefully to avoid damage.
Locate Screws
Look inside the drawer and under the side glides. Screws hold the glides firmly to both the drawer and cabinet. Finding all screws is important before removal.
- Open the drawer fully and pull it out if possible.
- Check both sides of the drawer for screws.
- Look inside the cabinet where the glide attaches.
- Use a flashlight to see hidden screws clearly.
Unscrew And Detach
Use a screwdriver to remove all screws holding the glide. Keep screws in a safe place for later use. Gently pull the glide away from the drawer and cabinet.
| Tool | Purpose |
| Screwdriver | Remove screws from glides |
| Flashlight | Find hidden screws in dark areas |
| Container | Keep screws safe and organized |
Removing Under-mounted Glides
Under-mounted drawer glides are hidden beneath the drawer, providing a clean look. Removing them needs care to avoid damage to the drawer or cabinet.
This guide shows how to remove under-mounted glides safely and easily.
Access The Glide Mechanism
First, open the drawer fully to see the glide system underneath. You may need to lift the drawer slightly to release it from the cabinet. Look for any levers or clips that hold the drawer in place.
- Pull the drawer straight out until it stops.
- Lift the front of the drawer slightly to clear the glide.
- Locate the glide parts attached under the drawer and inside the cabinet.
- Check for any visible clips or locks on the glide.
Release Clips Or Screws
Under-mounted glides usually attach with clips or screws. Releasing these is key to removing the glide and drawer.
| Type | How to Release |
| Clips | Press or lift the clip to unlock the glide |
| Screws | Use a screwdriver to remove screws securing the glide |
After releasing clips or removing screws, gently pull the glide away from the drawer or cabinet. Keep all parts safe for reassembly or replacement.
Removing Center-mounted Glides
Center-mounted drawer glides support the drawer from the middle. They help the drawer slide smoothly in and out. Removing them carefully prevents damage to the drawer and cabinet.
This guide shows how to take out center-mounted glides safely. Follow the steps below to identify the mounting points and remove fasteners.
Identify Mounting Points
Center-mounted glides usually attach to the bottom center of the drawer and the cabinet. Look inside the cabinet and under the drawer to find the exact spots where the glide is fixed.
- Open the drawer fully to see the glide clearly.
- Check the center bottom area of the drawer for screws or clips.
- Look inside the cabinet base for the matching glide part.
- Note if the glide uses screws, nails, or clips.
- Use a flashlight if the area is dark or hard to see.
Remove Fasteners
Once you find the mounting points, remove the fasteners holding the glide. Use the right tools and work gently to avoid damage.
- Choose a screwdriver or drill bit that fits the screws.
- Unscrew all screws from both the drawer and cabinet parts.
- If clips are used, carefully pry them open with a flat tool.
- Keep all screws and parts in a safe place for reuse.
- Gently pull the glide out from the drawer and cabinet.
| Fastener Type | Tool Needed | Removal Tips |
| Screws | Screwdriver or drill | Turn counterclockwise slowly |
| Nails | Pry bar or pliers | Lift gently to avoid wood damage |
| Clips | Flathead screwdriver | Slide or pry carefully |
Tips For Stubborn Glides
Removing kitchen drawer glides can be tricky if they are stuck. Some glides get stuck because of rust or tight screws.
These tips help you remove stubborn glides without damage. You will need some basic tools and patience.
Use Lubricant To Loosen Rust
Apply a spray lubricant like WD-40 to rusty glide parts. This helps loosen rust and makes screws easier to turn.
Let the lubricant sit for 10 minutes before trying to remove the glide again. Repeat if needed.
Remove Screws Carefully
Use the correct screwdriver to avoid stripping screws. Turn screws slowly and apply steady pressure.
- Use a screwdriver that fits the screw head perfectly
- Press down firmly while turning
- If a screw is stuck, try a manual impact driver
Tap The Glide Gently
Sometimes glides stick due to paint or swelling wood. Tap the glide gently with a hammer and a wood block.
This helps break the seal without damaging the glide or drawer. Avoid heavy hits that may cause damage.
Heat Stuck Areas
Use a hairdryer to warm metal parts of the glide. Heat expands metal and can loosen tight parts.
Do not use an open flame. Heat only for a few minutes and try removing the glide again.
Check For Hidden Clips Or Locks
Some drawer glides have clips or locks holding them in place. Look closely for these before pulling.
- Look inside the drawer sides for small clips
- Press or slide clips to release the glide
- Consult glide instructions if available

Credit: www.4x4community.co.za
Safety Precautions
Removing kitchen drawer glides can be tricky. Safety is very important. Take steps to protect yourself and your kitchen.
Wear the right gear and follow safe methods. This will help you avoid injuries and damage.
Wear Protective Gloves And Eyewear
Gloves protect your hands from sharp edges on the drawer glides. Safety glasses keep dust and small debris out of your eyes. Always wear them before you start.
Clear The Work Area
Make sure the space around the drawer is clean and free of obstacles. This prevents trips and falls. Remove items inside the drawer to avoid spills or broken objects.
Use The Correct Tools
Use screwdrivers or drills that fit the screws well. Using wrong tools can strip screws or cause slips. Check your tools before starting.
- Choose a screwdriver that matches the screw head.
- Use a drill with adjustable speed for better control.
- Keep tools in good condition and clean.
- Have a magnetic tray nearby to hold screws.
Work Slowly And Carefully
Do not rush when removing drawer glides. Take your time to avoid slipping or breaking parts. If a screw is hard to remove, stop and check the situation.
Keep Children And Pets Away
Children and pets can get hurt or distract you. Keep them out of the work area until you finish. This keeps everyone safe.
Check For Hidden Fasteners
Some drawer glides have hidden screws or clips. Look carefully before you pull the glide off. Removing it without checking can cause damage.
| Type of Glide | Hidden Fasteners |
|---|---|
| Side Mount | Small clips under the glide |
| Bottom Mount | Screws hidden under drawer bottom |
| Center Mount | Single screw inside drawer back |

Credit: www.reddit.com
Frequently Asked Questions
How Do I Remove Kitchen Drawer Glides Easily?
To remove kitchen drawer glides, first empty the drawer. Unscrew the glide brackets from both the drawer and cabinet. Gently pull the drawer out and slide the glides off. Use a screwdriver and keep screws safe for reinstallation or replacement.
What Tools Are Needed To Remove Drawer Glides?
You need a screwdriver, usually Phillips or flathead, to remove screws. A putty knife or pry bar helps if glides are stuck. Optional: a flashlight for better visibility inside the cabinet. These tools make the removal process quick and safe.
Can I Reuse Kitchen Drawer Glides After Removal?
Yes, you can reuse glides if they are undamaged. Inspect for bends, cracks, or wear before reinstalling. Clean old glides thoroughly to ensure smooth drawer operation. If damaged, replace with new glides for better performance.
How Long Does It Take To Remove Drawer Glides?
Removing drawer glides typically takes 5 to 10 minutes per drawer. Time varies based on glide type and condition. Proper tools and a careful approach speed up the process without damage.
Conclusion
Removing kitchen drawer glides does not have to be hard. Follow the steps carefully and take your time. Use the right tools to avoid damage. Check the drawer and cabinet for screws or clips. Keep all parts safe for later use or replacement.
Cleaning the area before installing new glides helps a lot. With patience, you can do this yourself. A smooth drawer makes your kitchen better. Try it and see the difference it makes!


