
Are you looking to add a touch of elegance to your Ikea kitchen cabinets? Installing crown moulding can transform your kitchen from simple to stunning with just a few steps.
This guide will walk you through the process, making it easy for you to achieve a professional look without the professional price tag. Imagine the compliments you’ll receive from friends and family when they see your sleek, upgraded kitchen. You don’t need to be a DIY expert; you just need a little guidance and the right tools.
Ready to give your kitchen the makeover it deserves? Let’s dive into how you can effortlessly install crown moulding on your Ikea cabinets.
Tools And Materials Needed
Installing crown moulding on Ikea kitchen cabinets can improve your kitchen’s look. You need the right tools and materials for a smooth job.
This guide covers the essential tools, how to pick the right crown moulding, and extra supplies you may need.
Essential Tools
Having the right tools makes cutting and fitting crown moulding easier. These tools help you measure, cut, and attach the moulding properly.
- Measuring tape – to get accurate lengths
- Miter saw – for clean angled cuts
- Level – to keep moulding straight
- Stud finder – to locate cabinet edges
- Drill or screwdriver – to fasten screws
- Nail gun or hammer – to secure moulding
- Caulking gun – for finishing gaps
- Sandpaper – to smooth edges
Choosing The Right Crown Moulding
Choose crown moulding that fits Ikea cabinets and your kitchen style. The moulding should match the cabinet size and color.
Look for moulding that is easy to cut and install. Lightweight wood or MDF are good options.
- Pick moulding height to match cabinet size
- Choose material that is paintable or pre-finished
- Simple designs suit modern kitchens
- Detailed moulding fits traditional styles
Additional Supplies
Besides tools and moulding, gather supplies to complete the job. These help with installation and finishing touches.
- Wood glue – for extra hold
- Finish nails – small nails for trim
- Painter’s tape – to protect surfaces
- Wood filler – to cover nail holes
- Primer and paint – to match moulding
- Drop cloth – to keep workspace clean
Credit: www.familyhandyman.com
Preparing The Cabinets
Before installing crown moulding on Ikea kitchen cabinets, you need to prepare the surfaces. Proper preparation helps the moulding fit well and last longer.
Cleaning and measuring are important steps. They make sure the moulding sticks firmly and looks neat.
Cleaning And Clearing The Surface
Start by removing all items from the cabinet tops. Clear dust, grease, and dirt from the surfaces where the moulding will go.
Use a mild cleaner and a soft cloth. Avoid harsh chemicals that can damage the cabinet finish.
- Remove dirt with a damp cloth
- Use mild soap if needed
- Dry the surface completely
- Check for any bumps or nails
Measuring For Accurate Cuts
Measure the length of each cabinet top where the moulding will be installed. Accurate measurements help avoid gaps or overlaps.
Mark the moulding pieces clearly before cutting. Use a miter saw or a fine-toothed hand saw for clean edges.
- Measure each cabinet side carefully
- Write down all measurements
- Double-check before cutting
- Cut moulding at proper angles for corners
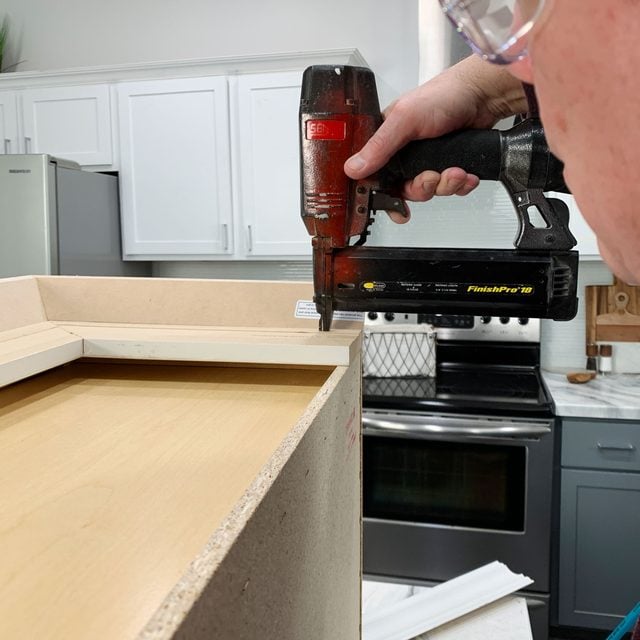
Cutting Crown Moulding
Cutting crown moulding accurately is key to a professional look on Ikea kitchen cabinets. This process requires careful measuring and precise cutting tools.
In this guide, learn how to measure angles, use a miter saw, and get tips for perfect cuts on your crown moulding.
Measuring Angles
Measure the angles where the crown moulding will fit. Most corners are either 90 or 135 degrees. Use a protractor or angle finder tool to get exact measurements. Mark your moulding pieces clearly before cutting.
Quick Angle Guide for Crown Moulding:
| Wall Corner Angle | Crown Moulding Cut Angle |
| 90° (right angle) | 45° miter cut |
| 135° (obtuse angle) | 22.5° miter cut |
Using A Miter Saw
A miter saw is essential for cutting crown moulding with clean edges. Set the saw blade to the correct angle based on your measurements. Hold the moulding firmly against the saw fence for stability.
- Set the miter saw to the angle you marked.
- Place the crown moulding upside down on the saw.
- Align the cutting edge with your mark.
- Make a slow, steady cut to avoid splintering.
- Check the cut piece against the cabinet before final installation.
Tips For Perfect Cuts
Use these tips to improve your cutting results and reduce waste. Accuracy and patience matter most when working with crown moulding.
- Double-check all measurements before cutting.
- Use a sharp blade on your miter saw.
- Support long pieces of moulding to prevent bending.
- Make test cuts on scrap wood first.
- Sand edges lightly for a smooth finish.
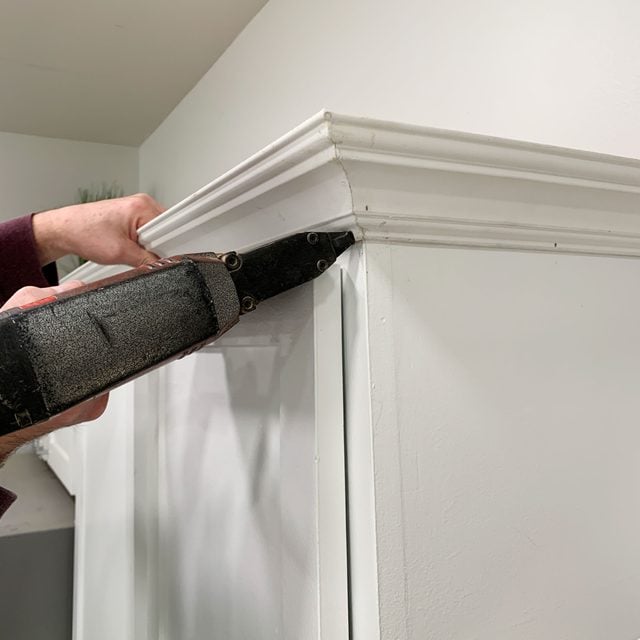
Attaching The Moulding
Attaching crown moulding to Ikea kitchen cabinets adds a finished look. It can be tricky due to the cabinet design. Careful steps ensure a strong, clean fit.
Use the right tools and techniques to avoid damage. This guide covers how to position, nail, glue, and fill gaps for a perfect finish.
Positioning The Moulding
Start by measuring the top edge of your cabinets. Cut the moulding to fit the length, using a miter saw for clean corners. Dry fit the pieces before attaching.
Hold the moulding flush against the cabinet top and wall. Check that the angles match and the moulding sits evenly. Adjust as needed for a tight fit.
- Measure cabinet width and height
- Cut moulding with 45-degree angles for corners
- Dry fit to check alignment and fit
- Make small adjustments before fixing
Nailing And Gluing Techniques
Use finishing nails to attach the moulding to the cabinet frame. Nail through the moulding into the cabinet top for a secure hold. Use a nail gun for easier nailing.
Apply wood glue on the back of the moulding before nailing. The glue adds strength and helps hold the moulding in place. Wipe off any excess glue quickly.
- Apply wood glue on moulding back
- Use 1 to 1.5-inch finishing nails
- Nail into cabinet frame, not just the panel
- Use a nail gun or hammer carefully
- Clean glue drips immediately
Filling Gaps And Seams
After attaching, check for gaps or seams between moulding pieces. Use wood filler or caulk to fill these gaps. Smooth the filler with a putty knife for a clean look.
Let the filler dry, then sand it lightly. Paint or stain the moulding to match the cabinets. This step gives a seamless finish and hides nails.
- Fill gaps with wood filler or caulk
- Smooth filler with a putty knife
- Allow filler to dry completely
- Sand gently for smoothness
- Paint or stain to match cabinets
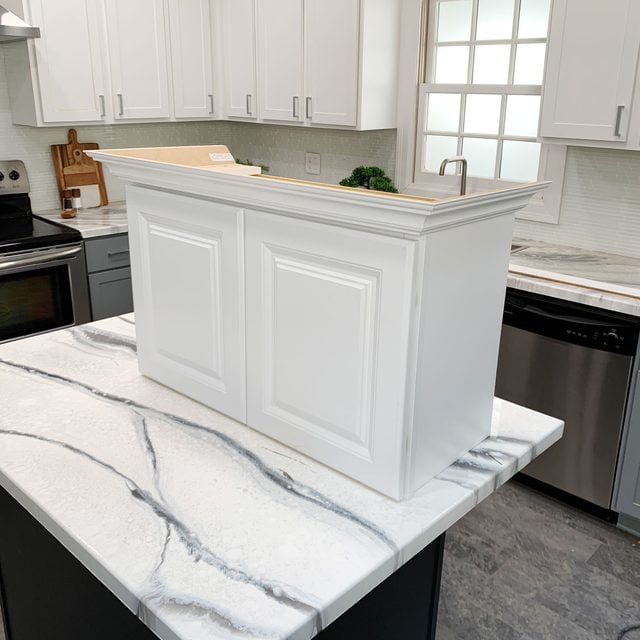
Finishing Touches
Adding crown moulding to Ikea kitchen cabinets gives them a polished look. The final steps ensure the moulding fits perfectly and looks great.
These finishing touches include sanding, painting or staining, and a careful inspection. Each step helps create a smooth and professional finish.
Sanding And Smoothing
Start by sanding the crown moulding with fine-grit sandpaper. This removes any rough edges or glue marks.
Make sure to sand the corners and joints where the moulding pieces meet. Smooth surfaces help paint or stain stick better.
- Use 120 to 220 grit sandpaper
- Smooth all edges and corners
- Wipe dust with a clean cloth
Painting And Staining
Choose paint or stain that matches your kitchen cabinets. Use a small brush for detailed areas on the moulding.
Apply thin coats to avoid drips. Let each coat dry completely before adding another.
- Use primer if painting raw wood
- Apply two or more thin coats
- Dry time depends on product label
Final Inspection
Check all edges and corners for smoothness and color consistency. Look for any spots that need touch-ups.
Make sure the crown moulding fits tightly with the cabinets. Fix any gaps with wood filler or caulk if needed.
- Inspect all seams and joints
- Touch up paint or stain as needed
- Fill gaps with matching filler or caulk
Credit: www.familyhandyman.com
Common Mistakes To Avoid
Installing crown moulding on Ikea kitchen cabinets can improve the look of your kitchen. Many people make mistakes that cause problems. Avoiding these errors helps get a neat and strong finish.
This guide explains common mistakes. Watch out for these to save time and get better results.
Incorrect Measurements
Measuring wrong is a big problem when adding crown moulding. If the pieces are too long or short, they won’t fit well.
Take your time to measure twice before cutting. Use a reliable tape measure and mark the moulding carefully.
- Measure the length of each cabinet section.
- Mark angles clearly for corner cuts.
- Double-check measurements before cutting.
Improper Adhesive Use
Using the wrong glue or too little adhesive can make the moulding fall off. Some adhesives do not stick well to Ikea cabinet surfaces.
Choose an adhesive made for wood and laminate. Apply enough glue to hold the moulding firmly in place.
- Use wood glue or construction adhesive.
- Avoid cheap glues that dry too fast.
- Apply glue evenly on the back of the moulding.
- Clamp or hold the moulding until the glue sets.
Ignoring Wall Irregularities
Walls and cabinets are not always perfectly straight or flat. Ignoring bumps or gaps can cause gaps between the moulding and wall.
Check for uneven spots before installing. Use caulk or wood filler to fix gaps for a smooth look.
- Run your hand along the wall to feel bumps.
- Fill small gaps with caulk before gluing moulding.
- Sand rough or uneven cabinet tops if needed.
- Use painter’s tape to hold moulding while adjusting fit.
Tips For A Professional Look
Installing crown moulding on Ikea kitchen cabinets can add a stylish touch. The right approach makes the finish look clean and polished.
Focus on color, angles, and finishing techniques to get a professional result. Small details improve the overall appearance.
Choosing Complementary Colors
Select crown moulding colors that match or complement your cabinet finish. This creates a smooth transition between pieces.
- Pick colors from the same family as your cabinets
- Use lighter shades for a subtle contrast
- Consider painting moulding to match wall colors for cohesion
- Test samples in different lighting before finalizing
Maintaining Consistent Angles
Keep the angles uniform when cutting and fitting crown moulding. Consistent angles ensure tight joints and a clean look.
| Angle Type | Description |
| Inside Corner | Cut at 45 degrees to fit cabinet corners |
| Outside Corner | Cut at 45 degrees outward for cabinet edges |
| End Cuts | Square or mitered cuts to finish runs neatly |
Using Caulk For Seamless Finish
Caulk hides gaps and fills joints between moulding and cabinets. It gives a smooth, seamless finish that looks professional.
Follow these tips when applying caulk:
- Use paintable latex caulk for easy finishing
- Apply a thin bead along gaps and smooth with a wet finger
- Clean excess caulk immediately to avoid mess
- Allow caulk to dry fully before painting
Credit: www.familyhandyman.com
Frequently Asked Questions
How Do I Prepare Ikea Cabinets For Crown Moulding?
Start by cleaning the cabinet tops thoroughly. Remove any existing trim or obstacles. Measure and mark where the moulding will sit. Use a level to ensure straight placement before installation.
What Tools Are Needed To Install Crown Moulding?
You will need a miter saw, measuring tape, level, drill, screws, wood glue, and finishing nails. A nail gun can speed up the process and improve accuracy.
Can I Install Crown Moulding Without Professional Help?
Yes, installing crown moulding on Ikea cabinets is doable with basic DIY skills. Follow detailed guides and take your time for precise cuts and fitting.
How Do I Attach Crown Moulding To Ikea Cabinets?
Use wood glue and finishing nails to attach the moulding. Pre-drill holes to avoid splitting, and use clamps to hold pieces while drying.
Conclusion
Adding crown moulding to Ikea kitchen cabinets lifts their style instantly. Measure carefully before cutting to ensure a perfect fit. Use the right tools and take your time for neat results. Small mistakes can be fixed with wood filler or paint.
Enjoy the new, polished look that adds charm and value to your kitchen. With patience and care, anyone can do this project successfully. Ready to give your cabinets a fresh, elegant touch?


