

How to Clean Kitchen Racks for a Sparkling Shine 2026
Is your kitchen feeling cluttered and chaotic? If so, your kitchen racks might be the culprits.
These essential storage saviors can quickly become magnets for grime, grease, and forgotten spices. Tackling this mess might seem daunting, but imagine the satisfaction of a sparkling, organized kitchen space that makes meal prep a breeze. In this guide on How to Clean Kitchen Racks, we’ll reveal the secrets to transforming your kitchen racks from dusty to dazzling.
You’ll discover simple yet effective techniques that will not only make your kitchen racks shine but also enhance the overall ambiance of your culinary haven. Ready to reclaim your kitchen’s sparkle? Let’s dive in and make cleaning those racks a breeze!
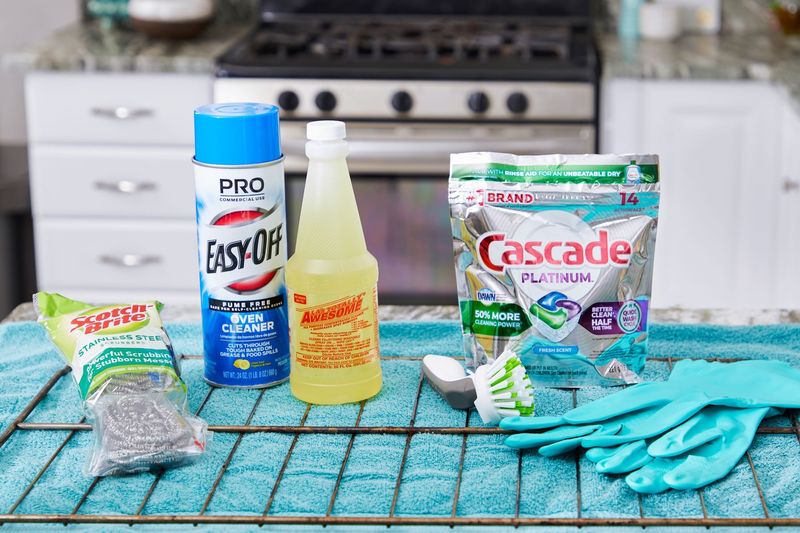
Choosing The Right Cleaning Tools
Cleaning kitchen racks well keeps them shiny and lasts longer. Picking the right tools helps you clean better and saves time.
Use tools that fit the type of dirt and rack material. This makes cleaning safe and easy.
Essential Supplies For Kitchen Racks
Gather these basic supplies before cleaning your kitchen racks. They help remove grease, dust, and food bits.
- Soft cloths or microfiber towels
- Non-abrasive scrub brushes
- Spray bottles for cleaners
- Rubber gloves to protect hands
- Bucket for warm water
- Old toothbrush for small corners
Natural Vs. Chemical Cleaners
Choose cleaners based on your rack type and health needs. Natural cleaners are gentle but may need more scrubbing.
| Cleaner Type | Advantages | Disadvantages |
| Natural | Safe for skin and environment, smells fresh | Less powerful on tough grease, longer cleaning time |
| Chemical | Strong on grease and stains, fast results | Can irritate skin, smells strong, needs careful use |

Credit: bbqovencleaning.com.au
Preparing The Kitchen Rack
Cleaning a kitchen rack starts with proper preparation. This step makes the cleaning easier and safer.
Take time to get the rack ready. This prevents damage to items and saves cleaning time.
Removing Items Safely
Take off all items from the rack carefully. This avoids dropping or breaking dishes and utensils.
Place items on a clean surface to keep them safe while you clean the rack.
- Check each shelf for fragile items.
- Lift items gently to avoid scratches.
- Use both hands for heavy or large items.
- Set items aside in a clean, dry place.
Pre-cleaning Dust And Debris
Remove dust and crumbs before washing. This step stops dirt from spreading during cleaning.
Use a soft cloth or brush to clear loose debris from all surfaces of the rack.
- Start from the top shelf and move down.
- Shake out crumbs into a trash bin.
- Wipe corners and edges carefully.
- Use a vacuum with a brush attachment if needed.
Cleaning Methods For Different Materials
Kitchen racks come in many materials. Cleaning each type needs a special way. Using the wrong method can cause damage.
We will explain how to clean metal, wooden, and plastic racks. Follow the tips to keep them looking good.
Metal Racks
Metal racks are strong and easy to clean. Use mild soap and warm water. Avoid harsh chemicals that can rust the metal.
- Remove dust with a dry cloth.
- Mix mild dish soap with warm water.
- Use a soft sponge to scrub the rack.
- Rinse with clean water.
- Dry thoroughly with a towel to prevent rust.
Wooden Racks
Wooden racks need gentle cleaning to avoid cracks. Do not soak in water. Use a damp cloth with mild soap to wipe the surface.
| Cleaning Tip | Reason |
| Use damp cloth only | Prevents wood from swelling |
| Avoid harsh chemicals | Protects wood finish |
| Dry immediately | Stops mold and mildew |
Plastic Racks
Plastic racks are easy to clean but can stain. Use baking soda paste for tough stains. Rinse well to remove residue.
Follow these steps for plastic racks:
- Wipe dust off with a dry cloth.
- Mix water with a little dish soap.
- Use a sponge to scrub the rack.
- For stains, apply baking soda paste and let sit 10 minutes.
- Rinse with warm water and dry.
Deep Cleaning Techniques
Kitchen racks collect grease, dust, and food stains. Deep cleaning keeps them safe and shiny.
Use effective techniques to remove tough grime and make racks look new again.
Soaking And Scrubbing
Soaking kitchen racks loosens dirt and grease. Use warm water with dish soap for best results.
After soaking, scrub racks gently with a brush or sponge. Focus on corners and joints.
- Fill a basin with warm water and dish soap
- Submerge the racks for 20-30 minutes
- Scrub with a soft brush to remove residue
- Rinse well with clean water
- Dry racks before placing back in the kitchen
Using Baking Soda And Vinegar
Baking soda and vinegar create a natural cleaner. This mix breaks down tough stains and grease.
Sprinkle baking soda on the rack, then spray vinegar. Let it fizz for a few minutes.
- Sprinkle baking soda over dirty areas
- Spray white vinegar on the baking soda
- Wait 5-10 minutes for fizzing action
- Scrub the rack with a brush or sponge
- Rinse thoroughly with water and dry
Drying And Maintaining Shine
Cleaning kitchen racks is only part of the job. Drying them properly helps avoid rust and water spots. Keeping racks shiny makes your kitchen look neat and fresh.
Use the right methods for drying and polishing. This guide shares easy tips to keep your kitchen racks dry and bright.
Proper Drying Tips
After washing, dry kitchen racks quickly to stop moisture damage. Use soft cloths or towels to avoid scratches. Let racks air dry fully before putting items back.
- Wipe racks with a clean, dry cloth right after washing.
- Place racks in a well-ventilated area to air dry faster.
- Avoid stacking racks until completely dry to prevent mold.
- Use a hairdryer on low heat to dry hard-to-reach spots.
Polishing For Extra Shine
Polishing your kitchen racks adds a smooth shine and protects the surface. Use natural or store-bought polish safely.
| Polish Type | Use | Benefits |
| Lemon Juice | Apply with cloth, then rinse | Removes stains, adds shine |
| Olive Oil | Rub a thin layer, wipe excess | Prevents rust, smooth finish |
| Commercial Metal Polish | Follow product instructions | Restores shine, protects metal |
While olive oil provides a nice shine, the best food-safe protection for metal racks comes from mineral oil. Unlike vegetable oils (like olive oil), mineral oil does not turn rancid over time, which is crucial for preventing a sticky, foul-smelling buildup that actually attracts dust and grime. “For long-term rust protection on infrequently used metal racks, apply a thin coat of food-grade mineral oil after cleaning. It forms a stable, protective barrier that doesn’t spoil.”
Credit: decorhint.com
Preventing Future Dirt And Grime
Keeping kitchen racks clean is easier with good habits. Dirt and grime build up less when you care for racks regularly.
Using protective coatings and liners can also stop stains and damage. These simple steps keep your racks looking fresh.
Regular Maintenance Habits
Clean kitchen racks often to avoid tough grime. Wipe spills quickly and remove crumbs daily. This stops dirt from sticking hard.
- Wipe racks with a damp cloth after cooking
- Use mild soap and warm water weekly
- Dry racks fully to avoid rust or mold
- Check racks for stains and clean immediately
- Keep kitchen well-ventilated to reduce moisture
Protective Coatings And Liners
Apply coatings or liners to protect racks from dirt and damage. These layers make cleaning faster and keep racks safe.
| Type | Use | Benefits |
| Non-slip liners | Cover shelves and drawers | Stop scratches and catch crumbs |
| Clear sealant spray | Coat metal racks | Prevent rust and stains |
| Plastic mats | Place under heavy items | Protect surface and ease cleaning |
Credit: www.rd.com
Frequently Asked Questions
How Often Should Kitchen Racks Be Cleaned?
Kitchen racks should be cleaned at least once a month. Frequent cleaning prevents grease buildup and bacteria growth. For heavy use, clean biweekly. Regular maintenance keeps racks hygienic and looking new.
What Is The Best Cleaner For Kitchen Racks?
A mixture of warm water, dish soap, and vinegar works well. It effectively removes grease and grime without damaging racks. Avoid harsh chemicals that can corrode metal surfaces. Always test cleaners on a small area first.
Can Kitchen Racks Be Cleaned Without Removing Them?
Yes, you can clean racks in place using a spray cleaner. Spray the solution, let it sit, then wipe with a cloth. This method works for light dirt but deep cleaning needs removal.
How To Remove Rust From Kitchen Racks?
Use a paste of baking soda and water to scrub rust spots. Let it sit for 15 minutes before wiping. For tough rust, use a commercial rust remover. Always dry racks thoroughly after cleaning.
Conclusion
Cleaning kitchen racks keeps your space neat and safe. Regular scrubbing stops dirt and germs from building up. Use simple tools like soap, water, and a brush. Dry racks well to avoid rust and damage. Clean racks help your kitchen look fresh and work better.
Try these easy steps often to keep racks shiny. A clean kitchen makes cooking more enjoyable and healthy. Simple care saves time and effort later. Keep your kitchen racks clean for a happier home.


