

Cleaning your Kitchen Aid oven racks might not be the highlight of your week, but imagine the satisfaction of seeing them gleaming and spotless. You deserve a kitchen that’s as pristine and inviting as the delicious meals you create.
Ever noticed how a clean kitchen boosts your mood and productivity? It’s no coincidence. A tidy space can actually make cooking feel less like a chore and more like a joy. In this guide, you’ll discover simple, effective methods to transform your oven racks from grimy to gleaming without the hassle.
Ready to make your kitchen sparkle and enjoy the benefits of a cleaner cooking environment? Keep reading to find out how effortless it can be.

Credit: www.kitchenaid.ca
Preparing Oven Racks For Cleaning
Cleaning your Kitchen Aid oven racks starts with good preparation. This makes the process easier and safer.
Getting the racks ready helps remove grease and grime better. It also protects your hands and floors.
Removing Racks Safely
Before cleaning, take the oven racks out carefully. This prevents damage to the racks and your oven.
Make sure the oven is cool to avoid burns. Use both hands to hold the racks firmly.
- Turn off the oven and wait until it cools.
- Open the oven door fully for easy access.
- Grip the rack firmly on both sides.
- Pull the rack straight out without tilting.
- Place the racks on a sturdy surface.
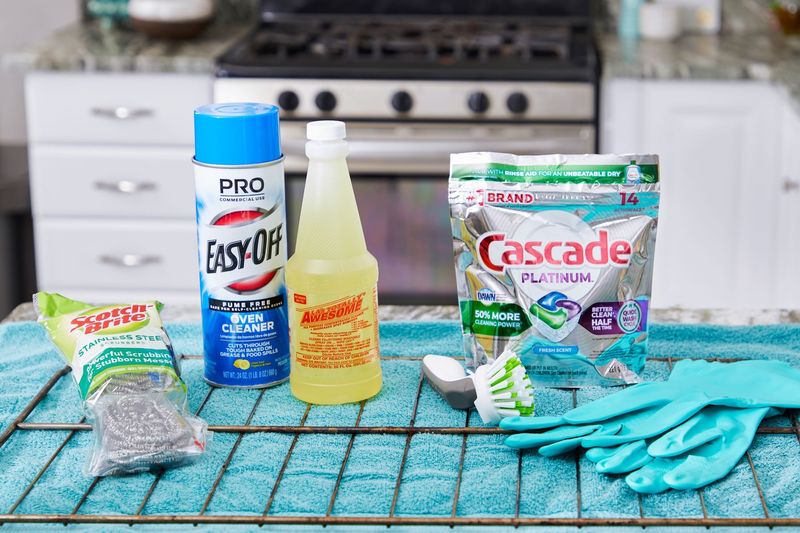
Gathering Cleaning Supplies
Use the right supplies to clean the oven racks well. This saves time and effort.
Have everything ready before you start cleaning. This keeps the process smooth and safe.
- Dish soap or a mild detergent
- Baking soda for scrubbing
- White vinegar for tough stains
- A large basin or bathtub for soaking
- Soft cloths or sponges
- Rubber gloves to protect your hands

Credit: www.amazon.ca
Simple Soaking Method
Cleaning Kitchen Aid oven racks can be easy with soaking. Soaking helps loosen grime and burnt food. This method saves scrubbing time and effort.
Use the right soaking solution and soak for the correct time. These tips help you get your racks clean and shiny again.
Choosing The Right Soaking Solution
Pick a solution that softens grease and burnt bits. Here are some common options to try:
- Dish soap mixed with warm water
- Baking soda and vinegar paste
- Ammonia in a sealed bag (use with caution)
- Commercial oven cleaner (follow instructions carefully)
Soaking Time Tips
| Soaking Solution | Recommended Soaking Time | Notes |
| Dish soap and warm water | 2-4 hours | Good for light to moderate grime |
| Baking soda and vinegar paste | 4-6 hours | Best for tougher stains |
| Ammonia in sealed bag | Overnight (8-12 hours) | Use in a well-ventilated area |
| Commercial oven cleaner | As directed on label | Wear gloves and avoid skin contact |
Scrubbing And Removing Stubborn Stains
Cleaning Kitchen Aid oven racks can be tough. Stubborn stains and baked-on grease need strong but gentle methods. Using the right materials helps protect your racks while making them shine.
This guide shows two easy ways to scrub and remove tough stains from your oven racks safely.
Using Baking Soda And Vinegar
Baking soda and vinegar form a natural cleaning duo. They work together to loosen grime and break down grease without harsh chemicals.
- Make a paste by mixing baking soda with water.
- Spread the paste over the oven racks, focusing on stained areas.
- Let the paste sit for at least 30 minutes to work on the stains.
- Spray white vinegar over the baking soda paste to create fizzing action.
- After fizzing stops, scrub the racks with a sponge or cloth.
- Rinse the racks thoroughly with warm water and dry them.
Employing A Non-abrasive Scrubber
Using a non-abrasive scrubber protects the rack’s finish. It cleans well without scratching the metal surface.
| Scrubber Type | Best Use |
|---|---|
| Soft Sponge | Light stains and everyday cleaning |
| Non-scratch Scouring Pad | Stubborn stains without damage |
| Microfiber Cloth | Final wipe and polish |
Credit: decorhint.com
Alternative Cleaning Techniques
Cleaning Kitchen Aid oven racks can be done in many ways. Some methods are simple and use items you already have at home. Others involve special products designed for oven racks.
These alternative techniques make cleaning easier and can remove tough grime. Here are two options to try if you want to skip the usual scrubbing.
Dishwasher Cleaning Option
Using a dishwasher is a convenient way to clean oven racks. This method works best if your racks fit inside your dishwasher.
- Remove loose crumbs and debris from the racks.
- Place the racks flat inside the dishwasher.
- Use a heavy-duty dishwasher detergent.
- Run the dishwasher on the hottest and longest cycle.
- Check the racks after the cycle for any leftover grime.
- Repeat if necessary or spot clean stubborn spots.
Commercial Oven Rack Cleaners
Commercial cleaners are made to dissolve baked-on grease and grime fast. These products are strong and need careful use.
| Cleaner Type | Use Instructions | Safety Tips |
| Spray Cleaner | Spray on racks and let sit 10-15 minutes, then scrub. | Wear gloves and work in a ventilated area. |
| Soak Solution | Mix with water, soak racks for 30 minutes, then rinse. | Avoid skin contact and follow label directions. |
| Gel Cleaner | Apply gel to tough spots, wait 20 minutes, then wipe off. | Use gloves and keep away from children. |
Drying And Reinstalling Racks
After cleaning your Kitchen Aid oven racks, drying them properly is important. This prevents rust and keeps your racks in good condition.
Once dry, putting the racks back correctly helps your oven work well and keeps food cooking evenly.
Proper Drying Methods
Drying your oven racks completely stops moisture from causing damage. You can use several easy methods to dry them safely.
- Use a clean towel to wipe off water from all rack surfaces.
- Set the racks in a warm, dry area for air drying.
- Place racks near a fan to speed up drying.
- Avoid direct sunlight to prevent discoloration.
- Make sure racks are fully dry before reinstalling.
Placing Racks Back Into The Oven
Put your racks back in the oven carefully to avoid damage. Correct placement helps your oven heat evenly and cooks food better.
| Step | Action | Tip |
| 1 | Hold the rack with both hands on each side. | Check for any bends or damage before placing. |
| 2 | Slide the rack gently into the oven rails. | Do not force it if it feels stuck. |
| 3 | Make sure the rack is level and stable. | Test by gently pressing down on the rack. |
| 4 | Leave space between racks for airflow. | Do not overcrowd the oven. |
Tips To Maintain Clean Oven Racks
Keeping your Kitchen Aid oven racks clean makes cooking easier. Dirt and grease can build up over time. Regular care helps your racks last longer.
Follow simple cleaning steps and use good habits. This guide covers how to clean and keep your racks spotless.
Regular Cleaning Schedule
Set a cleaning routine to stop grime from hardening. Clean your oven racks every few weeks or after heavy use.
- Remove racks from the oven carefully.
- Soak them in warm, soapy water for at least 30 minutes.
- Use a soft brush or sponge to scrub off food and grease.
- Rinse with clean water and dry completely before replacing.
Preventing Future Buildup
Stop grease and food from sticking to your racks. Use these tips to keep them cleaner longer.
| Tip | How It Helps |
| Line racks with aluminum foil | Catches spills and drips |
| Wipe racks after each use | Prevents grease from hardening |
| Avoid using harsh chemicals | Protects rack finish |
| Use oven-safe liners | Makes cleaning faster |
Frequently Asked Questions
How Do I Remove Kitchen Aid Oven Racks Safely?
To remove Kitchen Aid oven racks, pull them gently toward you. Lift slightly to release from side supports. Avoid using force to prevent damage or bending.
What Is The Best Cleaner For Kitchen Aid Oven Racks?
Use a mixture of warm water and mild dish soap. For tough grime, add baking soda or vinegar. Avoid harsh chemicals to protect the rack’s finish.
Can I Clean Kitchen Aid Oven Racks In The Dishwasher?
Most Kitchen Aid oven racks are dishwasher-safe. Place racks on the bottom rack of your dishwasher. This method saves time and removes grease effectively.
How Often Should I Clean Kitchen Aid Oven Racks?
Clean oven racks every 2 to 3 months or after heavy use. Regular cleaning prevents buildup and keeps racks looking new and functional.
Conclusion
Cleaning Kitchen Aid oven racks does not have to be hard. Use gentle scrubbing and simple cleaning solutions. Avoid harsh chemicals to keep racks in good shape. Regular cleaning keeps your oven fresh and safe. Try these easy steps for best results.
Your oven racks will look clean and work well. A clean oven makes cooking more enjoyable. Keep up with cleaning to prevent tough stains later. Small effort now saves time in the future. Simple care brings lasting cleanliness to your kitchen.


