Are you looking to add a touch of elegance and style to your kitchen without a full renovation? How to Build a Kitchen Tray Ceiling might be the perfect solution.
This simple yet striking design can transform the feel of your space, making it look bigger, brighter, and more inviting. In this guide, you’ll discover easy steps to create a stunning tray ceiling that fits your budget and skill level.
Keep reading, and by the end, you’ll have the confidence to give your kitchen a fresh, eye-catching upgrade that everyone will notice.
Credit: www.jlconline.com
Planning Your Tray Ceiling
Building a kitchen tray ceiling adds style and depth to your space. Careful planning helps you get the best result.
Think about the design, size, and materials before you start. This guide covers key points to plan well.
Choosing The Right Design
Pick a tray ceiling design that matches your kitchen style. Simple shapes suit small kitchens. Larger kitchens can use more detailed designs.
Consider the ceiling height and lighting. Some designs work better with recessed lights. Others fit natural light well.
- Square or rectangular trays fit most kitchens
- Multi-level trays add depth but need more space
- Rounded edges soften the look
- Include space for lighting fixtures
Measuring Your Kitchen Space
Accurate measurements are key to a good tray ceiling. Measure the ceiling length and width carefully. Note any uneven areas.
Mark the area where the tray will go. Measure the height from ceiling to the lowest point. This helps decide the tray depth.
- Use a tape measure for length and width
- Check ceiling height in several spots
- Mark edges with pencil for clear lines
- Record all measurements before buying materials
Selecting Materials And Tools
Choose materials that are moisture-resistant, since kitchens have humidity. Common materials include drywall and wood molding.
Gather the right tools to make the job easier. You will need measuring tools, saws, nails, and finishing supplies.
- Moisture-resistant drywall or plywood
- Wood or MDF molding for trim
- Measuring tape and level
- Power saw and nail gun
- Joint compound and sandpaper
- Paint and primer
Preparing The Ceiling Surface
Building a kitchen tray ceiling starts with preparing the ceiling surface. This step ensures a smooth and safe installation.
Proper preparation helps avoid problems later and makes your work easier. Focus on clearing, marking, and checking the ceiling.
Clearing And Cleaning The Area
Remove all furniture and items from the kitchen area. This gives you space to work safely and freely.
Clean the ceiling to remove dust and dirt. A clean surface helps materials stick better and prevents damage.
Marking The Tray Outline
Use a pencil and measuring tape to draw the tray ceiling outline on the ceiling. Measure carefully to keep lines straight.
Mark the edges where the tray will drop down. These marks guide your cutting and framing work later.
- Find the center of the ceiling
- Measure equal distances for symmetry
- Use a level to keep lines even
Checking For Electrical And Plumbing
Look for lights, fans, or pipes in the ceiling area. Knowing their location helps avoid damage during installation.
Turn off power to the kitchen before touching electrical parts. Call a professional if you find complex wiring or plumbing.
Constructing The Frame
Building a kitchen tray ceiling starts with creating a strong frame. The frame supports the entire ceiling design. Careful measuring and cutting are key to a good fit.
This guide covers three main parts: building the outer frame, installing the inner recessed section, and securing the framework.
Building The Outer Frame
The outer frame forms the base around the kitchen ceiling edges. Use sturdy wood or metal strips for support. Measure the ceiling perimeter and cut materials to size.
- Mark the ceiling edges where the tray will sit.
- Cut the frame pieces to fit these marked lines.
- Attach the frame securely to ceiling joists with screws.
- Check the frame is level all around before moving on.
Installing The Inner Recessed Section
The inner recessed section creates the tray's depth. It sits inside the outer frame and drops down slightly. Measure and cut the inner pieces carefully.
| Material | Length | Width | Notes |
| Wood strip | Depends on ceiling size | 3 inches | For recessed edges |
| Drywall panel | Cut to fit inner section | Varies | For ceiling surface |
| Screws | 1.5 to 2 inches | N/A | To secure materials |
Securing The Framework
Fasten all parts tightly to prevent sagging. Use a level to keep surfaces even. Adding corner braces improves strength and stability.
- Use screws instead of nails for better hold.
- Add metal brackets at corners for extra support.
- Double-check all connections before finishing.
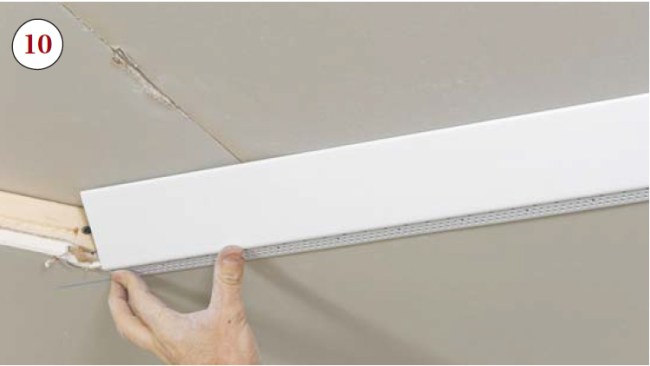
Adding Drywall And Finishing Touches
Building a kitchen tray ceiling takes patience and care. Adding drywall and finishing touches helps create a smooth, clean look.
This guide covers cutting drywall, taping seams, and sanding surfaces to make your ceiling ready for paint or texture.
Cutting And Installing Drywall
Measure the tray ceiling sections carefully before cutting drywall. Use a utility knife to score and snap drywall sheets.
Attach drywall to the ceiling frame using drywall screws. Make sure sheets fit tightly and edges align well.
- Measure each tray section precisely
- Score drywall with a utility knife
- Snap drywall along the score line
- Screw drywall sheets into ceiling frame
- Check for tight seams and level surface
Taping And Mudding Seams
Apply drywall tape over seams to prevent cracks. Use joint compound (mud) to cover tape and screw holes.
Spread mud evenly with a drywall knife. Let it dry before adding more layers for a smooth finish.
- Place drywall tape over joints
- Cover tape with thin layer of mud
- Smooth mud with a drywall knife
- Fill screw holes with mud
- Allow mud to dry completely
- Repeat mudding for smooth surface
Sanding And Smoothing Surfaces
Sand the dried mud with fine-grit sandpaper. This removes bumps and creates a flat surface.
Wear a mask to avoid dust. Clean the ceiling with a damp cloth before painting or adding texture.
- Use fine-grit sandpaper (120-220 grit)
- Sand seams and mud until smooth
- Wear a dust mask for safety
- Wipe ceiling with damp cloth
- Check surface for any rough spots
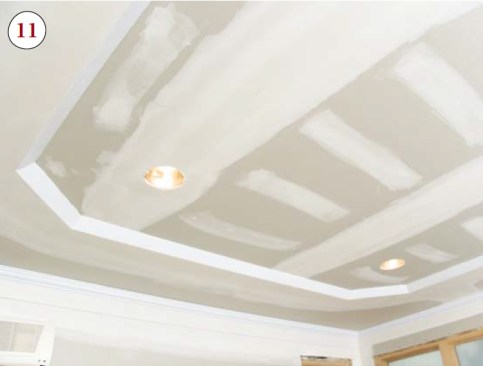
Painting And Lighting Options
Building a kitchen tray ceiling adds style and depth to your space. Painting and lighting are key to highlighting this feature well.
Choosing the right paint and lighting can make the ceiling stand out or blend smoothly. Let’s explore some simple ideas.
Choosing Paint Colors
Pick colors that match your kitchen style and lighting. Light colors make the ceiling look taller.
Darker colors add drama and focus. You can use one color or two for contrast.
- Soft whites and creams brighten the room
- Pastel blues or greens add calm tones
- Bold colors like navy or charcoal create depth
- Use contrasting colors for the tray edges
Applying Paint Evenly
Use a good primer before painting. It helps paint stick and look smooth.
Apply thin coats of paint with a roller or brush. Let each coat dry before adding the next.
- Start with edges using a brush
- Use a roller for flat ceiling areas
- Paint in one direction for even color
- Avoid drips by not overloading paint tools
Installing Recessed And Accent Lighting
Recessed lights fit inside the ceiling for a clean look. They provide bright, even light.
Accent lighting highlights the tray edges. LED strips or small spotlights work well.
- Place recessed lights around the tray for balance
- Use dimmers to control light mood
- Install LED strips inside tray edges for glow
- Accent lights add warmth and focus
Credit: www.jlconline.com
Maintaining Your Tray Ceiling
Tray ceilings add beauty and depth to any kitchen. Keeping them in good shape helps maintain their charm.
Regular care prevents damage and keeps your kitchen looking fresh and inviting.
Regular Cleaning Tips
Dust and dirt can build up on tray ceilings. Cleaning them often keeps the surface bright and neat.
- Use a soft cloth or duster to remove dust weekly.
- For stains, gently wipe with a damp sponge and mild soap.
- Avoid harsh chemicals that can damage paint or finish.
- Check corners and edges for cobwebs or dirt buildup.
Spot Repairs And Touch-ups
Small cracks or chips can happen over time. Fix these quickly to avoid bigger problems.
| Issue | Fix | Tools Needed |
| Cracks | Fill with spackling paste | Putty knife, sandpaper |
| Peeling paint | Sand and repaint area | Sandpaper, paintbrush, matching paint |
| Water stains | Clean and repaint with stain-block primer | Cleaner, primer, paintbrush |
Upgrading Lighting Fixtures
Tray ceilings often have built-in lights. Updating these can refresh your kitchen’s look.
- Choose LED bulbs for energy saving and longer life.
- Install dimmers to control light brightness easily.
- Consider adding accent lights to highlight the tray design.
- Hire a professional for electrical work to ensure safety.

Credit: www.amenify.in
Frequently Asked Questions
What Tools Are Needed To Build A Kitchen Tray Ceiling?
You need a measuring tape, level, saw, drill, screws, drywall, joint compound, and paint. Safety gear is also essential. Proper tools ensure a smooth and accurate installation process.
How Much Does It Cost To Install A Tray Ceiling?
Tray ceiling installation costs range from $500 to $2,500. Factors include ceiling size, materials, and labor. Custom designs and lighting add to the total price.
How Long Does It Take To Build A Tray Ceiling?
Building a tray ceiling usually takes 2 to 4 days. Time varies based on complexity, ceiling size, and skill level. Allow time for drying and finishing.
Can I Install A Tray Ceiling Myself?
Yes, DIY installation is possible with basic carpentry skills. Follow detailed instructions and safety precautions. However, professional help ensures better results and fewer mistakes.
Conclusion
Creating a kitchen tray ceiling adds elegance to your space. It's a project worth the effort. Start with a clear plan and gather necessary tools. Follow each step carefully to ensure precision. Take your time; patience leads to great results.
Safety should always be a top priority. Double-check your work for a professional finish. Soon, you'll enjoy the stylish look of your new ceiling. Enhance your kitchen's charm and value with this beautiful upgrade. A tray ceiling can transform your kitchen into a welcoming and attractive spot.
Enjoy the new ambiance!