


Troubleshooting Common Timing Issues
Baking bread after proofing needs the right timing. Baking too little or too long causes problems.
This guide helps you spot and fix common timing mistakes with baked bread.
Underbaked Bread Signs
Underbaked bread feels doughy inside and looks pale on top. It may also be sticky or heavy.
Check for these signs to avoid eating raw Dough or dense bread.
- The crust is very soft and pale
- The inside feels wet or gummy
- The bread sinks when pressed lightly
- The loaf sounds dull when tapped
Overbaked Bread Fixes
Overbaked bread has a hard crust and a dry inside. It can be tough to eat, but it is still useful.
Try these fixes to improve the texture and flavor of overbaked bread.
- Wrap the bread in a damp cloth and warm it briefly
- Use slices for toast or bread pudding
- Serve with butter, spreads, or sauces to add moisture
- Store leftover bread in an airtight container to keep it soft.

Credit: breadtopia.com
Frequently Asked Questions
How Long Should I Bake Bread After Proofing?
Bake bread for 25 to 35 minutes after proofing, depending on the recipe. The crust should be golden brown and sound hollow when tapped. Use an oven temperature between 375°F and 450°F for optimal results.
What Is The Ideal Oven Temperature For Baking Proofed Bread?
The ideal oven temperature for baking proofed bread ranges from 375°F to 450°F. Higher temperatures create a crisp crust quickly, while moderate heat ensures even baking. Always follow your recipe’s temperature recommendation for best results.
How Do I Know When Proofed Bread Is Fully Baked?
Proofed bread is fully baked when it has a golden crust and sounds hollow when tapped. Internal temperature should be around 190°F to 210°F. Using a thermometer helps ensure the bread is cooked through and not underbaked.
Can Baking Time Vary After Bread Proofing?
Yes, baking time varies based on bread size, type, and oven temperature. Smaller loaves bake faster, while denser bread requires longer baking. Always check for a golden crust and hollow sound to confirm doneness.
Conclusion
Baking bread can seem tricky, but it's truly rewarding. After proofing, baking time depends on bread type and oven temperature. Check for a golden crust and hollow sound when tapped. This signals readiness. Always let your bread cool before slicing.
It enhances the flavor and texture. Practice makes perfect. With time, you'll bake like a pro. Enjoy the delicious aroma and taste of homemade bread. It's a comforting delight. Don't rush the process. Patience is key. Happy baking!
Ideal Baking Times For Different Breads
Baking bread after proofing is important for good texture and flavor. Different breads need different baking times. This guide helps you bake each type just right.
Knowing how long to bake bread after proofing saves time and avoids undercooked or burnt loaves. Read on for ideal baking times for common breads.
White And Wheat Loaves
White and wheat loaves are classic breads. They usually bake well at 350°F to 375°F. Baking time depends on size and shape.
A standard 1-pound loaf takes about 30 to 40 minutes. Larger loaves need up to 45 minutes. Check for a golden crust and hollow sound when tapped.
- Small loaves: 25-30 minutes at 350°F (175°C)
- Medium loaves: 35-40 minutes at 375°F (190°C)
- Large loaves: 40-45 minutes at 375°F (190°C)
Sourdough Variations
Sourdough bread has a thick crust and chewy crumb. It bakes longer than white bread. Bake sourdough at a higher temperature for a crusty outside.
Most sourdough loaves bake well between 400°F and 450°F. The baking time is usually 35 to 50 minutes. Use a thermometer to check for 200°F inside.
- Small sourdough: 35-40 minutes at 400°F (205°C)
- Medium sourdough: 40-45 minutes at 425°F (220°C)
- Large sourdough: 45-50 minutes at 450°F (230°C)
Quick Breads And Buns
Quick breads and buns use baking powder or soda. They bake faster than yeast breads. The oven temperature is usually lower.
Most quick breads bake at 350°F. Baking time varies from 20 minutes for small buns to 60 minutes for large loaves. Watch closely to avoid drying out.
- Small buns: 15-20 minutes at 350°F (175°C)
- Medium buns: 20-25 minutes at 350°F (175°C)
- Quick bread loaves: 50-60 minutes at 350°F (175°C)
Oven Settings And Their Impact
Baking bread after proofing needs the right oven settings. These settings affect the bread’s crust, texture, and baking time.
Choosing the correct temperature and oven type helps you bake bread evenly. It also affects how the crust forms and how the bread rises.
Temperature Guidelines
Bread usually bakes between 350°F and 475°F. The exact temperature depends on the bread type and recipe.
High temperatures create a thick, crispy crust. Lower temperatures bake bread more gently but may give a softer crust.
- 350°F to 375°F: Good for soft breads and enriched Dough
- 400°F to 450°F: Ideal for crusty artisan breads
- 475°F: Best for quick oven spring and dark crusts
Using Steam For Crust
Adding steam in the oven helps develop a shiny and crispy crust. Steam delays crust hardening so bread can expand fully.
You can add steam by spraying water or placing a pan of water in the oven. Steam works best in the first 10 to 15 minutes of baking.
- Place a shallow pan with water at the bottom of the oven
- Spray water on bread or oven walls before baking
- Use steam only in the early baking phase
Convection Vs. Conventional Ovens
Convection ovens use fans to circulate hot air. This speeds up baking and creates a crisp crust.
Conventional ovens bake with still air. They may bake more slowly and less evenly, but keep bread moist.
- Convection ovens bake 25% faster than conventional ovens
- Lower the convection oven temperature by 25°F to avoid burning
- Conventional ovens may need longer baking time for a brown crust
Testing Bread For Doneness
Baking bread is a skill that requires attention to detail. Knowing when bread is fully baked is important for good texture and taste.
After proofing, the baking time varies. You can check if bread is done using simple tests at home.
Visual Cues
Look at the color of the bread crust. A golden brown crust usually means the bread is baked well. The crust should look firm and dry.
If the bread looks pale, it may need more time in the oven. Also, check if the bread has risen fully and holds its shape.
Tap And Sound Test
Tap the bottom of the bread with your fingers. A hollow sound means the bread is cooked inside. A dull sound suggests it needs more baking.
This test works well for round loaves or bread baked on a baking stone. Be careful not to burn your fingers.
Using A Thermometer
Use an instant-read thermometer to check the bread's internal temperature. Most breads are done at 190°F to 210°F (88°C to 99°C).
Insert the thermometer into the center of the loaf. Avoid touching the baking pan or oven walls for an accurate reading.
Adjusting Time Based On Environment
Baking bread after proofing needs attention to your environment. Changes in altitude and humidity can affect baking time and results.
Knowing how to adjust baking time helps you get a perfect loaf every time. Small changes make a big difference in your bread's texture and crust.
Altitude Effects
At higher altitudes, air pressure is lower. This causes Dough to rise faster and bake quicker. You may need to reduce baking time or lower oven temperature.
- Reduce baking temperature by 15-25°F (8-14°C).
- Check bread 5-10 minutes earlier than recipe time.
- Watch for over-browning and adjust time accordingly.
Humidity Considerations
Humidity affects dough moisture and proofing time. High humidity can make Dough sticky and slow to bake. Low humidity dries Dough faster and may shorten baking time.
| Humidity Level | Effect on Baking | Adjustment |
| High (above 60%) | Dough sticky, longer proofing | Increase baking time slightly |
| Medium (40%-60%) | Normal proofing and baking | Follow recipe time |
| Low (below 40%) | Dough dries fast, shorter proofing | Reduce baking time by 5-10 minutes |

Credit: www.reddit.com
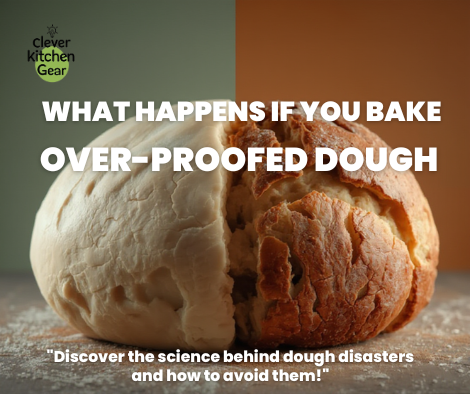
Troubleshooting Common Timing Issues
Baking bread after proofing needs the right timing. Baking too little or too long causes problems.
This guide helps you spot and fix common timing mistakes with baked bread.
Underbaked Bread Signs
Underbaked bread feels doughy inside and looks pale on top. It may also be sticky or heavy.
Check for these signs to avoid eating raw Dough or dense bread.
- The crust is very soft and pale
- The inside feels wet or gummy
- The bread sinks when pressed lightly
- The loaf sounds dull when tapped
Overbaked Bread Fixes
Overbaked bread has a hard crust and a dry inside. It can be tough to eat, but it is still useful.
Try these fixes to improve the texture and flavor of overbaked bread.
- Wrap the bread in a damp cloth and warm it briefly
- Use slices for toast or bread pudding
- Serve with butter, spreads, or sauces to add moisture
- Store leftover bread in an airtight container to keep it soft.
Credit: breadtopia.com
Frequently Asked Questions
How Long Should I Bake Bread After Proofing?
Bake bread for 25 to 35 minutes after proofing, depending on the recipe. The crust should be golden brown and sound hollow when tapped. Use an oven temperature between 375°F and 450°F for optimal results.
What Is The Ideal Oven Temperature For Baking Proofed Bread?
The ideal oven temperature for baking proofed bread ranges from 375°F to 450°F. Higher temperatures create a crisp crust quickly, while moderate heat ensures even baking. Always follow your recipe’s temperature recommendation for best results.
How Do I Know When Proofed Bread Is Fully Baked?
Proofed bread is fully baked when it has a golden crust and sounds hollow when tapped. Internal temperature should be around 190°F to 210°F. Using a thermometer helps ensure the bread is cooked through and not underbaked.
Can Baking Time Vary After Bread Proofing?
Yes, baking time varies based on bread size, type, and oven temperature. Smaller loaves bake faster, while denser bread requires longer baking. Always check for a golden crust and hollow sound to confirm doneness.
Conclusion
Baking bread can seem tricky, but it's truly rewarding. After proofing, baking time depends on bread type and oven temperature. Check for a golden crust and hollow sound when tapped. This signals readiness. Always let your bread cool before slicing.
It enhances the flavor and texture. Practice makes perfect. With time, you'll bake like a pro. Enjoy the delicious aroma and taste of homemade bread. It's a comforting delight. Don't rush the process. Patience is key. Happy baking!
You’ve carefully mixed your ingredients, let your Dough rise just right, and now you’re wondering: how long should you bake your bread after proofing? Getting this timing perfect can mean the difference between a soft, fluffy loaf and one that’s dry or undercooked.
You’ll discover clear, simple answers to nail the baking time every single time. Keep reading to unlock the secrets to baking bread that looks and tastes like it came from a bakery.
Proofing And Baking Basics
Baking bread is a process that takes time and care. After mixing, the Dough needs proofing before baking.
Proofing helps the Dough rise and develop flavor. Knowing how long to bake after proofing is important for good bread.
What Happens During Proofing
Proofing is the resting time for the Dough. Yeast eats sugar and produces gas.
This gas makes the Dough rise and become soft. It also helps the bread get a light texture.
- Yeast creates carbon dioxide gas
- Dough expands and becomes airy
- Flavors develop in the Dough
- Gluten relaxes for a better shape
Factors Affecting Baking Time
Baking time changes based on dough size and oven temperature. Bigger loaves need longer baking.
Oven types and dough moisture also affect how long bread should bake. Watch the crust color and sound.
- Loaf size: larger takes more time
- Oven heat: hotter ovens bake faster
- Dough moisture: wetter Dough needs longer
- Type of bread: dense bread bakes longer
- Altitude: A higher altitude can change the baking time

Credit: www.reddit.com
Ideal Baking Times For Different Breads
Baking bread after proofing is important for good texture and flavor. Different breads need different baking times. This guide helps you bake each type just right.
Knowing how long to bake bread after proofing saves time and avoids undercooked or burnt loaves. Read on for ideal baking times for common breads.
White And Wheat Loaves
White and wheat loaves are classic breads. They usually bake well at 350°F to 375°F. Baking time depends on size and shape.
A standard 1-pound loaf takes about 30 to 40 minutes. Larger loaves need up to 45 minutes. Check for a golden crust and hollow sound when tapped.
- Small loaves: 25-30 minutes at 350°F (175°C)
- Medium loaves: 35-40 minutes at 375°F (190°C)
- Large loaves: 40-45 minutes at 375°F (190°C)
Sourdough Variations
Sourdough bread has a thick crust and chewy crumb. It bakes longer than white bread. Bake sourdough at a higher temperature for a crusty outside.
Most sourdough loaves bake well between 400°F and 450°F. The baking time is usually 35 to 50 minutes. Use a thermometer to check for 200°F inside.
- Small sourdough: 35-40 minutes at 400°F (205°C)
- Medium sourdough: 40-45 minutes at 425°F (220°C)
- Large sourdough: 45-50 minutes at 450°F (230°C)
Quick Breads And Buns
Quick breads and buns use baking powder or soda. They bake faster than yeast breads. The oven temperature is usually lower.
Most quick breads bake at 350°F. Baking time varies from 20 minutes for small buns to 60 minutes for large loaves. Watch closely to avoid drying out.
- Small buns: 15-20 minutes at 350°F (175°C)
- Medium buns: 20-25 minutes at 350°F (175°C)
- Quick bread loaves: 50-60 minutes at 350°F (175°C)
Oven Settings And Their Impact
Baking bread after proofing needs the right oven settings. These settings affect the bread’s crust, texture, and baking time.
Choosing the correct temperature and oven type helps you bake bread evenly. It also affects how the crust forms and how the bread rises.
Temperature Guidelines
Bread usually bakes between 350°F and 475°F. The exact temperature depends on the bread type and recipe.
High temperatures create a thick, crispy crust. Lower temperatures bake bread more gently but may give a softer crust.
- 350°F to 375°F: Good for soft breads and enriched Dough
- 400°F to 450°F: Ideal for crusty artisan breads
- 475°F: Best for quick oven spring and dark crusts
Using Steam For Crust
Adding steam in the oven helps develop a shiny and crispy crust. Steam delays crust hardening so bread can expand fully.
You can add steam by spraying water or placing a pan of water in the oven. Steam works best in the first 10 to 15 minutes of baking.
- Place a shallow pan with water at the bottom of the oven
- Spray water on bread or oven walls before baking
- Use steam only in the early baking phase
Convection Vs. Conventional Ovens
Convection ovens use fans to circulate hot air. This speeds up baking and creates a crisp crust.
Conventional ovens bake with still air. They may bake more slowly and less evenly, but keep bread moist.
- Convection ovens bake 25% faster than conventional ovens
- Lower the convection oven temperature by 25°F to avoid burning
- Conventional ovens may need longer baking time for a brown crust
Testing Bread For Doneness
Baking bread is a skill that requires attention to detail. Knowing when bread is fully baked is important for good texture and taste.
After proofing, the baking time varies. You can check if bread is done using simple tests at home.
Visual Cues
Look at the color of the bread crust. A golden brown crust usually means the bread is baked well. The crust should look firm and dry.
If the bread looks pale, it may need more time in the oven. Also, check if the bread has risen fully and holds its shape.
Tap And Sound Test
Tap the bottom of the bread with your fingers. A hollow sound means the bread is cooked inside. A dull sound suggests it needs more baking.
This test works well for round loaves or bread baked on a baking stone. Be careful not to burn your fingers.
Using A Thermometer
Use an instant-read thermometer to check the bread's internal temperature. Most breads are done at 190°F to 210°F (88°C to 99°C).
Insert the thermometer into the center of the loaf. Avoid touching the baking pan or oven walls for an accurate reading.
Adjusting Time Based On Environment
Baking bread after proofing needs attention to your environment. Changes in altitude and humidity can affect baking time and results.
Knowing how to adjust baking time helps you get a perfect loaf every time. Small changes make a big difference in your bread's texture and crust.
Altitude Effects
At higher altitudes, air pressure is lower. This causes Dough to rise faster and bake quicker. You may need to reduce baking time or lower oven temperature.
- Reduce baking temperature by 15-25°F (8-14°C).
- Check bread 5-10 minutes earlier than recipe time.
- Watch for over-browning and adjust time accordingly.
Humidity Considerations
Humidity affects dough moisture and proofing time. High humidity can make Dough sticky and slow to bake. Low humidity dries Dough faster and may shorten baking time.
| Humidity Level | Effect on Baking | Adjustment |
| High (above 60%) | Dough sticky, longer proofing | Increase baking time slightly |
| Medium (40%-60%) | Normal proofing and baking | Follow recipe time |
| Low (below 40%) | Dough dries fast, shorter proofing | Reduce baking time by 5-10 minutes |
Credit: www.reddit.com
Troubleshooting Common Timing Issues
Baking bread after proofing needs the right timing. Baking too little or too long causes problems.
This guide helps you spot and fix common timing mistakes with baked bread.
Underbaked Bread Signs
Underbaked bread feels doughy inside and looks pale on top. It may also be sticky or heavy.
Check for these signs to avoid eating raw Dough or dense bread.
- The crust is very soft and pale
- The inside feels wet or gummy
- The bread sinks when pressed lightly
- The loaf sounds dull when tapped
Overbaked Bread Fixes
Overbaked bread has a hard crust and a dry inside. It can be tough to eat, but it is still useful.
Try these fixes to improve the texture and flavor of overbaked bread.
- Wrap the bread in a damp cloth and warm it briefly
- Use slices for toast or bread pudding
- Serve with butter, spreads, or sauces to add moisture
- Store leftover bread in an airtight container to keep it soft.
Credit: breadtopia.com
Frequently Asked Questions
How Long Should I Bake Bread After Proofing?
Bake bread for 25 to 35 minutes after proofing, depending on the recipe. The crust should be golden brown and sound hollow when tapped. Use an oven temperature between 375°F and 450°F for optimal results.
What Is The Ideal Oven Temperature For Baking Proofed Bread?
The ideal oven temperature for baking proofed bread ranges from 375°F to 450°F. Higher temperatures create a crisp crust quickly, while moderate heat ensures even baking. Always follow your recipe’s temperature recommendation for best results.
How Do I Know When Proofed Bread Is Fully Baked?
Proofed bread is fully baked when it has a golden crust and sounds hollow when tapped. Internal temperature should be around 190°F to 210°F. Using a thermometer helps ensure the bread is cooked through and not underbaked.
Can Baking Time Vary After Bread Proofing?
Yes, baking time varies based on bread size, type, and oven temperature. Smaller loaves bake faster, while denser bread requires longer baking. Always check for a golden crust and hollow sound to confirm doneness.
Conclusion
Baking bread can seem tricky, but it's truly rewarding. After proofing, baking time depends on bread type and oven temperature. Check for a golden crust and hollow sound when tapped. This signals readiness. Always let your bread cool before slicing.
It enhances the flavor and texture. Practice makes perfect. With time, you'll bake like a pro. Enjoy the delicious aroma and taste of homemade bread. It's a comforting delight. Don't rush the process. Patience is key. Happy baking!