
Have you ever felt the excitement of preparing your sourdough and placing it in the fridge, only to wonder what happens next? If so, you’re not alone.
Baking sourdough after proofing in the fridge can feel like a mystery. You might be asking yourself, “What’s the next step? ” Or “How do I ensure my sourdough turns out perfect every time? ” In this guide, you’ll discover the secrets to mastering this crucial part of the sourdough process.
Imagine the aroma of freshly baked bread filling your kitchen, the crunchy crust, and the soft, tangy interior that awaits you. Stay with us, and you’ll learn how to achieve all of this effortlessly. Let’s turn your sourdough endeavors into delicious success!

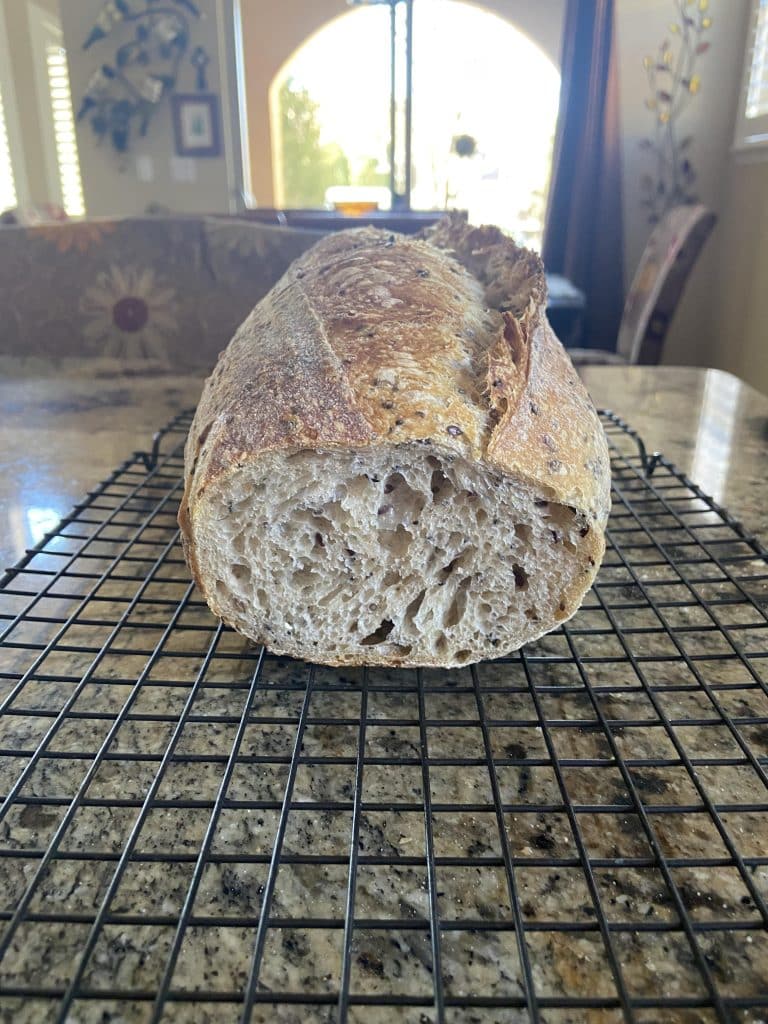
Credit: www.reddit.com
Cold Proofing Benefits
Cold proofing sourdough after shaping slows down yeast activity. This process happens in the fridge. It changes the dough in helpful ways.
Keeping dough cold lets flavors grow deep. It also makes the bread texture better and controls fermentation well.
Flavor Development
Cold proofing helps develop complex, rich flavors in sourdough bread. The slow fermentation allows natural acids and sugars to form.
- Long fermentation creates a tangy taste
- More time gives wild yeast a chance to work fully
- Acids formed improve the bread’s aroma
- Flavors are more balanced and less sharp
Texture Improvement
Cold proofing changes the dough texture. The crumb becomes open and airy. The crust gets crispier when baked.
| Effect | Result |
| Gluten Relaxation | Soft and chewy crumb |
| Gas Retention | Light, airy holes in bread |
| Moisture Control | Better crust crunch |
Fermentation Control
Cold proofing slows fermentation. This gives better control over dough rise and timing. Bakers can plan baking times more easily.
Key points of fermentation control:
- Slows yeast activity
- Prevents over-proofing
- Improves dough handling
- Allows baking at convenient times
Credit: thatsourdoughgal.com
Preparing Dough Before Fridge
After your sourdough dough has gone through bulk fermentation, it is time to prepare it for the fridge. Proper preparation helps develop flavor and texture during cold proofing.
Taking care with shaping, using the right basket, and covering the dough properly will give the best results after proofing in the fridge.
Shaping Techniques
Shape your dough gently to keep air inside. Form a tight round loaf by folding the dough edges toward the center.
- Lightly flour your work surface.
- Turn the dough out onto the surface.
- Fold the edges toward the middle.
- Use your hands to create surface tension by pulling the dough toward you.
- Place the dough seam-side down for resting.
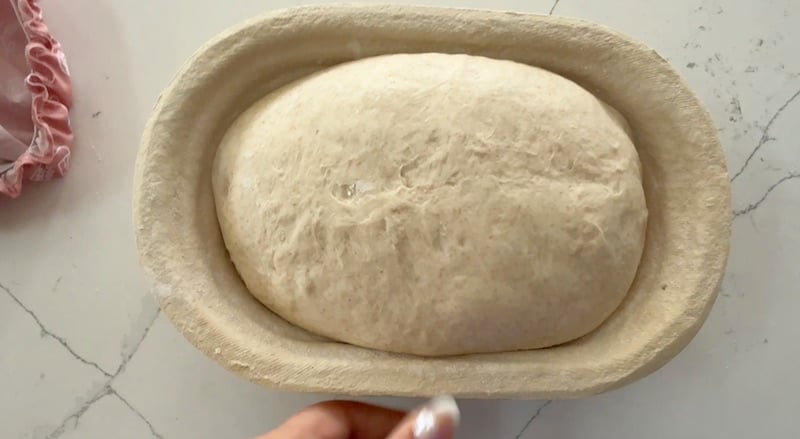
Using Banneton Baskets
Banneton baskets support the dough shape during the fridge proof. They help create a nice crust pattern and keep the dough from spreading.
| Type of Banneton | Purpose | Care Tips |
| Round | For boule or round loaves | Dust with rice flour before use |
| Oval | For batard or oval loaves | Use a linen liner for stickier dough |
| Plastic | Easier to clean and store | Wash with warm water only |
Covering Methods
Cover your dough well to prevent drying out in the fridge. Use breathable materials to avoid excess moisture buildup.
- Place the dough in a banneton dusted with flour.
- Cover with a large plastic bag or shower cap to trap humidity.
- Alternatively, use a clean kitchen towel to allow some air circulation.
- Seal the edges loosely so the dough can expand slightly.
- Store the covered dough on a tray to catch any leaks.
Fridge Proofing Tips
Proofing sourdough in the fridge slows down fermentation. This helps develop flavor and texture. Proper fridge proofing needs the right temperature and time.
Too cold or too warm can affect your dough. Watch your dough to avoid mistakes. Here are some tips for fridge proofing sourdough.
Ideal Temperature Range
Keep your sourdough in the fridge between 38°F and 45°F (3°C to 7°C). This range is cold enough to slow yeast but warm enough for slow fermentation.
- Below 38°F, fermentation may stop completely.
- Above 45°F, dough can overproof and collapse.
- Use a fridge thermometer to check the temperature.
- Place dough away from fridge door to avoid temperature changes.
Proofing Duration
Proofing time varies with dough and fridge conditions. Usually, 12 to 24 hours is good for flavor and rise. Longer proofing can work but watch dough closely.
| Proofing Time | Effect on Dough |
| 12 hours | Moderate rise, good flavor |
| 18 hours | Stronger flavor, good texture |
| 24 hours | Full flavor, softer crumb |
| Over 24 hours | Risk of overproofing |
Avoiding Overproofing
Overproofing happens when dough ferments too long. It loses strength and can collapse in the oven. Watch dough size and feel to prevent this.
- Check dough after 12 hours.
- Look for dough that rises but still feels slightly springy.
- Do not let dough grow too large or very loose.
- If unsure, bake earlier rather than later.
- Use a glass container to see dough rise clearly.
Preheating The Oven
Preheating your oven is a key step before baking sourdough bread taken from the fridge. It ensures the oven reaches the right temperature for a good crust and even bake.
Getting the oven hot enough helps the bread rise quickly and develop a crisp crust. This step sets the stage for a perfect bake.
Choosing The Right Bakeware
Pick bakeware that holds heat well and fits your loaf size. Thick metal pans or ceramic dishes work best for sourdough baking.
A good baking surface helps heat spread evenly. Avoid thin or glass pans as they may not keep steady heat.
- Cast iron pans hold heat long
- Ceramic bakeware provides even cooking
- A heavy baking stone can mimic traditional ovens
Using A Dutch Oven
A Dutch oven traps steam inside, which helps sourdough rise and form a crispy crust. Preheat it in the oven before baking.
Place the dough inside the hot Dutch oven carefully. The steam will keep the bread moist while baking.
- Preheat Dutch oven for at least 30 minutes
- Use oven mitts to handle hot cookware
- Remove lid halfway to brown crust
Temperature Settings
Set your oven temperature between 450°F and 500°F for baking sourdough. This high heat helps the bread develop a good crust.
Start baking with the oven fully preheated. After 20 minutes, lower the temperature to finish baking without burning.
- Preheat oven to 475°F (245°C)
- Bake covered for 20-25 minutes
- Remove cover and bake 15-20 minutes more at 450°F
Scoring The Dough
Scoring the dough is a key step before baking sourdough. It helps the bread rise well and creates a beautiful crust.
This guide explains the tools, patterns, and timing for scoring your dough after it proofs in the fridge.
Scoring Tools
Using the right tool makes scoring easier and safer. A sharp blade cuts cleanly without tearing the dough.
- Lame: a special curved blade for precise cuts
- Sharp knife: a clean, thin blade works well
- Razor blade: very sharp but handle carefully
- Scissors: can create unique patterns with snips
Patterns And Techniques
Scoring patterns affect the bread’s look and how it expands in the oven. Use gentle, quick cuts for best results.
| Pattern | Description | Effect on Bread |
|---|---|---|
| Single Long Slash | One deep cut along the dough’s length | Creates a classic open crack |
| Cross | Two cuts crossing in the center | Helps bread expand evenly |
| Waves | Multiple curved cuts side by side | Gives a decorative, wavy crust |
| Leaf or Feather | Several angled cuts forming a shape | Shows artistic design |
Timing For Scoring
Score the dough right before baking. This keeps the dough from drying out and helps it rise well in the oven.
- Remove dough from fridge and let it sit 15–30 minutes to warm slightly.
- Dust the dough surface lightly with flour to prevent sticking.
- Use your chosen tool to make quick, confident cuts.
- Place the dough into the hot oven immediately after scoring.
Baking Process
Baking sourdough after proofing in the fridge requires careful heat control. This helps the bread rise well and develop a crisp crust.
Follow the right steps to get a perfect bake with a good oven spring and crust color.
Steam Creation Methods
Steam keeps the bread crust soft at first. This helps the dough expand fully during baking.
Use one of these ways to create steam in your oven:
- Place a pan with hot water at the bottom of the oven.
- Spray water inside the oven with a spray bottle right after putting in the bread.
- Bake the bread inside a covered Dutch oven to trap steam.
Initial High Heat Phase
Start baking at a high temperature, usually 450°F (230°C). This helps the sourdough rise quickly.
High heat encourages oven spring and forms a good crust fast. Bake like this for about 15-20 minutes.
Lowering Temperature Mid-bake
After the first high heat phase, reduce the oven temperature to 400°F (205°C). This lets the bread bake inside evenly.
Lower heat prevents the crust from burning and helps the crumb cook fully. Bake for another 20-25 minutes.
Cooling And Storing
After proofing sourdough in the fridge, proper cooling and storage keep the bread fresh. Cooling helps keep the crust crisp and the inside soft. Storing correctly stops the bread from drying out or getting moldy.
Let’s explore how to cool sourdough on racks, avoid soggy crusts, and store leftover bread the right way.
Cooling On Racks
Place your sourdough on a wire rack after baking. This allows air to circulate under the bread. Air circulation stops moisture build-up. It helps the crust stay crunchy and the bread cool evenly.
Avoid putting the bread on a solid surface, like a plate or countertop, while it cools. This traps steam and makes the crust soft.
Avoiding Soggy Crusts
To keep your sourdough crust crisp, do not cover it right after baking. Wrapping too soon traps steam. Wait until the bread cools completely.
- Cool the bread on a wire rack for at least 1 hour.
- Keep the bread uncovered during cooling.
- Store bread in a paper bag if you want a crisp crust later.
- Avoid plastic bags until the bread is fully cooled.
Storing Leftover Bread
| Storage Method | Best For | Duration |
|---|---|---|
| Paper Bag | Short-term storage | 1-2 days |
| Cloth Bread Bag | Breathable storage | 2-3 days |
| Plastic Bag | Soft crust, prevent drying | Up to 3 days |
| Freezer (sliced or whole) | Long-term storage | Up to 3 months |
For longer storage, slice the bread before freezing. Wrap slices tightly in plastic wrap or foil. Then place them in a freezer bag. Toast or warm frozen slices before eating.

Credit: www.reddit.com
Troubleshooting Common Issues
Baking sourdough after proofing in the fridge can be tricky. You might face problems like dense crumb, flat loaves, or crust issues.
Knowing how to fix these issues helps you bake better bread every time. Let’s look at common problems and easy solutions.
Dense Crumb Solutions
A dense crumb means your bread is heavy and not airy. This often happens if the dough did not rise enough or was overworked.
Make sure to give your dough enough time to ferment before putting it in the fridge. Also, avoid pressing the dough too hard when shaping it.
- Check if your starter is active and bubbly before use.
- Let the dough rise until it doubles in size before refrigeration.
- Handle dough gently to keep air bubbles intact.
- Allow the dough to warm up slightly after fridge proofing before baking.
Flat Loaf Fixes
A flat loaf means your bread did not hold its shape and spread too much. This can happen if the dough is too wet or underproofed.
Use a flour type with good gluten strength and avoid adding too much water. Also, make sure the dough proofed well in the fridge before baking.
- Use bread flour or a mix with high protein content.
- Keep the dough hydrated but not sticky or runny.
- Proof the dough until it shows clear signs of fermentation.
- Score the dough before baking to help it expand upwards.
Crust Problems
Crust issues include a crust that is too hard, too soft, or uneven. This affects the bread’s texture and flavor.
Steam in the oven during the first baking minutes helps create a good crust. Also, bake at the right temperature and let the bread cool fully before cutting.
- Add steam by placing a pan with water in the oven or spraying water on the dough.
- Bake at 450°F (230°C) for a crispy crust.
- Cool bread on a wire rack to keep crust crisp.
- Use a Dutch oven to trap steam around the dough.
Frequently Asked Questions
How Long Should Sourdough Proof In The Fridge?
Sourdough typically proofs in the fridge for 12 to 48 hours. This slow fermentation enhances flavor and texture. Avoid over-proofing as it can weaken dough structure, affecting the final bake.
Should I Let Sourdough Come To Room Temperature Before Baking?
Yes, let your sourdough sit at room temperature for 30 to 60 minutes before baking. This helps even out the dough temperature and improves oven spring during baking.
How Do I Score Sourdough After Cold Proofing?
Use a sharp blade to score the dough just before baking. Scoring controls expansion and creates an attractive crust. Make quick, confident slashes about 1/4 inch deep.
What Oven Temperature Is Best For Baking Cold-proofed Sourdough?
Bake sourdough at a high temperature, around 450°F (230°C). Preheat your oven and baking vessel for at least 30 minutes to ensure proper crust formation and oven spring.
Conclusion
Baking sourdough after fridge proofing takes patience and care. Keep your oven hot and your dough handled gently. Watch your bread rise and develop a crispy crust. This method helps develop flavor and texture over time. Each loaf will taste better with practice and attention.
Enjoy the process as much as the final bread. Happy baking and fresh, delicious sourdough awaits!


