Are you a sourdough enthusiast looking to perfect your baking game? If you've ever wondered about the perfect moment to bake your sourdough after cold proofing, you're not alone.
Timing can make all the difference between a loaf that's just okay and one that's absolutely perfect. Imagine pulling a golden, crusty loaf out of the oven, with a texture and flavor that could rival any artisan bakery. That's the power of getting the timing just right.
We'll delve into the key signs you need to watch for, ensuring your sourdough bread turns out beautifully every time. Stick around to discover the secrets that will elevate your baking skills to new heights.
Cold Proofing Basics
Cold proofing is a step in sourdough baking that happens after shaping the dough. It involves letting the dough rest in a cold place. This slows down the fermentation and helps develop flavor.
Understanding cold proofing helps you know the best time to bake your sourdough. It also improves the bread's texture and taste.
What Is Cold Proofing
Cold proofing means placing the shaped dough in the refrigerator. The low temperature slows yeast activity. This gives the dough time to rest and develop slowly. Cold proofing usually lasts between 12 to 48 hours.
- Dough is shaped and placed in a container or banneton.
- The container is covered to prevent drying.
- The dough is put in the fridge at about 38°F (3°C).
- The dough ferments slowly over many hours.
- After cold proofing, the dough is ready to bake.
Benefits Of Cold Proofing
Cold proofing improves sourdough bread in several ways. It enhances flavor, texture, and crust quality. It also makes baking schedules more flexible.
| Benefit | Description |
| Better Flavor | Long fermentation creates complex, tangy taste. |
| Improved Texture | Dough develops a more open crumb and chewiness. |
| Strong Crust | Cold proofing helps form a crisp and golden crust. |
| Flexible Timing | Baking can be delayed without losing dough quality. |

Credit: www.reddit.com
Ideal Cold Proofing Duration
Cold proofing helps develop sourdough’s flavor and texture. It slows fermentation and allows the dough to rest in the fridge.
The length of cold proofing depends on your schedule and the bread’s style. Knowing the right time to bake is key.
Short Cold Proof Times
Short cold proofing usually lasts 8 to 12 hours. This time is good for mild sour flavor and soft crumb.
- Use if you want bread the next day
- Retains more yeast activity for rise
- Best for smaller loaves
- Keep dough covered to prevent drying
Extended Cold Proof Times
Extended cold proofing means 24 to 72 hours in the fridge. It gives a stronger sour taste and chewier texture.
| Duration | Effect on Dough | When to Use |
| 24 hours | Mild sour, good rise | Weekend baking |
| 48 hours | Stronger sour, denser crumb | More flavor depth |
| 72 hours | Very sour, chewy crust | Slow baking schedule |
Signs Sourdough Is Ready To Bake
Baking sourdough after cold proofing needs good timing. You want to bake when the dough is at its peak.
Knowing the signs helps you get the best texture and flavor from your bread.
Visual Indicators
Look at your dough carefully before baking. Certain signs show it is ready.
- The dough has grown but not doubled in size.
- Surface shows small bubbles or a slight shine.
- The dough has a smooth, slightly domed top.
- Edges may look set but not dry or cracked.
- Color changes slightly to a pale or creamy tone.
Touch And Feel Tests
Touching the dough gives clues about its readiness. Use gentle tests to check it.
| Test | How to Do It | What to Look For |
| Finger Dent | Press finger gently into dough | Dent springs back slowly but stays visible |
| Surface Texture | Feel dough surface with fingertips | Soft and slightly tacky, not sticky or dry |
| Elasticity | Gently stretch a small piece | Stretchy without tearing easily |
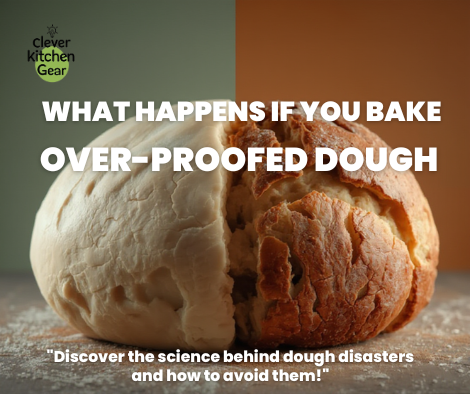
Effects Of Overproofing
Overproofing sourdough can change its texture and flavor. Cold proofing slows fermentation, but too long can cause issues.
Knowing what happens after overproofing helps you bake better bread. Watch for signs in texture and taste.
Texture Changes
Overproofed sourdough dough becomes weak and sticky. The gluten structure breaks down, causing poor rise in the oven.
- The crumb becomes dense or gummy.
- Crust may turn too thin or collapse.
- Air bubbles can become uneven or large.
- The dough can spread instead of rising up.
Flavor Impact
Overproofing affects the sourdough’s flavor by making it too sour or bland. Yeast and bacteria consume sugars unevenly.
| Flavor Effect | Cause | Result |
|---|---|---|
| Excessive sourness | More acid from bacteria | Strong, sharp taste |
| Flat flavor | Yeast exhaustion | Less aroma and complexity |
| Off-flavors | Too long fermentation | Unpleasant or bitter notes |
Adjusting Baking Time After Cold Proofing
Cold proofing slows down dough fermentation. This affects baking time and temperature. Adjust baking time for best sourdough results.
Baking right after cold proofing needs care. The dough is cooler and denser. This changes how heat moves inside the bread.
Temperature Considerations
Cold proofed dough is colder than room temperature dough. Start baking with a hot oven to balance this. Preheat your oven well before baking.
Because the dough is cold, it takes longer to heat through. You may need to bake a few minutes longer. Watch the crust color and bread sound to check doneness.
- Preheat oven to 450°F (230°C) or higher
- Place dough directly on hot baking surface
- Extend baking time by 5–10 minutes if needed
- Check bread color and tap bottom for hollow sound
Oven Spring Tips
Oven spring is the bread’s rise during baking. Cold proofed dough can have a strong oven spring. The yeast is still active and ready to rise.
To get good oven spring, use steam in the oven. Steam keeps the crust soft early on. This allows the dough to expand well before crust hardens.
- Add water to a hot pan at the oven bottom
- Spray water inside oven before baking
- Remove steam source after first 10–15 minutes
- Use a baking stone or steel for even heat
Common Mistakes To Avoid
Baking sourdough after cold proofing needs care and patience. Many beginners make errors that affect bread quality.
Knowing what to avoid helps you bake better bread with good texture and flavor.
Rushing The Bake
Some bakers rush to bake right after cold proofing. This can cause underdeveloped flavor and texture.
- Wait for dough to warm to room temperature before baking.
- Check if dough feels airy and soft, not dense.
- Give dough time to bloom for better oven spring.
Ignoring Dough Condition
Cold proofing changes dough's look and feel. Ignoring these signs causes poor baking results.
| Dough Condition | What It Means | Action Needed |
| Very tight and dense | Not fully proofed | Let dough rest longer |
| Too loose and sticky | Overproofed | Bake soon to avoid collapse |
| Firm but slightly jiggly | Perfectly proofed | Ready to bake |
Tips For Perfect Timing
Baking sourdough after cold proofing needs good timing. The dough must be ready to bake for the best crust and flavor.
Knowing when to bake is key. It helps the bread rise well and develop a nice texture.
Using A Proofing Box
A proofing box keeps dough at a steady temperature. This helps the dough rise evenly during cold proofing and warming up before baking.
Set the box to a warm temperature just before baking. This wakes up the yeast and makes the dough ready to bake.
- Keep dough in the fridge for cold proofing
- Move dough to the proofing box 1-2 hours before baking
- Keep temperature around 75°F (24°C) in the proofing box
- Watch for dough to puff up and feel soft
Monitoring Dough Progress
Check the dough often after cold proofing. Look for signs that it is ready to bake.
Dough is ready when it has risen and feels light. Press it gently; it should bounce back slowly.
- Dough should look puffy and airy
- It should not collapse or shrink too much
- Slow bounce back means good fermentation
- Use the poke test to check readiness

Credit: www.reddit.com

Credit: www.reddit.com
Frequently Asked Questions
When Should I Bake Sourdough After Cold Proofing?
Bake sourdough immediately after cold proofing to capture its flavor and texture. Cold proofing develops taste, but baking right away prevents over-proofing and ensures the best oven spring and crust.
How Long Is Cold Proofing For Sourdough?
Cold proofing typically lasts 12 to 48 hours. This slow fermentation enhances flavor and texture. Avoid exceeding 72 hours to prevent dough over-fermentation and loss of structure.
Can I Bake Sourdough Straight From The Fridge?
Yes, you can bake sourdough straight from the fridge. Baking cold dough helps retain shape and improves crust. Some prefer a brief rest at room temperature for better oven spring.
Does Cold Proofing Affect Sourdough Baking Time?
Cold proofing slightly extends baking time since the dough is cold. Preheat the oven well and add a few extra minutes if needed to ensure thorough baking and a crispy crust.
Conclusion
Timing matters when baking sourdough after cold proofing. Bake soon after the dough reaches room temperature. Watch for signs like puffiness and slight springs back when pressed. Baking at the right moment ensures good texture and flavor. Waiting too long can cause over-proofing and a flat loaf.
Trust your eyes and hands more than the clock. Practice helps you feel the perfect bake time. Enjoy the process and the tasty results that follow.