

A Bountiful Kitchen Instant Pot Roast: Tender Beef, Flavorful Vegetables, and Easy Comfort Food
Imagine coming home after a long day to the mouthwatering smell of a perfectly cooked roast, tender and juicy, waiting for you on the table. With A Bountiful Kitchen Instant Pot Roast, you can make this dream a reality without hours of slow cooking or constant monitoring.
This recipe is designed to save you time and effort while delivering rich, comforting flavors that satisfy your whole familServing Suggestions”. If you want a delicious, hassle-free meal that feels like a special occasion every time, keep reading—your next favorite dinner is just a few steps away.
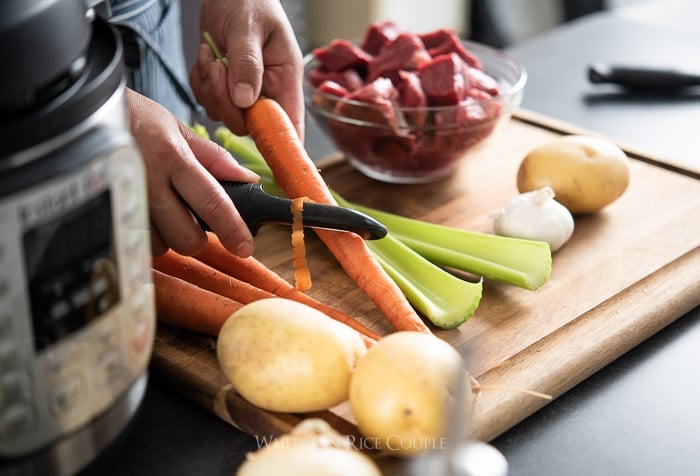
Credit: whiteonricecouple.com
Choosing The Right Cut
Picking the right beef cut is key to a tasty Instant Pot roast. Different cuts change the flavor and texture.
Understanding which cuts work best helps you cook faster and get tender meat every time.
Best Beef Cuts For Instant Pot
Some beef cuts cook better in an Instant Pot. These cuts become soft and juicy quickly.
- Chuck roast: well-marbled and full of flavor
- Brisket: rich taste, becomes tender with pressure cooking
- Round roast: leaner, but can be tender if cooked well
- Short ribs: flavorful and perfect for pressure cooking
Factors Affecting Tenderness
Tenderness depends on the cut, fat content, and cooking time. Cuts with more fat often stay moist.
Pressure cooking breaks down tough fibers fast. Overcooking can make meat dry and stringy.
- Marbling (fat inside meat) adds juiciness
- Connective tissue softens with longer cooking
- Cut thickness changes cooking time
Budget-friendly Options
Some cuts cost less but taste great when cooked in an Instant Pot. They get tender fast.
- Chuck roast offers great flavor for the price
- Bottom round roast is lean and affordable
- Beef brisket is a good choice for slow, moist cooking

Credit: www.foodnetwork.com
Preparing The Roast
Preparing a roast for the Instant Pot needs careful steps. These steps help make the meat tender and tasty.
This guide covers trimming, seasoning, searing, and using fresh herbs and spices. Follow each step for best results.
Trimming And Seasoning Tips
Trim the roast by removing excess fat. This stops the meat from being too greasy. Leave a thin fat layer for flavor.
- Remove large fat chunks
- Pat the meat dry with paper towels
- Sprinkle salt and pepper evenly
- Use garlic powder or onion powder for extra taste
- Rub seasonings gently into the meat
Searing For Flavor
Sear the roast in the Instant Pot using the sauté function. This locks in juices and adds a rich crust.
| Temperature | Medium-High |
| Time per side | 3-4 minutes |
| Oil type | Vegetable or canola oil |
| Tip | Do not overcrowd the pot |
Using Fresh Herbs And Spices
Fresh herbs boost the roast’s aroma and flavor. Add them before pressure cooking for best taste.
- Use rosemary sprigs
- Add thyme leaves
- Include bay leaves
- Crush fresh garlic cloves
- Season with cracked black pepper
Instant Pot Settings
The Instant Pot makes cooking a roast quick and easy. Knowing the right settings helps you get tender meat every time.
This guide explains the best cooking time, pressure levels, and release methods for your roast.
Optimal Cooking Time
The cooking time depends on the size and type of roast. Usually, it takes about 20 minutes per pound.
Smaller roasts cook faster, while larger ones need more time to become tender.
- 3-pound roast: 60 minutes
- 4-pound roast: 80 minutes
- 5-pound roast: 100 minutes
Pressure Levels Explained
The Instant Pot has two main pressure levels: high and low. High pressure cooks faster and is best for roasts.
Low pressure is gentler but takes longer. Use it for delicate cuts or when you want softer meat.
- High Pressure:10-12 psi, cooks quickly
- Low Pressure:5-7 psi, cooks gently
Natural Vs Quick Release
Natural release lets the pressure drop slowly on its own. This keeps the meat juicy and tender.
Quick release removes pressure fast. Use it only if you need to stop cooking immediately.
- Natural Release:Wait 10-20 minutes before opening
- Quick Release:Press release valve to release pressure fast
Adding Vegetables And Liquids
Adding the right vegetables and liquids to your Instant Pot roast makes the dish flavorful and tender. These ingredients cook together to create a rich and hearty meal.
Choosing vegetables and liquids carefully helps balance taste and texture. This guide covers the best options to enhance your roast.
Best Vegetables To Include
Root vegetables hold up well in the Instant Pot. They add sweetness and depth to the roast. Some vegetables cook faster, so add them later if needed.
- Carrots – add natural sweetness and color
- Potatoes – absorb flavors and provide texture
- Celery – adds a fresh, mild crunch
- Onions – bring sweetness and aroma
- Parsnips – offer a nutty, earthy flavor
Choosing Broth Or Stock
Broth and stock add moisture and flavor. Choose one that complements the roast without overpowering it. The liquid also helps the Instant Pot build pressure.
| Type | Flavor | Best Use |
|---|---|---|
| Beef broth | Rich and savory | Enhances beef taste |
| Chicken broth | Mild and light | Good for delicate flavor |
| Vegetable stock | Earthy and fresh | Vegetarian-friendly option |
| Water with seasoning | Neutral base | Allows spices to shine |
Balancing Flavors
Balancing savory, sweet, and acidic notes makes the roast taste complete. Small additions can change the overall flavor.
Try these tips:
- Add a splash of red wine or vinegar for acidity.
- Use garlic or herbs for aroma.
- Include a pinch of sugar to balance acidity.
- Season with salt and pepper carefully.
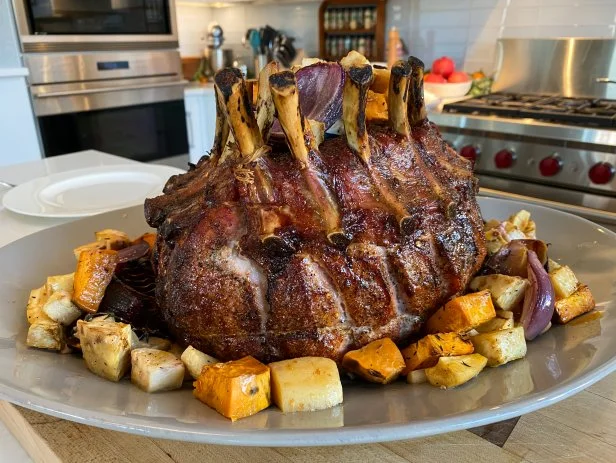
Serving Suggestions
A Bountiful Kitchen Instant Pot Roast makes a hearty and tasty meal. It pairs well with many side dishes. You can serve it for family dinners or special occasions.
Proper resting and slicing bring out the best flavor and texture. Storing and reheating the roast correctly keeps it juicy and delicious for later meals.
Looking for more easy and flavorful Instant Pot ideas? The Fix‑It and Forget‑It Instant Pot Cookbook by Hope Comerford brings you 100 quick, family‑friendly recipes — from tender roasts to creamy soups and desserts. It’s a New York Times bestseller packed with colorful photos and step‑by‑step instructions that make cooking effortless. Perfect for anyone who loves comfort food without the hassle!
Fix‑It and Forget‑It Instant Pot Cookbook: 100 Delicious Instant Pot Recipes!
Side Dishes To Pair
Choose side dishes that balance the rich flavors of the roast. Vegetables, potatoes, and salads work well. They add color and nutrition to your plate.
- Mashed potatoes with butter and herbs
- Steamed green beans or broccoli
- Roasted carrots and parsnips
- Fresh garden salad with vinaigrette
- Buttery dinner rolls or crusty bread
Resting And Slicing The Roast
After cooking, let the roast rest for 10 to 15 minutes. Resting helps the juices stay inside the meat. This makes it more tender and tasty.
Slice the roast thinly against the grain. Cutting this way makes the meat easier to chew. Use a sharp knife for clean slices.
Storing And Reheating Tips
Store leftover roast in an airtight container. Keep it in the fridge and use within 3 to 4 days. This keeps it fresh and safe to eat.
Reheat the roast gently to keep it moist. Use a microwave or oven at low heat. Add a splash of broth or water to prevent drying out.
Credit: www.foodnetwork.com
Troubleshooting Common Issues
Cooking a roast in the Instant Pot can save time and effort. Still, some common problems may occur. Knowing how to fix them helps you enjoy a perfect meal every time.
This guide covers three issues: dry meat, undercooked roasts, and excess liquid. Each section gives clear advice to improve your cooking results.
Avoiding Dry Meat
Dry meat happens when the roast cooks too long or at too high pressure. You can keep meat juicy by controlling time and adding moisture.
- Use the right cut of meat, like chuck or brisket, for pressure cooking.
- Trim excess fat but leave some for flavor and moisture.
- Add broth or water before sealing the pot to create steam.
- Follow recommended cooking times and avoid overcooking.
- Let the pressure release naturally to keep juices inside the meat.
Fixing Undercooked Roast
If your roast feels tough or raw inside, it needs more cooking time. The Instant Pot sometimes needs extra minutes for larger or thicker cuts.
- Close the lid and seal the Instant Pot again.
- Set the pressure cooking time for an additional 10 to 15 minutes.
- Allow the pressure to release naturally after cooking.
- Check the meat with a fork or thermometer to confirm it is tender and cooked through.
Dealing With Excess Liquid
Too much liquid can make the roast soggy and watery. Adjust the liquid amount and use techniques to reduce extra juice.
| Cause | Solution |
|---|---|
| Adding more broth than needed | Use only 1 to 1.5 cups of liquid for most roasts |
| Fat and juices released during cooking | Remove excess fat before cooking; drain liquid after cooking if desired |
| Not using natural pressure release | Always allow natural release to help liquid absorb back into meat |
| Cooking vegetables that release water | Add vegetables after cooking the roast or drain liquid before adding them |
- Executive chefs use a simple hack for flawless gravy: "The best part of an Instant Pot roast is the rich liquid left behind! To create a perfect, lump-free gravy in one minute, skip flour and cornstarch. Simply mix 2 tablespoons of soft butter with 2 tablespoons of flour (a beurre manié), then use the sauté function to boil the leftover broth. Drop the butter/flour mixture into the boiling liquid and whisk for 30 seconds. This easy technique creates an incredibly silky, rich, and flavorful gravy without the need for a separate pan or tedious straining."
Frequently Asked Questions
How Long Does An Instant Pot Roast Take To Cook?
An Instant Pot roast typically cooks in 60 to 90 minutes. Cooking time depends on roast size and desired tenderness. Using the pressure cook setting speeds up the process compared to traditional methods.
What Cut Of Beef Is Best For Instant Pot Roast?
Chuck roast is ideal for Instant Pot recipes. It becomes tender and flavorful after pressure cooking. Other cuts like brisket or round can work but may require adjusted cooking times.
Can I Cook Vegetables With My Instant Pot Roast?
Yes, adding vegetables is easy and convenient. Place carrots, potatoes, and onions in the pot. They cook perfectly alongside the roast, absorbing rich flavors.
How Do I Prevent Instant Pot Roast From Drying Out?
Use enough liquid and natural pressure release for moist results. Browning the roast before pressure cooking helps seal juices. Avoid overcooking by following recommended times closely.
Conclusion
Savor the warmth of an Instant Pot roast. It's a comforting meal. Easy to prepare and perfect for busy days. Tender meat, rich flavors. Ideal for family dinners or special occasions. This dish satisfies everyone. No complicated steps involved. Just simple, delicious results.
Enjoy every bite and share with loved ones. Your kitchen will smell amazing. Cooking doesn't get much easier. Try this recipe today. Experience the joy of homemade comfort food. Cooking has never been this delightful! Perfect for any time.


