
How to Replace Kitchen Faucet Filter: Is your kitchen faucet filter no longer working as it should? If your water doesn’t taste as fresh or you notice reduced flow, it might be time to replace that filter.
You don’t need to call a plumber or spend hours figuring it out. This guide will walk you through simple, clear steps to replace your kitchen faucet filter quickly and easily. By the end, you’ll have clean, fresh water flowing again—without any hassle.
Keep reading to learn how to do it yourself and save time and money!
Signs To Replace Your Faucet Filter
Your kitchen faucet filter keeps water clean and safe. Over time, it can wear out and need replacement.
Knowing when to change the filter helps keep water tasting fresh and flowing well.
Water Taste And Odor Changes
If your water starts to taste strange or smells bad, it may be time to replace the filter. A worn filter can no longer remove impurities effectively.
- Water tastes metallic or bitter
- Unpleasant odors like chlorine or sulfur appear
- Cloudy or discolored water
Reduced Water Flow
When the filter is clogged, water flow slows down. This happens because trapped particles block water movement.
| Cause | Effect on Water Flow |
| New filter | Strong and steady flow |
| Partially used filter | Moderate flow reduction |
| Old clogged filter | Significant flow decrease |
Filter Lifespan And Usage
Filters have a recommended lifespan set by the manufacturer. Using a filter beyond this time lowers its effectiveness.
- Check the filter’s packaging for recommended replacement time.
- Consider how much water your household uses daily.
- Replace the filter sooner if water quality or flow drops.

Credit: www.amazon.com
Tools And Materials Needed
Replacing a kitchen faucet filter keeps your water clean and tastes fresh. You need the right tools and materials to do the job well.
This guide explains the types of replacement filters and the basic tools you need to change your kitchen faucet filter.
Replacement Filter Types
Kitchen faucet filters come in different types. Knowing your filter type helps you buy the right replacement.
- Carbon Filters:These remove chlorine and bad tastes from water.
- Ceramic Filters:Good for blocking bacteria and sediments.
- Reverse Osmosis Filters:Remove many impurities using a special membrane.
- Inline Filters:Fit inside the faucet or hose for easy use.
Basic Tools Required
You need a few simple tools to replace your kitchen faucet filter safely and quickly. Most tools are common in home tool kits.
- Adjustable Wrench:To loosen and tighten faucet parts.
- Screwdriver:For removing screws on the faucet or filter cover.
- Bucket or Bowl:To catch any water that leaks during replacement.
- Towel or Rag:To dry spills and clean the area.
- New Filter Cartridge:Make sure it fits your faucet model.
Preparing For Filter Replacement
Replacing your kitchen faucet filter needs some preparation. Getting ready helps the process go smoothly.
Follow these steps to prepare before you start the filter change.
Shutting Off Water Supply
First, turn off the water supply to avoid leaks. This stops water from flowing while you work.
Find the shut-off valves under the sink and close them by turning clockwise.
- Locate hot and cold water valves
- Turn valves clockwise to close
- Check faucet to confirm no water flows
Clearing The Work Area
Clear the space under your sink. Remove items that can get in your way.
Clean and organize the area so you can reach the faucet filter easily.
- Remove cleaning products and tools
- Place a towel to catch water drips
- Keep a bucket nearby for water spills

Credit: www.reddit.com
Removing The Old Filter
Replacing a kitchen faucet filter starts with removing the old one safely. This process helps keep your water clean and fresh.
Follow simple steps to detach the filter housing and handle the used filter properly.
Detaching The Faucet Filter Housing
First, turn off the water supply under the sink. This prevents leaks during removal.
Next, locate the filter housing on your faucet. It usually screws off by hand or with a wrench.
- Turn off the water supply valve.
- Place a towel or small container under the faucet.
- Grip the filter housing firmly.
- Twist the housing counterclockwise to loosen.
- Remove the housing carefully to avoid spilling water.
Handling The Used Filter
After removing the housing, take out the old filter cartridge. Check if it looks dirty or clogged.
| Action | Reason |
| Inspect the filter | See if it needs replacement |
| Dispose of the filter | Use proper waste methods |
| Clean the housing | Remove debris and buildup |
| Prepare for new filter | Ensure a good fit |
Always wash your hands after handling used filters. This keeps you safe from bacteria and dirt.
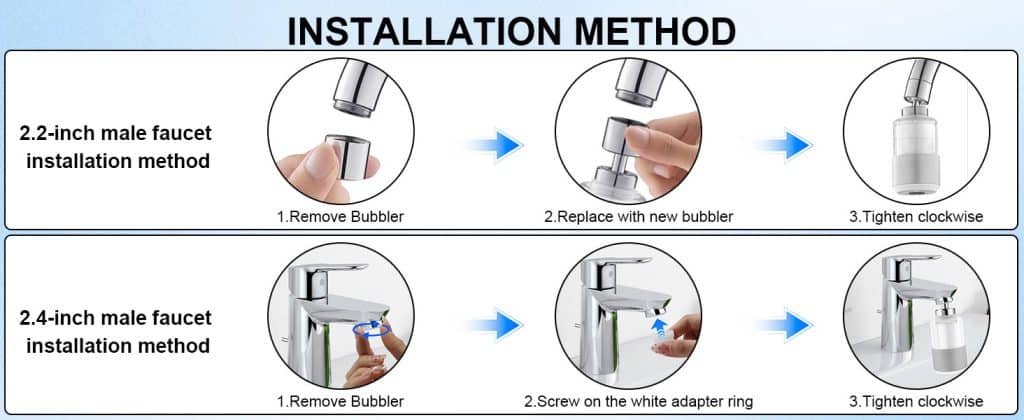
Installing The New Filter
Installing a new kitchen faucet filter is a simple task. It improves your water quality quickly. Follow clear steps to place and secure the filter properly.
Careful installation helps avoid leaks and ensures clean water flow. Make sure you have all parts ready before starting.
Placing The Filter Correctly
Place the filter in the right spot under the sink or on the faucet. Check the flow direction marked on the filter housing. This ensures water flows through the filter correctly.
- Align the filter inlet with your water supply pipe.
- Make sure the outlet faces the faucet connection.
- Keep the filter vertical for best performance.
- Clear space around the filter for easy access.
Securing The Filter Housing
Secure the filter housing tightly to avoid leaks. Use the mounting bracket if your filter includes one. Tighten all connections carefully but do not over-tighten.
| Connection Part | Action | Tip |
| Inlet Hose | Attach and tighten | Use plumber’s tape for a better seal |
| Outlet Hose | Connect to faucet | Check for correct direction |
| Filter Housing | Mount securely | Use screws or bracket provided |
| Final Check | Test for leaks | Run water slowly first |
Testing The New Filter
After replacing your kitchen faucet filter, testing is crucial. It ensures the filter works right and your water stays clean.
This guide covers how to check for leaks and verify water quality after installation.
Checking For Leaks
Leaks can cause water damage and reduce filter performance. Carefully inspect the faucet and connections.
- Turn on the water slowly and watch all joints.
- Look for water drops around the base and underneath the sink.
- Check the filter housing for any cracks or loose parts.
- Use a dry cloth to detect moisture on fittings.
- Tighten any loose fittings if needed.
Verifying Water Quality
Good water quality means the filter works properly. Test the water for clarity, taste, and odor.
| Test Type | What to Check | Expected Result |
| Visual Check | Water color and particles | Clear and clean |
| Taste Test | Flavor of water | Neutral or fresh |
| Smell Test | Odor of water | No strange smells |
| Optional Lab Test | Contaminants and minerals | Within safe limits |
Maintenance Tips For Longevity
Keeping your kitchen faucet filter in good shape ensures clean water and extends its life. Regular care helps avoid costly repairs.
Simple maintenance steps can keep your faucet working smoothly for years. Learn how to replace the filter and clean the parts properly.
Regular Filter Replacement Schedule
Changing the faucet filter regularly prevents clogs and keeps water fresh. The schedule depends on your water quality and usage.
- Check the filter every 3 months for dirt or discoloration.
- Replace the filter every 6 months or as recommended by the manufacturer.
- Use only filters that fit your faucet model.
- Keep spare filters at home to avoid delays.
Cleaning The Faucet Components
Cleaning parts of the faucet helps remove mineral buildup and prevents damage. Use gentle tools and safe cleaners.
| Component | Cleaning Method | Frequency |
| Aerator | Soak in vinegar, scrub gently | Every 3 months |
| Faucet Body | Wipe with mild soap and water | Monthly |
| Filter Housing | Rinse with water, remove debris | With each filter change |

Credit: m.youtube.com
Frequently Asked Questions
How Often Should I Replace My Kitchen Faucet Filter?
Replace your kitchen faucet filter every 3 to 6 months. Frequency depends on water quality and usage. Regular replacement ensures clean, safe water and improves filter performance.
What Tools Do I Need To Replace A Kitchen Faucet Filter?
You typically need an adjustable wrench, a bucket, and a towel. Some filters may require a screwdriver. Always check your faucet model instructions before starting.
Can I Replace The Kitchen Faucet Filter Myself?
Yes, most kitchen faucet filters are designed for easy DIY replacement. Follow the manufacturer’s instructions carefully. Turn off the water supply before replacing the filter.
How Do I Know If My Kitchen Faucet Filter Needs Replacement?
Signs include reduced water flow, bad taste, or strange odors. Visible dirt or discoloration on the filter also indicates replacement time. Regular checks keep water fresh and healthy.
Conclusion
Replacing your kitchen faucet filter boosts water quality. Follow the steps carefully. Gather necessary tools beforehand. Turn off the water supply first. Unscrew the faucet head gently. Remove the old filter. Fit the new one securely. Reassemble the faucet head.
Turn the water supply back on. Check for any leaks. Enjoy fresh, clean water flow. Regularly replace filters for best performance. Simple maintenance extends faucet life. Saves money in the long run. Keeps your kitchen functioning smoothly. A DIY task anyone can handle.
Enhance your home’s water system today. Stay proactive with faucet care.


