Are you tired of seeing gaps and cracks between your kitchen countertop and moulding? Those small spaces can collect dirt, crumbs, and even moisture, leading to damage and an unclean look.
But here’s the good news: caulking your moulding is a simple fix that can make your kitchen look fresh and prevent future problems. This guide on How to Caulk Moulding on Kitchen Countertop will walk you through the process step by step, even if you’ve never done it before.
Keep reading, and you’ll have a neat, sealed kitchen space in no time!
Tools And Materials Needed
Caulking moulding on a kitchen countertop helps stop water damage. You need the right tools and materials to get the job done properly.
This guide on Caulk Moulding covers what to choose and how to prepare before you start, ensuring a smooth, long-lasting seal that protects your countertop and keeps your kitchen looking neat.
Choosing The Right Caulk
Pick a caulk that works well for kitchens and wet areas. Silicone caulk is flexible and water-resistant.
Look for caulk that is mold and mildew resistant. It lasts longer in moist places.
- Silicone caulk for water resistance
- Mold and mildew resistant formulas
- Paintable caulk if you want to match colors
Essential Tools
Use these tools to apply caulk smoothly and cleanly along the moulding.
- Caulking gun to hold and squeeze the caulk tube
- Utility knife for trimming old caulk and opening tubes
- Caulk smoothing tool or a wet finger for finishing
- Paper towels or rags for quick clean-up
Surface Preparation Supplies
Preparing the surface ensures the new caulk sticks well and lasts long.
- Rubbing alcohol or mild cleaner to remove dirt and grease
- Scraper or putty knife to remove old caulk
- Masking tape to protect areas next to moulding
- Clean cloths to dry the surface before caulking
Credit: crystelmontenegrohome.com
Preparing The Area
Caulking moulding on a kitchen countertop starts with good preparation. This helps the caulk stick better and last longer.
Proper preparation is essential when you Caulk Moulding. Cleaning the surface, removing old caulk, and making sure the area is completely dry are key steps before applying new caulk. These steps ensure a smooth, durable, and professional-looking finish.
Cleaning The Countertop And Moulding
Start by removing dirt, grease, and dust from the countertop and moulding. Use a mild cleaner and a soft cloth to avoid damage.
- Wipe the area with a damp cloth and mild detergent.
- Use a soft brush to clean tight corners.
- Rinse with clean water to remove any soap residue.
- Dry the surface with a clean towel.
Removing Old Caulk
Old caulk can stop new caulk from sticking properly. Remove it fully using a caulk remover tool or a utility knife.
| Tool | Use | Tip |
| Caulk remover tool | Scrape off old caulk | Work slowly to avoid surface damage |
| Utility knife | Cut through tough caulk | Keep the blade sharp and steady |
| Razor blade scraper | Clean edges and small areas | Hold at a low angle to prevent scratches |
Drying The Surface
Wet surfaces stop caulk from adhering well. Make sure the area is completely dry before caulking.
Here are tips to dry the surface fast:
- Use a clean, dry cloth to soak up moisture.
- Allow air drying for at least 30 minutes.
- Use a fan or hair dryer on low heat for quicker drying.
Applying Painter’s Tape
Painter’s tape helps create clean caulk lines on kitchen countertops. It protects surfaces from messy caulk edges.
Use painter’s tape carefully to get sharp and even lines. This makes your kitchen look neat and professional.
Marking The Caulk Line
Start by marking where you want to apply the caulk. Use a pencil or a small piece of tape to guide you.
- Measure the gap between the molding and the countertop.
- Mark a straight line along the edge using a pencil.
- Check that the line follows the contour of the molding exactly.
- Keep the mark light to avoid visible pencil marks after caulking.
Ensuring Straight Edges
Apply painter’s tape along the marked line to protect surfaces. Use a putty knife to press tape edges firmly.
| Tip | Reason |
| Press tape edges firmly | Prevents caulk from seeping under the tape |
| Use good-quality painter’s tape | Leaves clean lines and removes easily |
| Apply tape evenly | Keeps caulk line straight and smooth |
| Remove tape while caulk is wet | Prevents peeling or cracking of caulk edges |

Credit: www.youtube.com
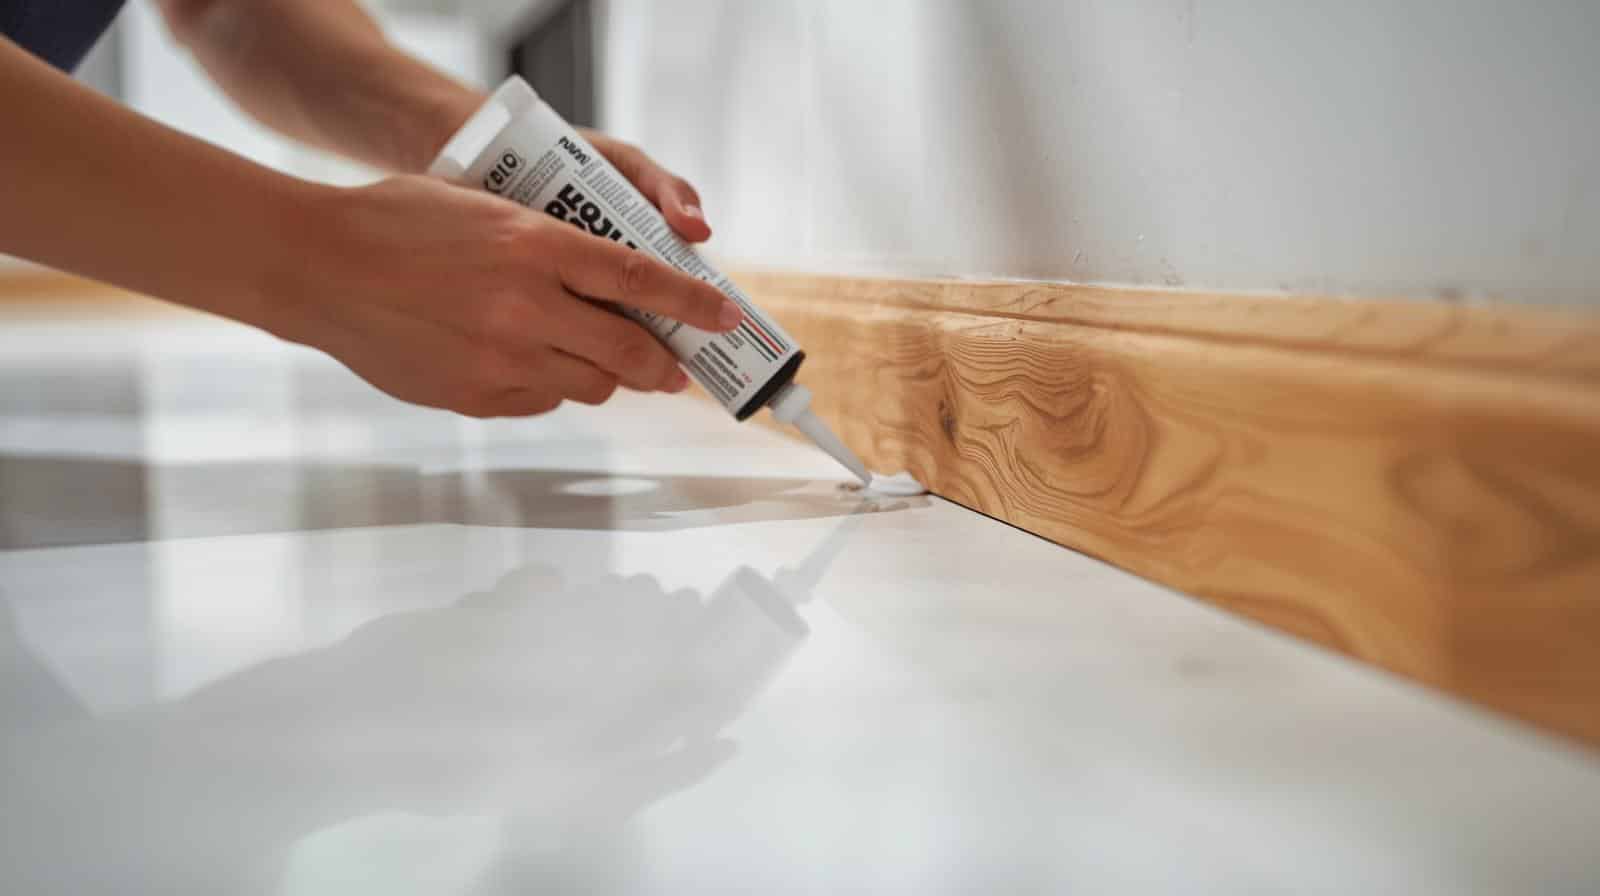
Caulking Techniques
Caulking moulding on a kitchen countertop helps seal gaps and keeps water out. Using the right techniques makes the job neat and long-lasting.
When you Caulk Moulding, good technique is essential. Learn how to cut the caulk tube, apply the caulk evenly, and smooth it properly for a clean, professional finish. Proper caulking prevents water damage and keeps your kitchen looking tidy for years.
Cutting The Caulk Tube Tip
Cut the tube tip at a 45-degree angle. This helps control the flow of caulk and fits well into corners.
Make the opening small at first. You can always cut more if needed. A small hole gives a cleaner line.
- Use a sharp utility knife or scissors
- Cut near the tip for better control
- Start small, increase size if needed
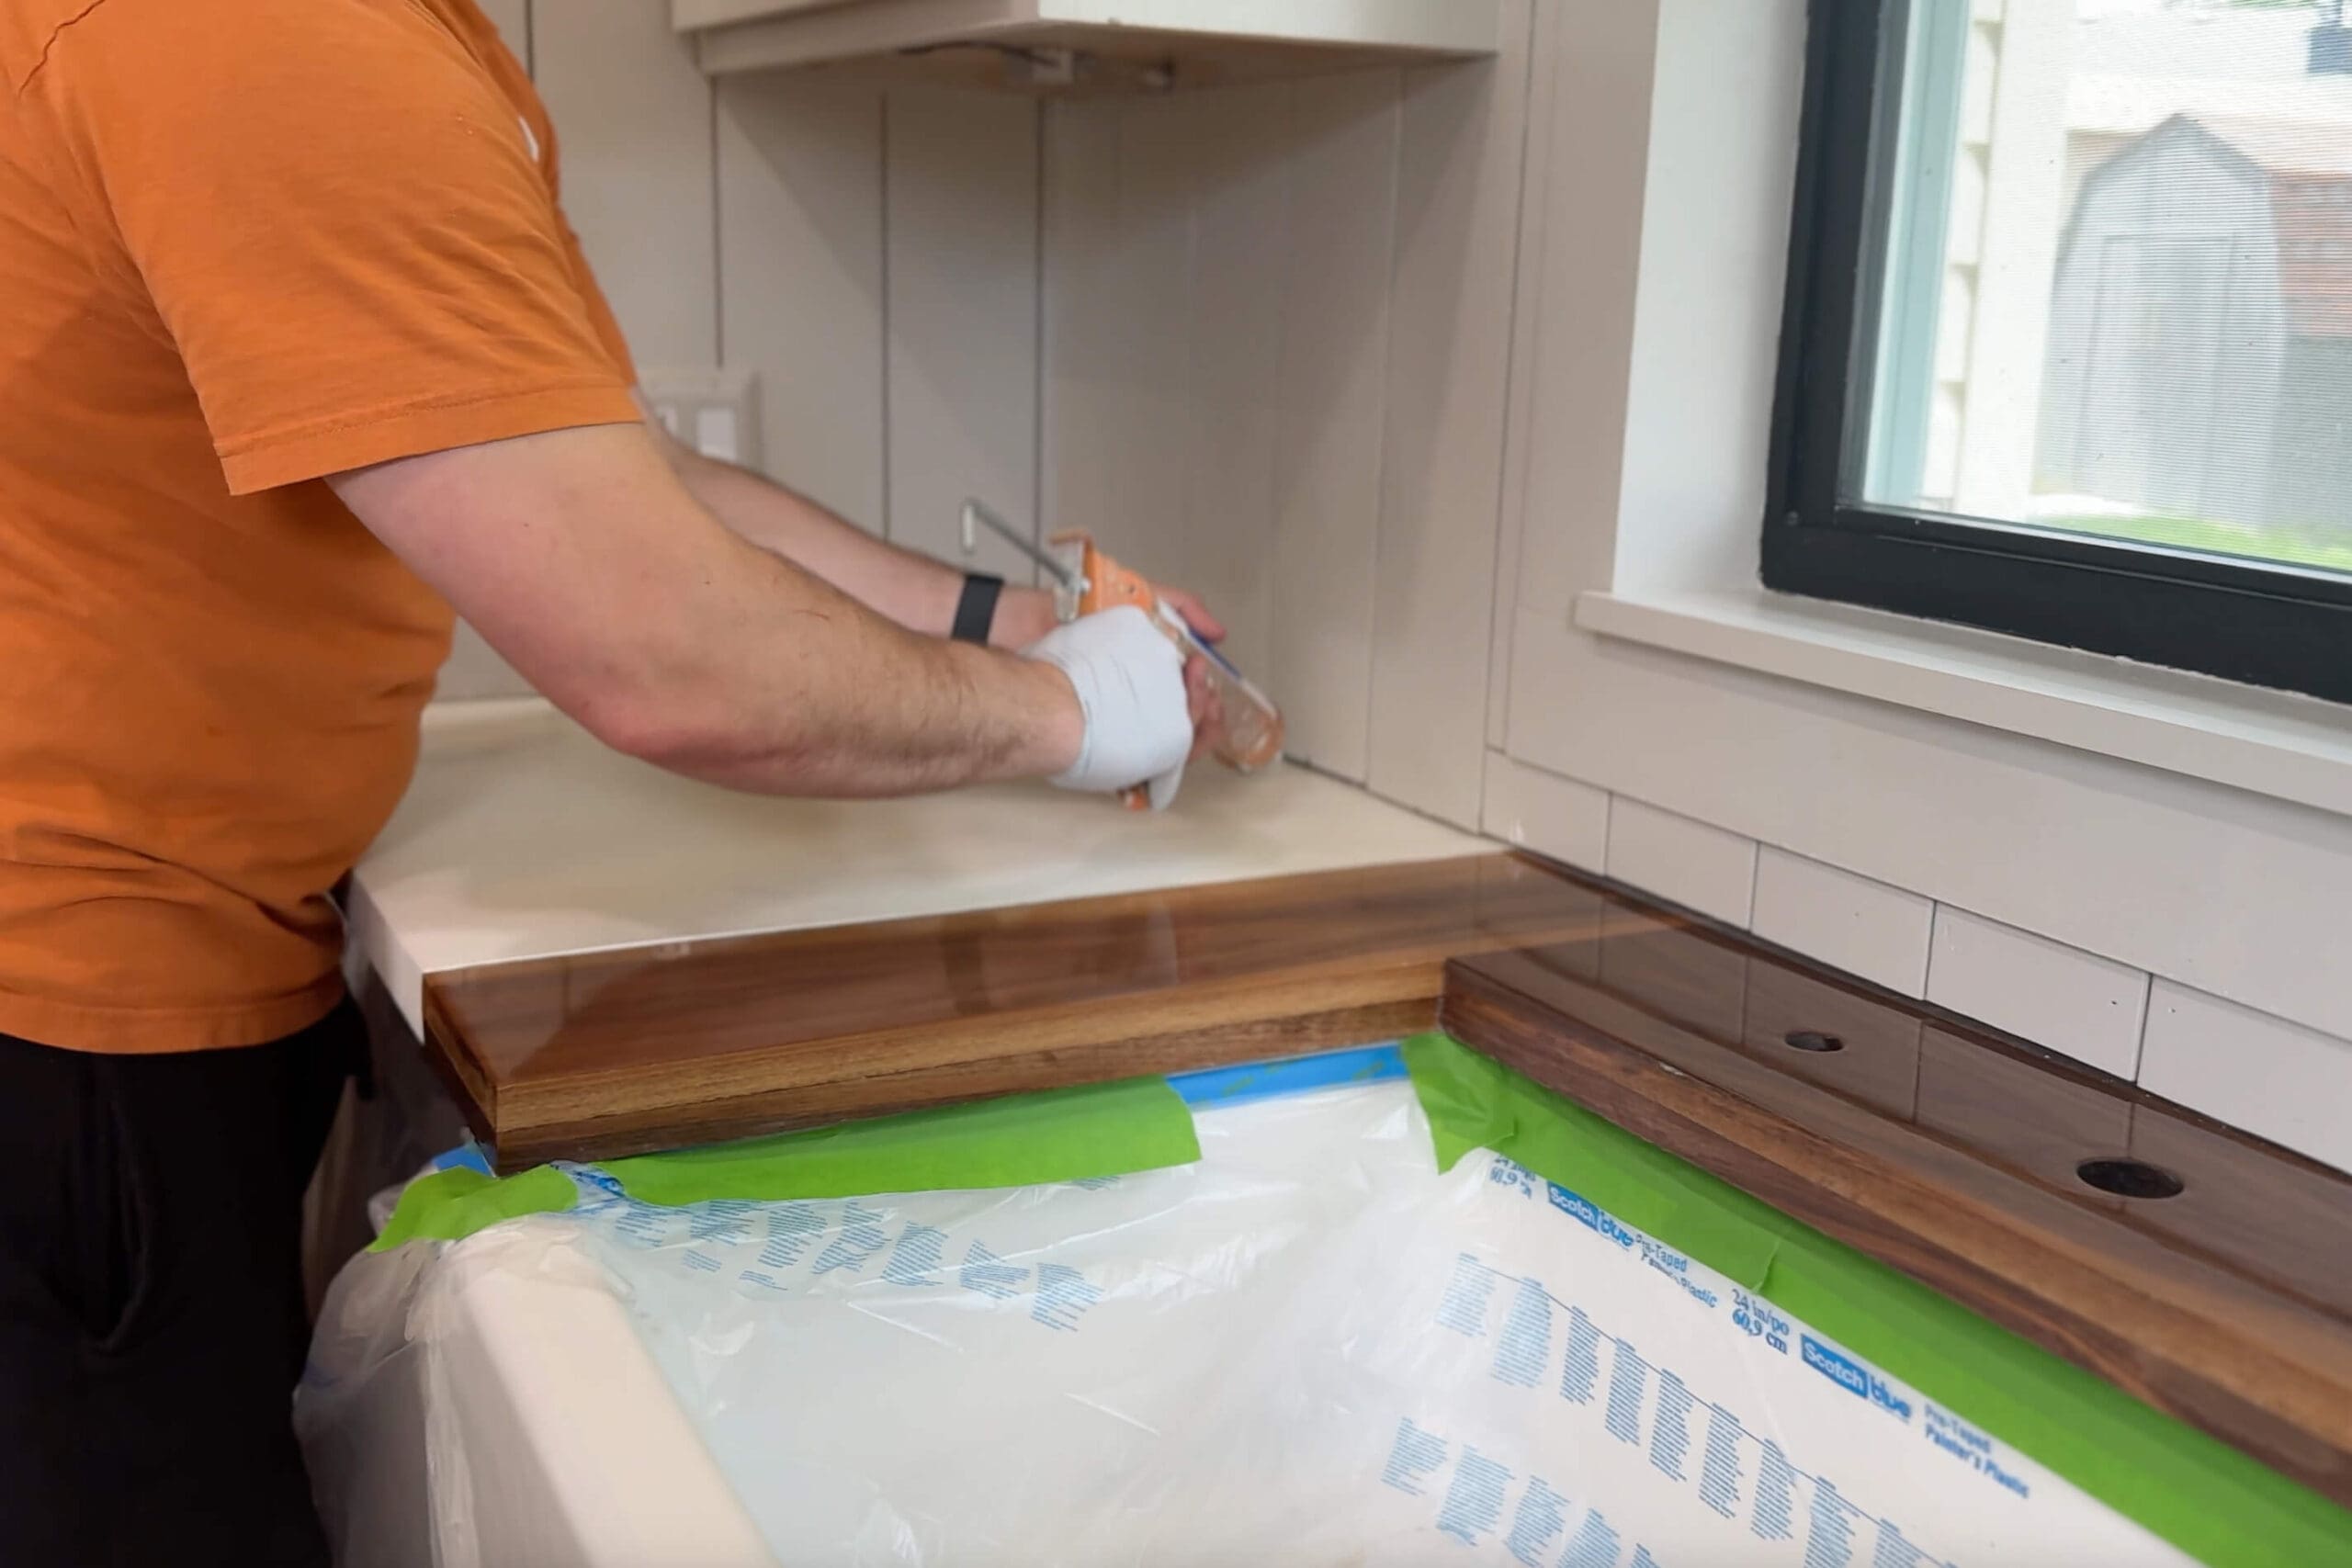
Applying Steady Pressure
Hold the caulk gun firmly with one hand. Use your other hand to guide the tube tip along the moulding seam.
Press the trigger slowly and evenly. This puts out a smooth bead of caulk without gaps or lumps.
- Keep the tube tip close to the seam
- Move the gun steadily along the joint
- Release pressure at the end to stop flow
Smoothing The Caulk Bead
Use a wet finger or a caulk smoothing tool to smooth the bead. This pushes the caulk into the gap and removes excess.
Work quickly before the caulk starts to dry. A smooth bead looks neat and seals better.
- Dip finger in water to prevent sticking
- Run finger or tool along the bead gently
- Wipe off extra caulk with a damp cloth
Finishing Touches
Caulking moulding on a kitchen countertop needs careful finishing. These steps make the job look clean and neat.
Pay close attention to removing tape, cleaning excess caulk, and letting the caulk dry well.
Removing Painter’s Tape
Remove the painter’s tape while the caulk is still wet. Pull the tape slowly at a 45-degree angle. This helps keep the edges sharp and clean.
If the caulk starts to pull off, stop and let it dry more before trying again.
Cleaning Excess Caulk
Use a damp cloth or sponge to wipe away extra caulk right after applying. Don’t wait for it to dry.
- Use water for latex caulk
- Use mineral spirits for silicone caulk
- Be gentle to avoid removing too much caulk
For small mistakes, a plastic putty knife can help smooth the caulk before it dries.
Allowing Caulk To Cure
Let the caulk dry fully before using the countertop. Dry time depends on the type of caulk and room conditions.
- Check the product label for drying time
- Avoid touching or wetting the caulk during curing
- Good air flow helps caulk dry faster
Waiting the full cure time ensures the caulk lasts longer and stays flexible.

Credit: ktar.com
Tips For Long-lasting Results
Caulking moulding on your kitchen countertop helps keep water out. It prevents mold and damage from forming. Using the right tools and caulk ensures the job lasts longer.
When you Caulk Moulding, follow simple steps to choose the best caulk and keep the area clean. Proper preparation and careful application will protect your kitchen surfaces and keep your countertop looking neat and well-maintained.
Choosing Mold-resistant Caulk
Select caulk that fights mold and moisture. Silicone caulk is a good choice because it stays flexible and seals well. Look for labels that say "mold-resistant" or "kitchen and bath use."
- Pick 100% silicone or silicone blend caulk.
- Avoid acrylic caulk, as it can crack with water exposure.
- Check if the caulk is mildew-resistant.
- Choose a color that matches your molding for a neat look.
Maintaining The Caulked Area
Keep the caulk clean and dry to stop mold growth. Wipe spills quickly and clean the area weekly. Use mild soap and water to avoid damage.
| Maintenance Task | How Often | Tips |
| Clean caulk lines | Weekly | Use soft cloth and mild soap |
| Check for cracks | Monthly | Replace damaged caulk promptly |
| Dry area after spills | Immediately | Prevent mold and mildew |
| Ventilate kitchen | Daily | Reduce moisture buildup |
Frequently Asked Questions
What Tools Are Needed For Caulking Moulding?
To caulk moulding, you'll need a caulk gun, a utility knife, painter's tape, and a damp cloth. Choose high-quality silicone or latex caulk for best results. These tools ensure precise application and a clean finish, enhancing your kitchen countertop's appearance and longevity.
How Do I Prepare The Area Before Caulking?
Start by cleaning the moulding and countertop with a mild detergent. Ensure the surfaces are dry. Apply painter's tape along the edges to avoid mess. This preparation ensures the caulk adheres properly and results in a smooth, professional-looking finish for your kitchen moulding.
Can I Caulk Over Existing Caulk?
It's best to remove old caulk before applying new caulk. Use a utility knife or caulk remover tool for this task. Removing old caulk ensures a better bond and cleaner finish, preventing potential adhesion issues that could lead to peeling or gaps in the future.
How Long Does Caulk Take To Dry?
Caulk typically takes 24 hours to cure fully. However, it may be dry to the touch within 30 minutes to an hour. Ensure the area remains undisturbed during this period to achieve optimal adhesion and a smooth, durable finish on your kitchen moulding.
Conclusion
Caulking moulding on your kitchen countertop keeps it neat and clean. It stops water from seeping into gaps and causing damage. Using the right tools and materials ensures smooth, lasting results.
When you Caulk Moulding, take your time to apply it evenly along the edges and let it dry fully before using the countertop again. These small steps make a big difference in your kitchen’s appearance and durability. Keep your space fresh, protected, and looking its best with simple caulking techniques.